From 2014-2016 I chronicled my crafty endeavors on the site Adventures-in-Making. I’ve selected a few of those DIY’s, Recipes, and other posts to share on the site.
In typical cat fashion, my kitties seem to like toys that are not intended to be toys at all. You might think it’s a child-safe plug cover, but they think it’s the neatest thing since canned tuna. For a while they have been sharing a repurposed jack-o-lantern drawstring bag filled with catnip- and I decided it was time to give them something a little nicer. They do love the scale of the jack-o-lantern bag, which is long and wide unlike most catnip toys, so I decided to replicate the scale with a super-simple catnip kicking bag.
I wanted to customize the bags a bit, and I kept thinking about the lovely art Tara Bliven shared with us last month. I asked if she would write up a few feline words for us, and she did! You can use the free printable below to make this cat toy even cattier!
Download and print out the Cat Fabric according to the specifications on the package.
Cut the fabric in half to make a sheet 10″ x 3.75″. Peel the backing paper off the fabric and stack it on top of the two pieces of thick fabric- with “right sides” facing out.
Stitch, 1/2″ in, around three sides and leave the fourth open.
Pour at least a teaspoon of dried catnip in the middle of your pocket…
Close the last side of the bag, and trim around it with pinking shears to limit fraying (and add character.)
Repeat with the second set of materials, and you’re done! A super cute sewing project that’s quick enough that you won’t mind when your kitties shed all over it. Now for the fun part…
(Warning, you are about to be bombarded with too many pictures of my kitties.)
The dangers of catnip trips. Very unflattering photos.
Success.
A couple of notes
The printable fabric is quite thin and I didn’t trust it to contain the catnip for very long, so I used it as an outside layer only. The catnip itself is contained within two layers of thicker fabric.
If you’re feeling adventurous, try this tutorial to make your own printable fabric!
Tara is a wizard at decorative writing (and many other arts). Visit her website tarabliven.com to find out how you can bring more of her awesomeness into your life.
From 2014-2016 I chronicled my crafty endeavors on the site Adventures-in-Making. I’ve selected a few of those DIY’s, Recipes, and other posts to share on the site.
I like to “joke” that I have a kitten biological clock. Every couple of years I start thinking about how much fun kittens are, and how cute, and how nice it would be to have the pitter patter of little feet.
Dangerous.
To nip this in the bud this year, I’ve signed up for some future fostering, and came up with this little kitten pocket to bridge the gap. It’s based on a picture of Wee Cooper (our last kitten) and I thought I would share it so you can all have a kitten pocket of your very own.
Supplies
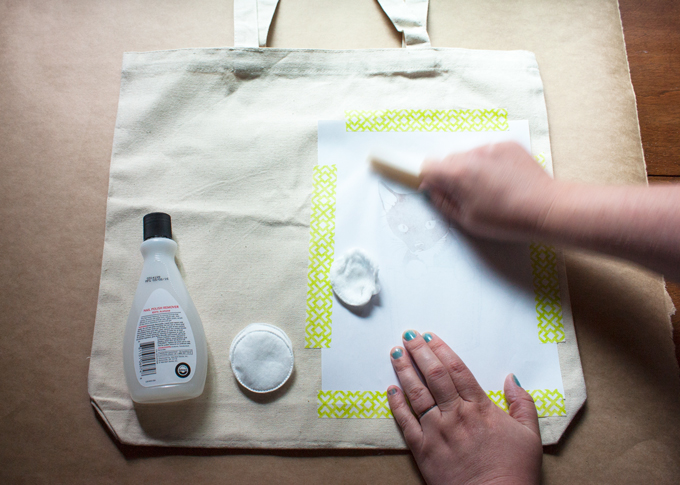
Cotton Tote that kneads needs a kitten. It’s important to use cotton or another natural material because acetone can eat through a lot of synthetic materials.
This kitten template* printed with a laser printer or copier. Use the reversed image on the right for transferring.
Step One: Printing and Prepping Your Template
Use a Laser Printer or Copier to print the Kitten Template* on a normal sheet of paper. Black and white is fine. It’s important to use a printer or copier that has TONER instead of ink. The transfer process with move some of that toner onto the fabric. If you try it with ink you’ll end up with a mess!
If you don’t have access to a toner-based printer or copier, or this process doesn’t work for some other reason, never fear! You can use a light table to trace the kitten on your bag, or use transfer paper to apply the design. You can see examples of those processes here and here.
After you have printed your page, cut out the cat and pocket on the right, leaving a large border.
Step Two: Layout Your Design
Decide where you want to put your kitten, and tape it firmly face down on your bag. Make sure everything is as straight and tight as you can make it.
Step Three: Blot and Burnish
Saturate a cotton pad with acetone, and press it into the paper. You will start to see the design through the paper. Saturate a small portion of the design with acetone, then switch to burnishing with your bone folder. Rub the side of the bone folder on the paper to press it firmly down into the fabric. Repeat on small sections of the design, then go back over each portion one or two times, adding more acetone and pressure.
If you can, peak to make sure that you have transferred the kitten. If not, you may want to repeat the process with more acetone and more pressure. If you see the design, move to the next step!
If you don’t see anything at all, there’s a chance your printer won’t work for this process. Don’t fear! You can use a light table to trace the kitten on your bag, or use transfer paper to apply the design. You can see examples of those processes here and here.
Step Four: Fill it in
If you used a smooth material and have a good transfer you could skip this step altogether– it’s up to you. If you’d like, use a black Sharpie to darken in the design. You can use the left side of the template as a reference for portions you can’t see as well on the transfer.
When you have the kitten filled in, use a silver Sharpie to add in the whiskers. It will show up on the black of the kitten and on the light bag as well!
When you’re done let it dry for a couple of minutes, pile all your stuff in it, and take a kitten everywhere you go.
Purrfect.
*Kitten template includes an original illustration by Alison Lang. We’re happy to share files for personal and educational purposes, but please don’t use it for anything else without our permission. Thanks!
From 2014-2016 I chronicled my crafty endeavors on the site Adventures-in-Making. I’ve selected a few of those DIY’s, Recipes, and other posts to share on the site.
There once was a girl named Alison who had an awkward entry space and no good options. She went searching for a rug to protect what was left of her ugly carpet. She went to store after store with no luck, instead bringing home a rug that was so bland it made her cry.
No really. I could find NOTHING that I liked. Everything was either too small, too bold, to “contemporary”, or too “tempting for a cat to destroy.” I decided that bland was better than something that was REALLY not me. However, I got inspired buy the rugs Bazaar Velvet creates and I grabbed a can of spray paint.
This month’s theme was a great chance to embrace my inner subtly-secret-goth-girly-girl and decorate the rug with a few briars (á la Sleeping Beauty, or Briar Rose.)
I used Con-Tact paper to make a mask for the rug. I cut a bunch of free-hand curved pieces, and laid them across each side of the rug in a random arrangement. When each piece was in a location I liked, I stepped on it to adhere it to the rug firmly ( are an awesome tool, too!) Once I had the stems all lined up, I began to decorate each with triangles of thorns.
When I was happy with everything, I sprayed a thin layer of white all-purpose spray paint across the rug, paying special attention to the edges of the mask. Then I tortured myself by leaving the whole thing to dry a few hours before removing the mask and seeing what it was going to look at.
After those couple of hours, I gently peeled the mask material off of the rug…
and had the big reveal.
After airing the rug out overnight, I put it in place in my entry space.
No more bland rug!
Here’s a word of warning: This was so fun and transformative that I want to spray paint everything in the house now.
I’ve got my eye on you, dining rug… what do you think about circles?
From 2014-2016 I chronicled my crafty endeavors on the site Adventures-in-Making. I’ve selected a few of those DIY’s, Recipes, and other posts to share on the site.
The weather was nice for a few days in April, uncharacteristically, and began the countdown to the Pacific Northwest Summer. Ahhh; the handful of blissful weeks that makes you fall in love with the trees again, and wipes the memory of the last 8 gray months.
Safety Husband and I have been trying to be more mindful, and that extends to the way we interact with our home. We are who we are [not catalog people] and we want everything at our house to be conducive to the way we live. We have several outdoor areas that would make great external living spaces, but we haven’t done a great job of outfitting them for the task.
All this to explain why I decided I needed to make a giant pile of outdoor cushions that I could lay upon like the Princess and the Pea. I wanted them to be cheap, washable, refurbishable, and also work with our inside decor. Fabric and wood don’t do well outside over the Seattle winter, and I can’t store things in out non-existent storage space. So I put together a handful of pillow forms from scrap material, filled with recycled styrofoam peanuts; then covered them with painted canvas covers. In one afternoon I had 7 assorted cushions, and dreams of the perfect summer.
SUPPLIES
Fabric scissors and optional pinking shears
Sewing machine and thread
Pillow Form Fabric: approximately 24″ (2/3 yard) of 45″-wide lightweight scrap fabric per pillow
Pillow Cover: approximately 24″ (2/3 yard) of 52″ to 60″-wide canvas-type material per pillow
Styrofoam Peanuts: about a grocery sack full per pillow. Make sure that you are using styrofoam peanuts instead of the cornstarch ones that melt under water. Imagine the mess!
Tape: masking, packing, cello, washi. Whatever you want!
Con-Tact Paper: A great option for cutting out larger masks or covering more material.
Decorative punches and scissors
Compass, or fun shapes to trace
Step 1: Making the Pillow Forms
Take your scrap pillow-form material and fold it so that the selvedged edges touch. Cut the other two sides with pinking shears so that you have an approximately 23″ square (45″x23″ unfolded.) Sew a 1/2″ seam along the two pinked edges, then do the same for about half of the remaining side.
Fill the form about halfway full with peanuts, then sew the opening closed to seal your pillow form.
Hire a professional to test the security of your stitching.
Repeat until you have run out of material. (I made 7 pillows so that I could make a GIANT PILE.)
Step 2: Making the Pillow Covers
There is dirt outside, so you want to make sure that your pillow cover can be easily removed and laundered; this also means you want to pre-wash your fabrics so there is no future shrinkage.
Cut your fabric to about 23″ wide. With the back side showing, fold the width of the fabric into a tube about 22″ wide. The overlapped pieces will make the flap for inserting and removing your pillow form.
Stitch up the two open ends of your tube approximately 1/4″ in.
Then turn the cover inside out using the open flaps. Make sure to press the corner all the way out with your finger or a pencil.
Stitch around the outside edges of your pillow cover, about 3/8″ in- then you’re done!
Step 3: Decorating the Cushions to Match your Life.
Decorating the pillows was definitely the biggest fun in this project (other than sitting in the sun on the cushions later.) If you’re a selfless person, you could share that fun with your family and friends, and let each person design a mask for their own pillow. Masking the pillow is as easy as using tape and scissors. Build shapes out of strips of tape, or cut shapes out of contact paper. (ABOVE: I used a compass to draw circles, then cut and arranged them on the front of my cover.) You could have the initials of everyone in your family, silhouettes of your pets and favorite animals… anything really.
Once you’ve settled on a masked design, take it outside and spray it down with your fabric spray paint. (I used Tulip Color Shot Fabric Color which is washable and flexible.) Remember that spray paint doesn’t ever go on consistently, so embrace the irregularity and leave some patches lighter than others.
After you’ve got a nice coat of paint on, let your cover dry for an hour or so before pulling off the mask.
Then let your covers air out for a few more hours.
When everything is dry (not sticky or smelly) you can put your pillow forms into your covers. Slip the form into the open flap, then push it down under the inner over-lapping flap. Press the corners of the form into the corners of the cover and shake and stomp it until everything looks nice.
Then build the tower of pillow on which you will reign.
From 2014-2016 I chronicled my crafty endeavors on the site Adventures-in-Making. I’ve selected a few of those DIY’s, Recipes, and other posts to share on the site.
I have spent quite bit of time working on my studio lately, and in the process have embraced a few truths about my personality. 1-I like to turn chaos into order 2-I love clean visually simple spaces with little subtle details 3-Rainbows are the best.
With that in mind, I set out to turn this basic curtain (that hides the closet that houses the clutter) into something a tiny bit more special.
To be honest, I had been thinking about making some changes in my studio for a while, and the bifold doors to my closet were in desperate need of sprucing up. I did some research online and apparently you can replace slats of bifold doors relatively easily with fabric these days so I considered removing the old slats and replacing them with some new material.
However, in the end, I decided to simply refresh the curtain that the doors hide behind. I might still replace the slats on my bifold doors at some point in the future, but, for now, I am really happy with how the curtain turned out.
Anyway, I have an absolute wealth of Sharpies, and I decided to use them to doodle a faux-embroidered rainbow trim across the curtains.
First I cut strips the length of the curtains and about 8″ wide to doodle on.
I ironed under the raw edged, and put a seam down the middle as a reference point for the decoration.
I then gleefully sorted my Sharpies by color (to understand my glee, see points 1 and 2 above) and chose the best colors for my rainbow.
I divided the length into a small portion for each color, and made a light mark where each color began and ended.
Overlapping those marks a bit, I began to draw shapes with small dots and dashes– mimicking the stitches on decorative embroidery pieces. I used a lot of botanical shapes (cause I love ’em) and tried to break up the space with a lot of variety.
When I had the strips all filled up with decoration, I pinned them to my curtains, and used a simple zig-zag stitch on my machine to attach them for good.
I really like the little touch of color this added, and it was tons of fun to doodle inch-after-inch of floral rainbow.
One day I’ll show you some of the other rainbows I’ve captured in here…
From 2014-2016 I chronicled my crafty endeavors on the site Adventures-in-Making. I’ve selected a few of those DIY’s, Recipes, and other posts to share on the site.
A while back my friend Susan made a bunch of simple paper flowers that found a home on a shelf in my store.
Every few weeks a kid would ask me about the flowers, and I would give them one and tell them to take it home and try to figure out how to make their own. Without fail the kid would stare at the flower until it was time to leave, and I could see the parents trying to work out what materials they needed to make it happen.
Sometimes they asked me to demonstrate, but mostly I just loved the idea that I had inspired a kiddo to use their imagination and ingenuity to make something fun.
I think this is a great project to do with kids of all ages, and you just need a few simple supplies to make it happen.
Supplies
• Scrap Paper – Anything from text weight paper, to light weight card stock will work. Big pieces will make big flowers, small pieces will make small flowers. Susan used some old book pages for her flowers, you could use wrapping paper, catalog pages, or anything really!
• Scissors
• Your favorite glue – I used Aleene’s Tacky Glue but Elmer’s would also work.
Step 1
Cut an oval out of your piece of paper. It doesn’t have to be perfect, but try to keep the corners rounded.
Step 2
Starting from one side, cut the oval into a spiral. You should have a pointed end on the outside, and a rounded end on the other.
Step 3
Take the pointed end, and fold it down toward the center of the spiral.
Step 4
Starting at that fold, begin rolling the paper into a flower shape.
Step 5
When you get to the center portion of the spiral, tighten the bloom up by twisting the paper around the folded piece.
Step 6
Hold the bloom in your hand, and apply a drop of glue to the folded portion you started the flower with, then
fold it over and hold it for a few seconds until the glue holds.
The whole process takes a couple of minutes, and gives you a lovely simple flower to brighten up your day. You can put them in a basket, like I did, hang them like a mobile, or decorate a table with them. They don’t fade, and the possibilities are endless!
So make a bunch and send us a picture of your creation for the DIY Craft Challenge this month! Or share your favorite flower craft.
From 2014-2016 I chronicled my crafty endeavors on the site Adventures-in-Making. I’ve selected a few of those DIY’s, Recipes, and other posts to share on the site.
I’ve been in a major cleaning and organization mood, so most of my projects have been focused on “using up” materials I have around. One giant project used a bin full of old printed t-shirts (I’ll show you when I’m done!) and I ended up with so many colorful t-shirt scraps that I over-ran my rag box. I decided it was a perfect time to combine those scraps, and the May DIY Challenge theme to make some simple jersey flowers.
After playing with the fabric for a day or two, I came up with two basic flower-making methods that you can use to make a whole army of blossoms.
• Shredding scissors, or other decorative edging scissors
• Straight pins
• Buttons
• Felt for leaves and backing. I used wide grosgrain ribbon.
• Pin-backs, bobby pins, or other clips to attach to the back
• Fabric Paints, or floss, or other decorating tools.
The Stitch & Draw-up Method
This is by far the quickest way I made flowers, and was also especially useful for adding details to the center of other flowers, or for making the smallest simplest bonus blooms to add to a flower bunch. The template includes two example petal shapes to play with, and a feathered shape that I used for a center detail. It works with basically any shape you want to use, though, so be sure to try your own ideas for rows of petals.
Step One
Cut the template shape out of a piece of jersey. (This is from the arm of a t-shirt.)
Then stitch a loose line starting close to one edge and ending close to the other.
Step Two
Put a stitch through the end you started on, to pull it into a ring.
Step Three
Pull both ends of the thread to gather the fabric into a round shape. Make sure the extra puckered fabric from below your stitch line if on one side of the flower.
Step Four
Take a couple more stitches through the puckered side of the flower (which will be the back side, tie your favorite knot, and cut the thread.
Step Five
Flip the flower over and add a button or other decoration. You can also stitch a clip or pin to the back side. I put a button in the center of this one by stitching through the middle of the bloom,
and added a couple of leaf-shaped pieces and a piece of ribbon to the back, by stitching them through the back of the petal.
Voila, a quick simple flower that I can use on a package, as a pin, or in my hair. (Or all of the above.)
The Pinch & Piece Method
This method takes a little more work, but I loved the way it makes a fuller and more complicated flower shape. I’ve given you four petal shapes to try on the template– each with a different number of petals per flower– but you can try all sorts of shapes for different results.
Step One
Cut the indicated number of petal pieces out of jersey material. For this flower, I also used the “Center Detail” piece from the other template page to create a fuzzy center for my flower (shown above in dark purple.)
Step Two
Stitch a loose line across the middle of each the petal (shown as a dotted line on the template) starting close to one edge and ending close to the other.
Put a stitch through the end you started on, and pull to gather the fabric.
Step Three
Bend the petal piece in half, and put a stitch in the fold. Then do the same to each petal to connect them all together. Tighten them together, and tie a knot at the first petal.
Step Four
Wrap your thread between each petal section to draw the center together and fluff the petals out. Then stitch through the back of the flower, & tie off the thread using your favorite knot. For the center on this flower, I used the “Stitch and Draw-up” method on my dark purple center detail piece, and then sewed through it and the center of my bloom. I attached a leaf shape and a piece of ribbon to the back like my first flower, and used that to bobby pin it in my hair.
I’ve started flipping through my flower books for inspiration, and I love the flexibility and the whimsy of using old t-shirts like this.
Soft, sweet, flowers.
Remember that if you do this or any other flower project, send us a picture to enter the May DIY Craft Challenge.
From 2014-2016 I chronicled my crafty endeavors on the site Adventures-in-Making. I’ve selected a few of those DIY’s, Recipes, and other posts to share on the site.
Showing appreciation isn’t always about buying something sparkly, or something chocolate. Sometimes it’s finding the right words to tell someone what they mean to you.
When I think about my mom, I think about all the little things she taught me to do. She taught me to look at things in a different way, to experiment. She taught me how to make teddy bear ornaments out of wallpaper samples, to sew tiny dresses for spool dolls, and to use my imagination. Add my grandmother into the equation and you’ve got all the creative forces that drive me today.
I decided that it would be fun to build a card that I could use to thank her for all the things she’s taught me. Since she also taught me to share, I thought I’d let you use it yourself.
I’ve attached two different ways that you can thank your mom for everything she taught you.
Customize your thank you by adding your face. Take a photo of yourself holding this 8×10 poster. (Your mom loves to see your smile.) Fill in the empty space with your special skill, snap a photo, and email it to your mom. Download the poster here.
Or cut out this mailable card-and-envelope-in-one and to send or hand deliver with a handful of wildflowers. You can download the free printable card here.
You’ll get extra credit for making something just for her, and you get to remember all the reason’s she’s the one you’re happy to call Mom.
From 2014-2016 I chronicled my crafty endeavors on the site Adventures-in-Making. I’ve selected a few of those DIY’s, Recipes, and other posts to share on the site.
The sun has made a couple of appearances, and when the sun comes out all I want to do is make paper. Why fight it? I’m always in a crafty mood so it makes sense to craft! Making paper and cards is one of my absolute favorite past times so I would never want to miss an opportunity to do so. I came across some of these gift ideas for card makers the other day and I couldn’t get the idea out of my head so I told myself that as soon as it was sunny, I would make some paper for my cards, and that’s exactly what I’m doing.
I decided to take the opportunity to make a bunch of plantable heart cards, using flower seeds and a simple pour-over paper making method (instead of my usual dip method featured here and here.) The pour-over method uses paper scraps and things that you probably have around the house; making this an awesome, kid-friendly, activity for a sunny afternoon.
Pour-over Paper Making Supplies
• Shredded scrap paper Mix your favorite color and white paper for the best results. You can use a shredder, scissors, or your hands to tear the paper into manageable bits.
• Smallish flower seeds I felt several packets of seeds before settling on a combination of chamomile, viola, and alyssum seeds. You can also give it a cooking theme by using tiny herb seeds.
• A “Deckle”- This will be the template for your sheet of paper. I used an inexpensive, wood, heart-shaped picture frame that I picked up at the craft store.
• 2 screens, slightly larger than your deckle- I used small pieces of window screen material from the hardware store. I have also had some luck with sheer curtain material and other porous fabrics.
• A blender
• A large bowl (or two)
• A wire cooling rack for support
• A rectangular cake pan to catch the runoff.
• A sponge or absorbent rag
• A couple of flat absorbent rags larger than your intended paper size.
Step 1: Making Paper Pulp
To make the pulp for your paper, first soak the shredded paper in water for a little bit. Typically I will dunk them all in water while I’m getting all my supplies together. Once they are saturated put a handful into your blender, with about twice that amount of water.
Then pulse your blender to pulverize the paper pulp. (If you feel like your blender is having trouble, add more water to your mix. The paper pulp quickly becomes thick sludge that’s harder to cut through. It’s better to err on the side of too much water.) When your mix is starting to look like a disgusting smoothie, open it up and take a look at the mix. I like to stop when the mix is a little bit chunky, but mostly liquified.
Step 2: Preparing your Mould
Stack the cooling rack, screen, and deckle on top of your cake pan. This is where you’ll be pouring your pulp in a minute.
Step 3: Mixing in the wildflower seeds.
Transfer your pulp from the blender to a pouring bowl. You will be using several batches of pulp, so pour just a little bit of your flower seed into the bowl and stir gently with your fingers.
Step 4: Pouring the Pulp
Slowly pour your pulp mixture into the deckle. The water from the pulp will run through the screen and leave you with saturated paper fibers in the shape of your deckle.
Fill the space completely by pouring, and (if needed) gently pushing the pulp into the corners of the frame with your finger.
Very gently, lift the deckle directly up towards the ceiling. (A note: One of the best parts about paper-making is that almost any mess up can be fixed by dumping the sheet back into the pulpy water, breaking it up with your hand, and starting over again. So if your shape doesn’t look right, or your get a tear or a bubble, just dump it back in and try again!) You will have a nice pile of wet paper mess.
Step 5: Drying the Paper
The final bits are all about drying the paper. Although much of the water falls through while you’re pouring, the fibers hold on to a lot of moisture. First, place your second piece of screen on top of the pulp and absorb as much of the water as you can by pressing gently with a sponge. This will flatten the pulp into something that looks more like a sheet of paper. (You can wring the sponge out into your pulp bowl, and dump the excess water in there that runs into your cake pan.)
The sheet is still delicate at this point.
Transfer it to a flat absorbent rag by flipping the whole screen onto the rag, and gently peeling back just the screen.
Next, place another rag on top, and press the paper gently with your fingers or a rolling-pin. You should start to see water in the shape of your card.
Use the same flipping method to transfer your sheet onto a surface that it can remain on to air dry. (I like to cover my dining table with bath towels.) Once you’re done making paper, you can dump the remaining pulp and water outside.
See! Paper!An army of plantable paper hearts!
Usually the paper will dry overnight, but may take a little more time in a damp or cold room. Once they are completely dry, you can decorate them however you please.
Since Mother’s Day is coming up, I decided to use one of my sheets as a card. I used the seed packets as inspiration and wrote a little message on the back, including directions for planting the card.
When you’re ready to toss out this card, plant it instead! It has a mix of viola, alyssum, and chamomile seeds– just cover with a little soil, water, and you might find yourself with a few new blooms.
Since every card needs an envelope, I decided to make a simple one from a paper grocery bag.
Simple Envelope Supplies
• A paper bag
• Your handmade paper deckle
• A Pencil
• A Ruler
• Scissors or craft knife
• Glue
Step 1
Open up the paper bag by cutting until you have a flat sheet. Place the deckle in the center and trace the inside with your pencil.
Step 2
To make your envelope guide, draw a box around your deckle shape, leaving about a quarter of an inch of space on each side. Extend the lines out from the box (as shown above).
Step 3
Cut the corner portions out of the form you drew, leaving a plus sign shape with your heart-shape in the center. Fold along each of the straight lines, and trim the flaps so that they overlap about a half an inch.
Step 4
Fold in one of the side flaps, then apply glue to the other side flap, fold it over, and do the same with the bottom flap.
You should have the perfect envelope for your card! Just slip it in, seal the last flap and send it to somebody special. (Remember that oddly shaped envelopes require more postage. Check with your post office for more details.)
I’m really happy with the way my card turned out, and glad that I was able to come up with another way to recycle materials I had already.
Now I have a nice stack of paper hearts packed full of flower seeds- what should I do with the rest of them?
From 2014-2016 I chronicled my crafty endeavors on the site Adventures-in-Making. I’ve selected a few of those DIY’s, Recipes, and other posts to share on the site.
I love playing with watercolors, I’m going to admit that right now. I love the way the colors run together, the little blotches of pigment, and basically everything else about it. I’m not a watercolor expert, which means that whenever the paint does something unexpected I have the giddy feeling that I just discovered something amazing. (What did I tell you? I love the process.)
My philosophy teacher in high school used to amazing things with watercolor, and I would always try to sneak a look at his paintings before and after class. One day I noticed him using something to cover up portions of the paper while he was working– cut to 15 years later and I finally decide to buy myself a little bottle of masking fluid to play around with. (I bought Winsor & Newton Colorless Art Masking Fluid.)
Still a little overwhelmed to jump in, I watched this introductory video, decided on a test project; and gathered my brushes, paints, and spirit of exploration.
A note: the first time I used the fluid, I ruined my brush. It was a cheap brush, granted, but after that I sharpened up and coated the next brush in dish soap before dipping it in the masking fluid. I coated the whole thing in the dish soap, then squeezed the excess out. (This video shows you how.) Trust me. It’s better that way.
I drew a basic outline of the words I wanted to mask out with pencil. After coating the brush in soap, and gently rolling the bottle of masking fluid to mix it up, I dipped my brush in and saturated it.
Bit by bit, I covered the words with the masking fluid.
All the lines are covered in the fluid now. I’ll be able to erase the pencil lines once everything is done.
I let the masking fluid dry COMPLETELY before I began to paint with my watercolor. (The dry masking compound feels like rubber cement. You’ll know it’s dry when it is only slightly shiny, and your finger does not stick to it.) The watercolor will not stick to the mask, so you will be able to see what you’re working with.
When I had finished my first layer of paint, I let it dry COMPLETELY, then added a little more masking to what would be the little abstract windows in the buildings.
Then I let those dry COMPLETELY (do you see a theme here?) before I went in and darkened all the fields of color.
When I was done working around my masked areas, and everything was dry, I lightly rubbed the masking agent off with the tips of my fingers. (This alone is worth the trouble. I love pulling glue off of things.)
Once the mask was off, and I did a little erasing, I had crisp white lines to work with.
The masked areas were pale enough to let me add a little light yellow watercolor. I love the way the white letters stand out.
Tips to remember
• Test out the water color paper you’re going to be using before you start your artwork. Some of the papers I tried stuck to the masking fluid terribly, and I had to tear the paper to get the dried mask off.
• Coat your brush in soap, or you will ruin a brush, and most likely the piece of paper you’re working on. The first brush started to pull the drying mask fluid back off the paper, and it totally ruined one of my projects.
• Let everything dry COMPLETELY before moving from fluid to paint, or paint to fluid. The fluid will cling to wet paper, or your wet paint and make a wet mess.
• Remember to have fun! Let that childish sense of wonder take over for an afternoon… and when you’re done experimenting, send us the outcome! April’s DIY Challenge is Watercolor, after all.


 From 2014-2016 I chronicled my crafty endeavors on the site Adventures-in-Making. I’ve selected a few of those DIY’s, Recipes, and other posts to share on the site.


You must be logged in to post a comment.