From 2014-2016 I chronicled my crafty endeavors on the site Adventures-in-Making. I’ve selected a few of those DIY’s, Recipes, and other posts to share on the site.
If you’ve tried out our Paper Flower or Tie-Dye Tissue Paper DIYs you know how much fun it is to dye paper with liquid watercolor. There’s something so magical about the way the colors mix and flow through the paper fibers.
I was thinking about fall leaves, and of course paper dyeing seemed like the perfect way to capture the fiery colors of the season. After a little experimentation, I came up with a dyeing variation where leaves mysteriously appear on a gorgeous field of color.
Supplies You’ll Need
• White tissue paper
• A Pigment Based White Stamp Pad, like this Craftsmart Pigment Ink Pad from Michaels. Other stamp pads, or inks, should work too, just test them out on a piece of scrap tissue.
• Stamps, made or bought. I made my own in a method similar to the one Rachel used for her Stamped Scarf project. I carved my stamps from cheap erasers.
• Blick Liquid Watercolors
• Liquid Droppers and/or absorbent foam paint brushes.
Here’s a sneak peek at the leafy magic…
To get started- decide how you are going to use your tissue, and where the leaf design should be. If you are using it in a bag, I would suggest decorating the corners; if you’re going to wrap with it you will want to decorate from the center out.
Ink up your stamp, and press it firmly on your tissue. (You know- stamp it!)
Repeat with your stamps in a random pattern until you are happy with the design. It may be difficult to see the white ink on white tissue- but that’s what makes the next part so fun!
Let the stamped tissue dry for a few minutes, then fold the tissue several times and place on a plate or other protective surface. With your dropper or brush begin applying dabs, drops, and lines of liquid watercolor to the tissue.
The leaves should start to appear in white on your tissue. (The watercolor won’t soak into the area that you have covered with the stamp ink.) If you end up with excess dye puddling up on your design, simply dab with your brush or a paper towel.
Keep dropping and dabbing until you’ve covered the area with color.
Flip the tissue over and add color there as well. (It should soak through all the layers.) After you are done, let the sheets dry completely (at least overnight) before unfolding and using them.
Tada! Customized tissue that will make all your gifts pop.
Other things to try
• More color combinations
• Different stamps – maybe stars, initials, polkadots…
• Other types of ink – colored or metallic ink pads, block printing inks and more
• Drawing with metallic Sharpies or paint pens
• Drawing with dry watercolor pencils before dyeing
• Experimenting with other papers
From 2014-2016 I chronicled my crafty endeavors on the site Adventures-in-Making. I’ve selected a few of those DIY’s, Recipes, and other posts to share on the site.
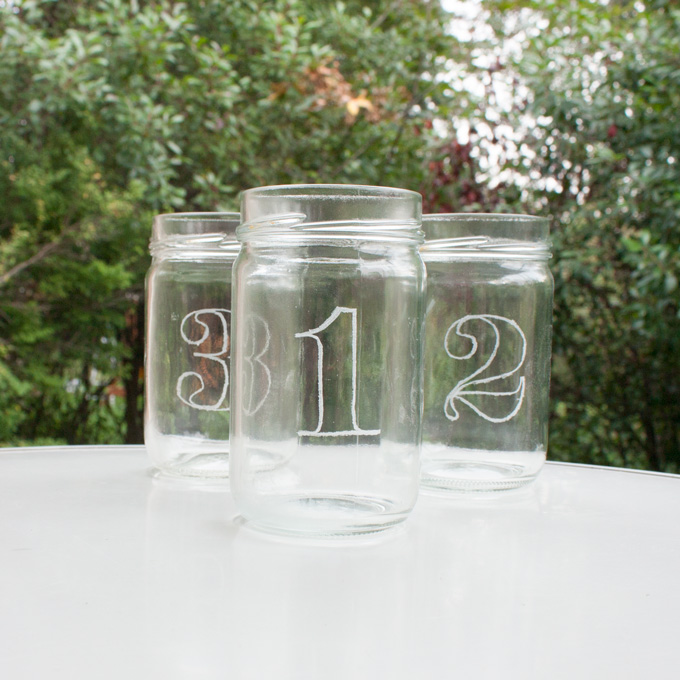
I used to have a set of numbered glasses that I loved. Each was marked (1-6) with a decal. When people would visit, I would give each their own number, so they wouldn’t mix up glasses. It was lovely.
Unfortunately it’s a partial set now, because they were delicate, and I am clumsy.
It’s been my goal to replace them for some time. So that was my first project when I got the Dremel etching underway.
Refer to your tool manual. I have listed my safety gear below, but it might not be adequate for your setup. Take all the precautions you can, and be ready to pay attention to what you’re doing.
• A respirator or dust mask.
• Safety goggles or Safety Glasses.
Tool Tips
• Practice a little bit with the tool to get an understanding of how it works on glass.
• Higher speeds seem to work best on glass.
• Build a jig to hold your glass in place while you work on it. I used a piece of plywood with scrap “rails” attached to it. My jig is painted black so I can easily see my project.
• Rubberized gloves may make it easier for you to hold onto your jar.
• Remember not to etch too deeply into the glass. Don’t hold the bit in one place for too long. Your goal is to make a pattern that is just barely felt when you run your finger across it.
Measure your glass and decide how large you would like your number to be. (I decided that a 2.5 inch number would be perfect. That’s roughly 180 pt.) Choose your size, and type numbers in your favorite font. Make sure to leave some extra space to cut the templates apart.
Cut the numbers into strips that will fit easily within your glass. You want the paper to be pressed as closely to the glass as possible.
Use a little tape to hold the paper template in place.
Now it’s time to etch! First take a good look at your number and make sure it’s straight and located where you want. You will notice that the thickness of the glass will affect the way you see your template from different angles, and it may be difficult to trace the number perfectly. If you like, you can trace the number on the glass with a Sharpie to make sure you have the shape just right. (The Sharpie mark will come off easily after you are done etching.)
Your first etching step (shown above) is to make a light outline of your number, using the pointed end of the bit and a very soft touch. Try to keep as straight-on to your template as possible– and cut yourself some slack. These are going to be awesome even if you have a stray line or two.
Once you have outlined the whole number lightly, remove the template and retrace the number to thicken up your outline. Hold the bit close to parallel with the surface of the glass to get a thicker, more consistent, line.
If you are happy with the shape of your outline, move on to outline the other numbers you would like to do in the same way.
Voila! You have numbered glasses! But don’t stop there…
Using the pointed end of the bit, add small designs and lines to the inside of your number. These little additions will look fun, camouflage any mistakes you made with the outline, and make the numbers pop-out on the glass. (This was my favorite part of the whole project. Any opportunity to doodle.)
I’m excited to show off my new glasses, and love that I turned something that should have been recycled into something I can use for years.
Other symbols to try
• Initial Letters for the people who visit often, or to give as gifts.
• Card Suits for game night (Which drink is trump?)
• Astrological Symbols
• Different Speech Bubbles
• Animal Silhouettes
• Punctuation marks (which I love)
From 2014-2016 I chronicled my crafty endeavors on the site Adventures-in-Making. I’ve selected a few of those DIY’s, Recipes, and other posts to share on the site.
I have a secret. I’ve been hoarding glass bottles… and jars. Sure, I’ve been drinking out of a set of 6 jars, but what no one knows is I have a whole box of them in my closet.
Shoot. Now you know.
The big plan was to use etching cream to mask and etch them into glass masterpieces– but something always stopped me. It may have been that the first time I pulled out the etching cream, Safety Husband insisted on reading the ingredients and warnings. He then set out a strict list of suggestions for using the DANGEROUS stuff I got from the craft store. I followed the suggestions once, but lived in fear of getting out the cream ever again. I had the PPE for it, but even so, it was a little scary. “Wear gloves. You don’t want it eating through your skin… to your bones.”
We live in a world of excess caution, over here.
For Dremel Etching, Safety Husband recommended safety goggles and a respirator- accepted spectacles and a dust mask.
The box of glass lived to taunt me. Sitting in there, instead of going to the recycling bin where it belonged; until I got the bright idea of looking for alternate etching options. There are a lot of great, videos, but the one from Dremel sold me. It was time to replace our old rotary tool, so after some shopping I decided on the…
•Dremel Micro, which is cordless.
•I bought two diamond bits, but I’ve only got around to playing with the one that looked most useful, the Dremel Diamond Wheel Point Bit.
** UPDATED 12/14 – I’ve since started using two different diamond bits with more success. 7105 Diamond Ball Pointand 7103 5/64-Inch Diamond Wheel Point
Experiments
I tried several different ways of getting my initial artwork laid out, including drawing the design on with a Sharpie, as well as using masks that we had made with the intention of using the etching cream.
Tara Bliven drew and cut out this beautiful mask for me.
We drew and cut these masks out of contact paper, but you could also use masking tape. They are a great way to start out, because the mask will help you learn to control the tool. Thankfully, this is a cordless dremel tool so you don’t have to worry about the wire tangling whilst you’re trying to follow the guide. If you jog out of the lines, the mask material will shred before you mark the glass, giving you one chance to screw up without consequences.
The mask is definitely the most time consuming and tedious way to go. I’ve moved on to freehand patterns, and occasionally use paper templates that taped to the other side of the glass. (More on that later.)
Tips
•Higher Speeds (controlled with a button on this model) work much better for etching glass. I usually use the second to highest speed. The highest works even better, but the sound is skull-splitting, so I only use it when absolutely necessary.
•Using the bit I’ve listed above, you will mainly be making thinnish lines, so plan on going over your artwork a couple of times. It works best to hold the bit as close to parallel with the surface of the piece.
•Make a jig for round items. I took a couple of wood scraps and made a kind of rail for the glasses to lay in. (See in the photos above.) Make sure it’s small enough to move around, as you will want to be able to approach your piece for all angles. After my experiments, I sprayed the whole jig black so I could see my work more easily.
•Wear Protective Gear… or you’ll get in trouble. I found a dust mask and glasses worked for me, but it might be good to start out with even more coverage, so you might want to look for personal protective equipment to suit you and the job you’re about to undertake. Remember that your glass could shatter at any time.
•Start with thick glass pieces, and don’t grind too much in one place. This is not a tool for drilling, so you’re more likely to shatter your pieces than cut cleanly through.
•Start with trash pieces you’re not afraid to throw away. There’s definitely a learning curve.
•Hand-wash any pieces, to make sure you’re not shocking the thinned glass with hot water.
•Work outside. You’ll be generating a ton of dust. While I haven’t had any sharp pieces (yet) it’s nice to let nature get rid of the dust.
•This is a no-distraction project. Don’t plan on watching TV while you work with power tools.
Things to Love
•It’s lightweight. Initially I was planning to use a flex shaft like they use in the video, but the cable is not very flexible, and I decided the lack of cord would be a benefit.
•It compact and easy to transport (although it does not come with a carrying case.)
•The battery lasts longer than I do. I haven’t had to stop what I was doing to recharge.
•I haven’t hurt myself (yet). This is always remarkable.
Things to Hate
•The “Lock” button sticks out just above the power button, and I have hit it accidentally a couple of times while the Dremel is running. It makes a terrible sound to tell me I’m killing it to death.
•It’s still a little clumsy. Even though the end is tapered so you can hold on to it, it’s more like trying to write legibly with a Squiggle Pen than an actual writing implement.
•It is quite tricky to get make a curve. A lot of this has to do with skill, and the kind of bit I’ve been using.
•The sound, especially at higher speeds. It makes a high keening when you’re using it on the glass. The birds have been complaining about this as well. It’s just life in the etching game.
Things to Try
•More bits. I tried scratching the glass with non-diamond bits with little result, but now that I’m hooked on the etchin’, I’m going to try everything. (If you have suggestions, I’d love to hear from you.)
•More freehand designs.
•On flat surfaces, like plates, trays, etc. On mirrors.
•Make a set of matching glasses, with patterned numbers, using paper templates. That’s pretty specific, huh? I guess a DIY is in the works… but until then, have fun!
From 2014-2016 I chronicled my crafty endeavors on the site Adventures-in-Making. I’ve selected a few of those DIY’s, Recipes, and other posts to share on the site.
Now, a typical person might throw away the scrappy evidence of a long week of paper making… but no one said I’m typical. My most recent batch of paper contains wildflower seeds, so I decided the scraps would make lovely confetti (and grow, too!)
Using this video tutorial, I made an origami pop-up box perfect for storing a small stash of confetti or flower seeds.
I used paper that already had colored pattern on one side, and as an added “bonus”, I printed a corny poem and a thank you message in the box. So all the people who get one will know to “pull the flaps, fling, and make it bloomy.” I closed each box with a piece of ribbon.
I’m sure you can come up with something less silly- so I’m giving you a pdf template* you can add your own wording to. Click the image below, and go to town!
The template is 8.5×11 inches, and you can resize if you need to. Make sure to use light-weight paper, and fold the printing into the box while you’re working.
*After you save the file to your desktop, you should be able to open and edit the file in Adobe Reader. If you don’t have Reader, it’s available for free here.
From 2014-2016 I chronicled my crafty endeavors on the site Adventures-in-Making. I’ve selected a few of those DIY’s, Recipes, and other posts to share on the site.
Packaging can go a long way to making your goods more valuable. The right kind of packaging can make a big impact on your potential customer, and even encourage them to buy more products from you in the future.
Watching customers at my store, I’ve learned what appeals to them; what works technically, and what doesn’t. It’s a great experience, so I thought I’d share a few tips.
This peek-a-boo tag is obvious from the front of the journal.
Use your packaging to tell the story of your product.
I write a little blurb for each of my card designs, and I’ve seen several customers slip that tag into the card before they send it. They aren’t major literary achievements, but I try to talk about the process (including where it was made) and why it says what it does. This simple thing adds value to the cards, and they want to share that value with the card’s recipient.
Assume your customer knows nothing about your process.
Give them enough information to be impressed by your skills, and curious to know more.
Be funny if you’re funny.
Unless you’re selling medical equipment, it’s alright to not take yourself too seriously.
Try to appeal to your whole audience base- and expand to reach to another one.
All kinds of people are going to pick up your product and look at the back. Your blurb might be the hook that catches them.
Don’t write too much.
Try to make it short and sweet, so they will read it all. Otherwise you wasted all that time trying to be clever!
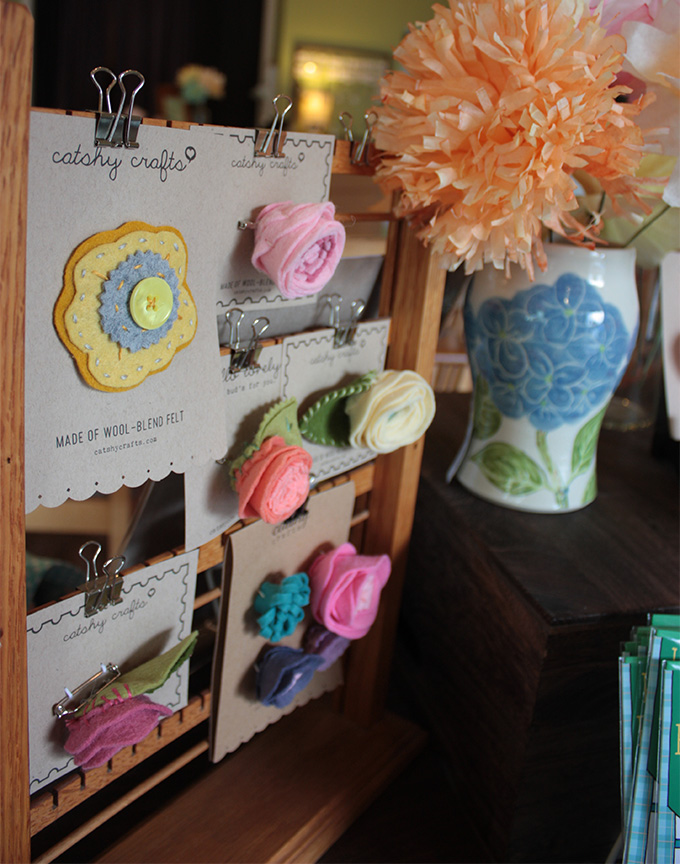
Catyshy Crafts does a lovely job with their packaging. The kraft paper reflects the qualities of their materials, and everything is left touchable.
Think of your packaging as an extension of your product and brand.
You should spend as much time thinking about your packaging as you do about your business card (which I know you obsess about.) In fact, you should probably try to think about it all at once.
Use materials that reflect your product, and your company’s philosophy.
If you’re into upcycling, use recycled papers. If your product is really modern and tech savvy, think unusual materials (aluminum?) and glossy stock.
Make sure your packaging does not distract from your product.
Usually it’s not a good idea to use bright colors or busy patterns in your packaging. You want it to complement your good. It’s not the focal point.
Be consistent.
Keep your visual message consistent across your products. Inconsistent designs can also distract from your message and designs.
Be professional, but not TOO professional.
Make sure you’re spelling is write, and your not making to many grammar mistakes. (Haha. Couldn’t help myself.) Don’t crop things strangely, or leave extra glue bits everywhere. BUT do make sure to leave a little character in your packaging. You’re hand-making, and hand packaging these things- a little quirkiness adds value. Think about the packaging at Anthropologie ($$) vs. the packaging at TJ Maxx ($). Using natural materials, and leaving the touch of your artistic hands adds value.
This photo album from Scroll Hand*Bound has a story wrap that holds the pages securely together while leaving the book accessible.
Be Practical.
It’s tempting to be only whimsical about your packaging, but there are a few things you need to keep in mind. (Do not get rid of all the whimsy, though.)
It’s gotta work.
I’m constantly reworking my tags and labels to fix them when it’s obvious they just aren’t working. Maybe they fall off every time someone picks it up. Maybe I’ve hidden them too well in my product. Maybe my type is too small. Think about your audience and be practical.
Leave room for a price.
I put a 1/2″ x 1 ¾” tag on every product that comes into the store. Sometimes I have to get really creative to keep from harming the product with my sticky sticker. Try to think about where your price is going to go, and how easy it will be to remove. Often your product will be a gift, so the price should disappear. I’ve started including a tag on my art prints, that has an end that can be cut off to remove the pricing completely.
Use renewable materials.
A lot of this is just personal opinion, but I’m all for getting rid of “plastic sleeves on everything”. They aren’t recycle-able, and they just go straight in the trash.
Even if you disagree- make sure to use materials that you can easily replace. Things you know you’ll be able to order again.
Your time is money.
Your packaging shouldn’t take more time than your product. Don’t make anything that’s so delicate that you will have to constantly fidget with it, or that is difficult to put together in the first place.
Think about protecting your goods.
I know, I know, a plastic sleeve is great protection- but you’re smart, I’m sure you can think of something else.
Let your product be accessible, even through the packaging.
Don’t cover too much of your design with your packaging. If it’s something that needs to be touched to be believed, leave it open! (Or else, consider having an open one everywhere your products are sold.)
These little owl and hedgehog ornaments from Yardia each come in their own origami boxes, with a little raffia nest. It’s a perfect example of whimsy, and added value.
Don’t be too practical.
Read all the advice above, and disregard what you want. You are the best judge of how your products will gain value from packaging. If you want to hand-cut gift boxes for every item, do it. (But make sure to pay yourself for it.) Gift packaging it a great way to reinforce the special nature of your product, and appeals to the thrifty (and lazy) who won’t have to come up with wrapping.
It might not always be feasible to hire a graphic designer for each thing you make, but a clever designer can help you develop some design solutions that you can work with yourself. It might not seem like the best way to spend your startup money, but I truly believe the right help can make the difference for you- especially as you start to work with stores and shows. Here are a few things they can help you with (be sure to make a list before meeting with anyone.)
Designing a logo that tells your story, and can grow with your company.
It’s tempting to make a logo with your favorite typeface, but chances are your tastes will change. A designer can help come up with a logo that can adapt to your changing tastes (a different color combo, perhaps) and your ever-widening product line.
Come up with some basic design solutions that will solve all your packaging dilemmas for years to come.
Most of the designers I know love a challenge. If you ask them to come up with a basic label design that can be used in a variety of ways, chances are they will think it’s the best puzzle they’ve ever met.
Think of things you’ve never heard of.
While you’ve been off perfecting what you make, they’ve been obsessing about labels, labels processes, materials, and all the nerdy stuff you don’t have time for. They might have a few tricks up their sleeves that will save you money and time.
Will be a great resource for you as your company grows.
Working with professionals is usually a good idea, whether it’s a designer, a plumber, or an accountant. As your needs change, they can help you clarify your goals, and keep you on-track. They can refer you to the right kind of helper, and make you think of things you might have overlooked otherwise.


You must be logged in to post a comment.