From 2014-2016 I chronicled my crafty endeavors on the site Adventures-in-Making. I’ve selected a few of those DIY’s, Recipes, and other posts to share on the site.
When you’re setting up a shop, or a booth for the first time, it seems like everyone has advice. What they don’t tell you about is the agony, exhilaration, and frustration that is display.
I think that I could spend every waking hour working on display pieces in my store, and never be done– and yet, I love putting together something unique that shows off the artist’s work (and my cleverness.)
I’d been using this stripped-down silverware box for display, but didn’t feel like if was as useful as it should be. I starting thinking about buying a piece of cork board to hang jewelry pieces from the back- then realized I was ignoring a free material right at my fingertips, those wine corks someone had been hoarding. (Just so you don’t worry about me being crushed in a pile of old newspaper and wine corks, I wasn’t the one saving them; and this project used up almost all of them.)
I decided to line the back of the box in little slivers of cork. So I laid each cork out on a cutting board, and
cut it into four pieces. (It’s not an exact science. I wanted the cork backing to be a little uneven, like old masonry.)
After I had cut a whole bunch of corks, I got ready to glue.
I used Aleene’s Tacky Glue to glue each cork sliver down, packing them in tightly to fill the space.
At the edges, I cut the cork slivers in half to fill in where needed.
Once I filled in the whole back, I let it dry overnight, before filling the bottom portion with dry rice. (Rice is a display staple, not just a food!)
I pressed straight pins into the cork to hang jewelry. (I’ve found that the less fidgety a display is, the more comfortable people are using it. The pins are easier to pull earrings off of than clips.)
One more display case down.
(The jewelry pieces seen here are from Christine Stoll jewelry, available at the So There store, and her shop ChristineStoll.com.)
From 2014-2016 I chronicled my crafty endeavors on the site Adventures-in-Making. I’ve selected a few of those DIY’s, Recipes, and other posts to share on the site.
After I had everything inked up for the hand printed wrapping paper, I looked over at the ink brayer and decided I wasn’t done printing. The 3″ surface of the brayer seemed perfect for decorating smaller surfaces and decorating gift bags.
For this design, I used the same basic shapes- lines and circles- but on a smaller scale.
Supplies I used
• 3″ Ink Brayer like this one
• Packaging Tape
• A piece of craft foam
• A hole punch
• Block or relief printing Ink- I used oil-based relief ink from Daniel Smith, in white. Speedball inks should work well too. (Make sure to read the cleanup instructions when you’re choosing an ink.)
• A smooth piece of glass or ceramic to spread ,my ink out on. (I used an old fridge shelf.)
• Plain gift bags, boxes, and everything else you can get your hands on. (Cats are off-limits.)
Since my brayer was doing double duty for this project, I made sure I rolled out a good amount of ink out on my glass palate. Then I cleaned the brayer with soap and water and dried it thoroughly.
Didn’t clean the brayer too well. But so what!?
Since I was going to be working with smaller pieces, I began by wrapping the brayer with packaging tape– sticky side out. This allowed me to stick small pieces of foam to the roller without fuss.I used two shapes to form my pattern- short strips and dots. I cut the craft foam into strips with a knife and put the pieces to the side, then
punched small holes out with two sizes of hole punches.
I cut and tore small pieces off the foam strip, and placed them in a kind of branchy pattern, decorating the ends with foam dots. The pieces stuck easily to the packaging tape making the whole thing easy peasy.
To ink up the design, I ran it back and forth across the ink palate until the foam was coated.
I tried a couple of different ways of decorating the gift bags, and settled on a basic “stripe” of design across the sides. The small pattern was a lot of fun to work with, and made a nice complement to the larger paper pattern.
The whole printing experience was such a joy. I printed everything I could get my hands on, and still want to do more. It’s such a simple way to make a gift really special.
and it’s so darn fun!!
What are you doing? Go print some gift wrap…
and send me photos.
From 2014-2016 I chronicled my crafty endeavors on the site Adventures-in-Making. I’ve selected a few of those DIY’s, Recipes, and other posts to share on the site.
For some reason I can’t quite master gift wrapping. I get the folding and the taping; but when it comes time to add bows or other decoration, everything just sort of unravels. (Literally, at times.)
So I discovered a trick- if you start with something unique and eye-catching, no one will ever notice your mistakes.
This year I decided to print a whole line of gift wrapping options– paper, bags, and boxes– for myself and for the store. It was easier (and much more satisfying) than I expected, and I ended up printing happily for a whole day.
I thought I would share the craft happiness by showing you two of the methods I used to turn basic kraft/craft stuff into something I love to look at.
First off, let’s talk great big, bold, wrapping paper…
Supplies I used
• Rolling pin
• Contact Paper to wrap around, and protect the rolling pin
• Craft Foam sheets and Craft Foam Stickers
• Double Stick Tape
• Block or relief printing Ink- I used oil-based relief ink from Daniel Smith, in white. Speedball inks should work well too. (Make sure to read the cleanup instructions when you’re choosing an ink.)
• A smooth piece of glass or ceramic to spread ,my ink out on. (I used an old fridge shelf.)
• A Brayer like this one.
• Plain kraft butcher paper.
To build a pattern like this one…
First I wrapped my rolling pin in contact paper to protect it from the stickers and double stick tape goo. I smoothed out as many air bubbles as I could, before trimming it to fit. (This is a very forgiving project.)
Since I had decided I wanted to make a pattern with lines in it, I used a piece of scrap paper to draw guide lines all the way around the pin.
I used the craft foam sticked first. This set included a whole bunch of sports ball shapes. I placed the circular balls along the guide lines I had drawn (randomly spaced)
Next I wanted to have thin lines of craft foam to place between the circles. To give them a sticker-like back I laid out several lines of double stick tape, before…
using my craft knife to trim them into strips.
I then placed these strips along the guide lines, and trimmed them where they met up with the circles.
I didn’t cover all of my guide lines because I wanted to add a little randomness into my pattern.
Once I had the pin covered with the design I wanted to print, I laid out a strip of ink on my glass and smoothed it out with my brayer. (Shown here half smoothed.) Once the ink was smeared out on the glass, I rolled the pin through the ink several times to make sure all of my pattern was coated. Then I did a test print on a scrap piece of paper by slowly rolling my design from one end to the other.
At this point I decided that I wanted to add more lines to my design. One of the nice things about this method is that you can add or subtract pieces as you go.
All inked up.
Once I was happy with the design, I went crazy. I tore sheets of kraft butcher paper into large squares (approximately 24″x24″). I inked up the roller, rolled the design all the way across the paper, reinked, shifted to the edge of my design and printed again. Since I was working with a randomish pattern of lines, the paper turned out great and was lots of fun to wrap with.
Tricks and Tips
• Pick a pattern idea that has some randomness to it. You will probably end up a little uneven, so it’s best to embrace the “handmade” look of it.
• If it looks like your roller is applying ink to your paper where you don’t have foam, consider adding another foam shape there to push your roller away from the paper. It will print, but that’s okay.
• If there’s no contact paper handy, you can cover the rolling pin with a pieces of card stock instead. Just tape it down with masking tape.
Things to Try
• Put a couple of colors of ink out on the glass and combine them to get a more tie-dye or ombre look.
• You can embed designs into the craft foam by simply drawing on it with a pencil or pen. I was too excited with the look of the solid shapes to try that with this project, but I plan to try it soon!
• This would be a great project to try with kids. Just grab a couple of sets of craft foam stickers from your local craft store (mine came from Michaels) and let them go to town!
Next I’ll show you how I made a smaller print to use on gift bags and boxes; but in the meantime, try this out.
From 2014-2016 I chronicled my crafty endeavors on the site Adventures-in-Making. I’ve selected a few of those DIY’s, Recipes, and other posts to share on the site.
I’ve been getting a lot of questions lately about my lettering, and a few poor souls have even asked if I teach a class (HA!). I tell everyone the same thing– my lettering has improved over the past year because I’ve been practicing. I know, that sounds like a cop-out, but it’s true! I’ve been making signs and chalkboards for the store, lettering in my prints, and wearing through Prismacolors like nobody’s business.
The key, for me, if to cut myself some slack while I’m practicing. Doodling letters is swell, and I take any opportunity to write words in weird ways.
This wrapping paper is a perfect example. I wanted to come up with a simple way to wrap a couple of small gifts, and went to the (very soggy) garden for inspiration. The remaining herbs were so pungent and gorgeous that I decided to use them as accents on a basic brown paper wrapping.
The whole thing’s pretty simple, and I’m sure you could come up with something even more special. The point is, I was able to mess around with letters and words without feeling too self-conscious. It’s just wrapping paper, and the herbs take center stage.
For the second gift, I made a tall bag with a few materials, and I thought I’d share my process.
Supplies I Used
• Plain brown kraft paper – you could also repurpose a grocery bag. • Fresh herbs from the garden • White Prismacolor Pencil • Flour & water to form a paste. You can also use glue, of course! • Scissors • Pencil • A can of spray paint as a base form
First I traced the base of the can to form the bottom of my bag…
and cut out the circle, about 1/4 inch inside my line.
I then measured the can and cut out a piece of paper for the main part of the bag, leaving myself about 2 inches of extra height to wrap along the bottom and enough width to cover the whole can with a little overlap.
I made a fold at that 2 inch mark, and cut a little fringe into that end (the bottom.) You’ll see why in a second.
I used my trusty white pencil to doodle words all over the paper.
I’ve started using a flour paste for a lot of paper projects, lately. Here I used about equal parts water and flour, mixed well, and applied with a cheap paintbrush.
I wrapped the paper around my spray paint can and painted both edges with my paste…
then began folding the fringe pieces down. Once those were down I painted them, and the round bottom piece with paste…
applied like so, and left to dry.
After it was completely dry (a few hours later) I trimmed the top of the bag, and filled it with my gift, and a little tissue paper.
Simple directions for a unique bag- and a great way to work on those lettering skills.
Are you inspired by herbs, like I am? Don’t forget to share you spice & herb work with us for our November DIY Challenge! We’d love to see what you think up.
You don’t have to work in a vacuum. (It’s too cramped in there, and too dusty.)
From 2014-2016 I chronicled my crafty endeavors on the site Adventures-in-Making. I’ve selected a few of those DIY’s, Recipes, and other posts to share on the site.
***
In advance of their Fall Conference, Schoolhouse Craft asked me to write a little post with some business advice, and I decided to take the time to write about one of the things I’ve learned from running the store.
One of the best things about my job is that I have daily chances to interact with customers and creative types. I don’t even have to try! They just walk through my door, and react to my work. I didn’t do a great job with this before I opened the shop (although I always encouraged friends to let me critique their work.) It takes a lot of courage to ask the tricky questions about your work and your business.
The benefits of that back-and-forth are so valuable, and will encourage you to push your work in new directions, to perfect your business, and to be a well-rounded maker. Since not everyone has the benefit of sitting in a gift store, so I thought I would share some ideas for bringing a little creative input your way.
The Kind Of Things You Might Ask About
You probably already have a good base of people to ask about these things. It’s worthwhile to keep adding to you collection, but in the meantime be sure to get feedback as often as you can.
Feedback On Your Products As A Whole.
This is the hardest thing to ask for, and the hardest advice to take, but it’s incredibly important for the development of your work and business. Encourage your audience to be candid– and make sure to take a deep breath before reading anything that might be negative.
Your Packaging And Promotional Materials.
Ask people to proofread for you, and offer edits. Make sure to run it by people who have no idea what you’re working on– it should make sense after they see everything.
Shipping And Bagging Procedures.
Send a package to a friend, and see if everything makes it there alright. Ask people what they are looking for when they buy a similar product- do they want a cute bag and tissue? A gift box? A Thank You card?
Your Prices
Ask if they would pay that for a similar product. This is also a good opportunity to ask what things you can add or change to give more perceived value.
Suggestions Of Materials, Tools, And Techniques.
This is a great thing to run by people who work with similar processes, but you might even get good results from out-of-the-box solutions from people who have a completely different knowledge base. Some people can be close-mouthed about their technique- but I think that sharing information is good for everyone involved.
Advertising and Networking Opportunities
Is there a chance to reach your niche audience that you haven’t considered?
Sales Opportunities
You can try all day an never round-up all the craft shows, shops, events, and other great places to sell you goods. Other artists can give you ideas of what has worked for them, and non-artist friends have surely seen great opportunities too.
Other Business Practicalities
like software or person for booking and accounting, an excellent Lawyer (like these business lawyers in houston, just in case), Liabilities you might not have thought of, etc.
Other Ways to Get Feedback
There are ways other than one-on-one question pestering to get your questions answered.
Through Your Employees
If you have them, your employees know your business better than anyone else because they are what makes it run. Ask them regularly if there are any changes that can be made to improve the work you’re doing and the products you’re putting out. There is often one or two employees that do the most work and provide the best feedback to benefit your business. If you’re only a small business then you can’t afford to lose these employees. Luckily, you can talk to UK key person insurance specialists to see how you can cover your business against the loss of a key employee like this. If you ask your employees to help improve the business then they will feel like a bigger part of the team and want to contribute more to its success.
Attend Conventions And Meetups For Creative Businesses.
(Like Schoolhouse Craft.) Be sure to schmooze and look for people who have similar interests- and get contact information for everyone.
Make a Mailing List
Put together an email list of people who are willing, and who you can count on to give you honest feedback. When you have a new design, run it by your list, and see what they have to say. Rather than sending out the emails to everyone on the list manually, use an email software to do it for you. I like to use Mailerlite – see how it compares against the popular Mailchimp by reading this mailerlite vs mailchimp write-up.
Join or Start A Facebook Group for Creative Feedback
You can keep it private, if you don’t want just anyone to see what you’ve got going on.
Offer To Look At The Work Of Other People
Giving advice is a great chance to work on your own experience, and it you help people, they are more likely to help you with feedback down the road.
Befriend People with Different Backgrounds and Experience
People with lots of opinions and ideas. People like your friendly local shop owner. You know the one….
From 2014-2016 I chronicled my crafty endeavors on the site Adventures-in-Making. I’ve selected a few of those DIY’s, Recipes, and other posts to share on the site.
Instead of using plastic sleeves for my cards, I like to hold the card and envelope together with a strip of recyclable paper. I also use this as a chance to price my cards, and provide a little story to go along with each design. (Stories can make your products- more on that in the Packaging Post).
Since I’ve been using the photo corners to package my prints, I decided to move over to a similar method to pack my cards. I played around with folding until I came up with a method that needs no tape or plastic, but still looks pretty nifty!
First I print out my card descriptions, and cut them into strips with a rotary cutter. Each strip is about 2.5″ tall and 11″ wide.
For smaller cards (up to 4 1/4″ x 5 1/2″) I use a decorative blade or punch on one edge of the strip.
A Then I turn everything over, and center the envelope diagonally on the paper strip. B Once it’s centered, I fold the non-decorative corners in, using the envelope as a guide. C Then I fold the flap back across. The scalloped edge will now be on top… D so that I can slip the corner of the card into the little pouch I made with the folds. E Then I slip the other corner in. The card itself keeps the wrap secured.
I use a similar method to cover larger cards (up to 5″ x 7″), with a couple of changes. Since I have to use more of the length of the strip, it takes a little adjustment to make sure that I have a pretty corner to tuck into. I still center the envelope on the strip (diagonally) but then…
F I fold the two opposite corners first. (Notice that the first fold doesn’t quite cover the whole corner of the envelope.) G Then I fold the second, longer, side over to make the same type of pocket for a card. H Then slide in the card a corner at a time.
Voila. A plastic free wrap, and a story too!
You might not need to use exactly this method for all the things you get up to- but I hope my experiment encourages you to think outside of the box with your projects. Just a couple of little clever changes could make the world a better place.
From 2014-2016 I chronicled my crafty endeavors on the site Adventures-in-Making. I’ve selected a few of those DIY’s, Recipes, and other posts to share on the site.
Packaging can go a long way to making your goods more valuable. The right kind of packaging can make a big impact on your potential customer, and even encourage them to buy more products from you in the future.
Watching customers at my store, I’ve learned what appeals to them; what works technically, and what doesn’t. It’s a great experience, so I thought I’d share a few tips.
This peek-a-boo tag is obvious from the front of the journal.
Use your packaging to tell the story of your product.
I write a little blurb for each of my card designs, and I’ve seen several customers slip that tag into the card before they send it. They aren’t major literary achievements, but I try to talk about the process (including where it was made) and why it says what it does. This simple thing adds value to the cards, and they want to share that value with the card’s recipient.
Assume your customer knows nothing about your process.
Give them enough information to be impressed by your skills, and curious to know more.
Be funny if you’re funny.
Unless you’re selling medical equipment, it’s alright to not take yourself too seriously.
Try to appeal to your whole audience base- and expand to reach to another one.
All kinds of people are going to pick up your product and look at the back. Your blurb might be the hook that catches them.
Don’t write too much.
Try to make it short and sweet, so they will read it all. Otherwise you wasted all that time trying to be clever!
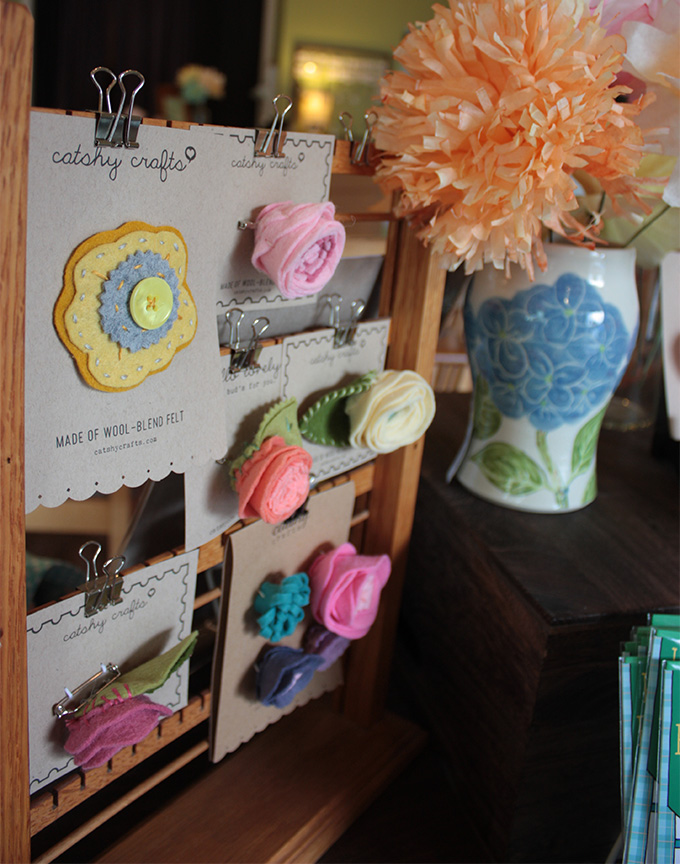
Catyshy Crafts does a lovely job with their packaging. The kraft paper reflects the qualities of their materials, and everything is left touchable.
Think of your packaging as an extension of your product and brand.
You should spend as much time thinking about your packaging as you do about your business card (which I know you obsess about.) In fact, you should probably try to think about it all at once.
Use materials that reflect your product, and your company’s philosophy.
If you’re into upcycling, use recycled papers. If your product is really modern and tech savvy, think unusual materials (aluminum?) and glossy stock.
Make sure your packaging does not distract from your product.
Usually it’s not a good idea to use bright colors or busy patterns in your packaging. You want it to complement your good. It’s not the focal point.
Be consistent.
Keep your visual message consistent across your products. Inconsistent designs can also distract from your message and designs.
Be professional, but not TOO professional.
Make sure you’re spelling is write, and your not making to many grammar mistakes. (Haha. Couldn’t help myself.) Don’t crop things strangely, or leave extra glue bits everywhere. BUT do make sure to leave a little character in your packaging. You’re hand-making, and hand packaging these things- a little quirkiness adds value. Think about the packaging at Anthropologie ($$) vs. the packaging at TJ Maxx ($). Using natural materials, and leaving the touch of your artistic hands adds value.
This photo album from Scroll Hand*Bound has a story wrap that holds the pages securely together while leaving the book accessible.
Be Practical.
It’s tempting to be only whimsical about your packaging, but there are a few things you need to keep in mind. (Do not get rid of all the whimsy, though.)
It’s gotta work.
I’m constantly reworking my tags and labels to fix them when it’s obvious they just aren’t working. Maybe they fall off every time someone picks it up. Maybe I’ve hidden them too well in my product. Maybe my type is too small. Think about your audience and be practical.
Leave room for a price.
I put a 1/2″ x 1 ¾” tag on every product that comes into the store. Sometimes I have to get really creative to keep from harming the product with my sticky sticker. Try to think about where your price is going to go, and how easy it will be to remove. Often your product will be a gift, so the price should disappear. I’ve started including a tag on my art prints, that has an end that can be cut off to remove the pricing completely.
Use renewable materials.
A lot of this is just personal opinion, but I’m all for getting rid of “plastic sleeves on everything”. They aren’t recycle-able, and they just go straight in the trash.
Even if you disagree- make sure to use materials that you can easily replace. Things you know you’ll be able to order again.
Your time is money.
Your packaging shouldn’t take more time than your product. Don’t make anything that’s so delicate that you will have to constantly fidget with it, or that is difficult to put together in the first place.
Think about protecting your goods.
I know, I know, a plastic sleeve is great protection- but you’re smart, I’m sure you can think of something else.
Let your product be accessible, even through the packaging.
Don’t cover too much of your design with your packaging. If it’s something that needs to be touched to be believed, leave it open! (Or else, consider having an open one everywhere your products are sold.)
These little owl and hedgehog ornaments from Yardia each come in their own origami boxes, with a little raffia nest. It’s a perfect example of whimsy, and added value.
Don’t be too practical.
Read all the advice above, and disregard what you want. You are the best judge of how your products will gain value from packaging. If you want to hand-cut gift boxes for every item, do it. (But make sure to pay yourself for it.) Gift packaging it a great way to reinforce the special nature of your product, and appeals to the thrifty (and lazy) who won’t have to come up with wrapping.
It might not always be feasible to hire a graphic designer for each thing you make, but a clever designer can help you develop some design solutions that you can work with yourself. It might not seem like the best way to spend your startup money, but I truly believe the right help can make the difference for you- especially as you start to work with stores and shows. Here are a few things they can help you with (be sure to make a list before meeting with anyone.)
Designing a logo that tells your story, and can grow with your company.
It’s tempting to make a logo with your favorite typeface, but chances are your tastes will change. A designer can help come up with a logo that can adapt to your changing tastes (a different color combo, perhaps) and your ever-widening product line.
Come up with some basic design solutions that will solve all your packaging dilemmas for years to come.
Most of the designers I know love a challenge. If you ask them to come up with a basic label design that can be used in a variety of ways, chances are they will think it’s the best puzzle they’ve ever met.
Think of things you’ve never heard of.
While you’ve been off perfecting what you make, they’ve been obsessing about labels, labels processes, materials, and all the nerdy stuff you don’t have time for. They might have a few tricks up their sleeves that will save you money and time.
Will be a great resource for you as your company grows.
Working with professionals is usually a good idea, whether it’s a designer, a plumber, or an accountant. As your needs change, they can help you clarify your goals, and keep you on-track. They can refer you to the right kind of helper, and make you think of things you might have overlooked otherwise.


You must be logged in to post a comment.