Visit the 4th Historic Shell Holiday Shop in Downtown Issaquah, opening November 23. We’ve put together a fun collection of useful gifts from more than 45 local artists, designers and makers. You can find ceramics, art kits, cards, journals, screen printed clothing, knitted goods, jewelry, holiday decoration…. you get the idea!
Come see us at the Historic Shell Station, 232 Front Street North
Open Nov 23-Dec 30, Fri-Sun 12-6PM.
For more photos and up-to-date info, visit our Facebook page
Thank you to everyone who applied! If you are interested in applying for future pop-up shops with us, please join our mailing list, and keep an eye on our Facebook page.
***
Calling Local Artists and Makers!
We’re looking for talented local artists and craftspeople to feature in our fourth holiday shop at the Historic Shell Station in Downtown Issaquah: 232 Front St N. If you make great gifty goods we want to feature you!
This holiday shop is curated and run by Alison Lang of So, There (andsothere.com); and will focus on fun, unique, handmade gifts of all sorts. The shop will be open weekends, from Thanksgiving to New Year 2018 in the beautiful, festive Downtown Issaquah corridor.
No table or booth fees! No booth to tend! Chosen products will be sold on consignment, and artists will receive payment (minus commission) for sales following the shop’s closure in December. Artists will be responsible for dropping off stock on November 18-19, and picking it up on Dec 31-Jan 1.
If you make it, we want to see it! We are looking for handmade: packaged food items, fashion accessories, jewelry, pillows, candles, textiles, home accessories, small furniture pieces, journals, stationery, books, office accessories, electronic gadgets, games, children’s toys, and more! Original art pieces and locally designed items will also be considered.
A few more important things
Artists must be able to drop off stock on November 18th or 19th, and pick up on December 31st or January 1st.
Shop commission is 40% to cover insurance, display, processing fees, and venue. Artist will receive 60% of sales, via check or PayPal by January 30th, 2019.
Artists must affix a price tag and business name to each item (pencil prices are ok!) Special packaging or tags are welcome.
Priority will be given to early applicants and those that are very local to Issaquah.
If you have a display or furniture piece you love to use, and are willing to lend, let us know!
Join Us!
Please fill out the form below by October 30th to be considered for the Historic Shell Holiday Shop
We should confirm your application within a week. If you have problems with the form, or you don’t hear from us, please email info@andsothere.com.
2017 Featured Artists and Makers
Aline’s Cardboard
A Tea Leaf
Beehive Creations
Belly of a Whale
Britt Greenland
Catshy Crafts
Camp Smartypants
Christine Stoll Designs
Coyote Moon Arts
Earth and Clay
Florette
Flux Ceramics
Freebird Studios
Glass Elements
Graceful Moon Studios
Heidi Rose Artworks
Kitten Mittens
Lexicon Collective
Lexi Sommer
Mayhem Here
MCreativeJ
Mrs. Robinson’s Affair
Pieced Together Designs
Sand Hat Games
Scented Gypsy
Shine on Art Accents
Snooter Doots
So There
Starlight Glassworks
Susan Hass
Uzura
Wandering White Pines
Yardia
Zoe Beth Jewelry
I wrote this post for our sister blog Adventures-in-Making in October 2015. It gives a little peek into one aspect of our process.
With the weather turning gloomy it’s becoming less practical (and pleasant) to work outside, but I have had more chances to work more with my lovely letterpress. It dawned on me (while I was listening to the clunking and whirring of the machine) that I haven’t ever shared my adventures with this 126-year-old guy, even though he takes up a huge space in my heart (and my bedroom.)
I thought I’d show you a couple of behind the scenes shots, and talk about my printing process.
An old etching of the letterpress model I work with, in the amazing American Wood Type book my mom passed down to me. Synchronicity?
There are a lot of great resources for learning about the history of printing (I’ve listed some resources below) so I won’t get too much into a subject that I’m learning more about all the time.
My first experience printing was at the University of Texas, on a Vandercook press using antique wood type (from the Rob Roy Kelly collection) and modern polymer plates. I eventually acquired a small table-top platen press (a Craftsmen Imperial) and started printing greeting cards and more using the same method I use today on my floor-standing platen press.
Nearly two years ago we moved the one-ton California Reliable into a corner of our bedroom, and it has become a my go-to for printing with love.
Polymer plates before they are aligned on the aluminum base for printing.
While I still use lead type and wood type occasionally, I mainly print with polymer plates on an aluminum base. I draw up the artwork, scan it, clean it up and prep it for the plates, then send the artwork out to have plates made. The plates are somewhat similar to the clear sticky stamp sheets some people use with a clear block; however the material is much harder which allows for much more detail and lets it stand up to the high pressure of the letterpress. The height of the material has to be just right to bring it up to type high on the aluminum block and allow for the ink rollers to roll, and the printer to print.
Hand carved linoleum blocks being printed on a small tabletop press.
Occasionally I get a wild hair and print from hand-carved linoleum blocks. There’s less perfection in this mode, but you can end up with really great results with lots of character. There’s a trick to raising the blocks up to the right height, but it’s definitely possible.
There’s a long list of things I love about letterpress printing, but color is at the top. I love how each color I print is one solid color instead of being made up of a pointillistic nightmare of Cyan/Magenta/Yellow/Black. (There’s no room in my blue for little pink dots.) Each color on a letterpress print is printed separately; each color has its own plate. I’m a somewhat inexact ink mixer, but I always seem to end up at the right color (and I try not to get ink everywhere.)
Printing the first color of a leafy card.
Alignment (registration) is something that has taken a little getting used to, but I’ve come up with a method that works great for me. Here you can see a couple of polymer plates on my aluminum base, printing the first color of a two-color card.
The opening and closing action on this Gordon-style press is powered by a flywheel and a foot-powered treadle. There is a single magical dance that inks the rollers on the ink plate, rolls them across the printing plate, then presses the paper into that plate to make a print. (I’m learning a little more all the time about the mechanics of this magic, but the first lesson was DON’T LEAVE YOUR HAND IN THERE.) I’m responsible for pumping with my foot/ankle/hip and feeding paper.
Printing on paper handmade from the scraps of other cards.
One of the nicest things about the letterpress is that with a little ingenuity you can print on just about anything flat. Most of my pieces are printed on thick cover stocks, often 100% cotton. I’ve started printing more and more on sheets of handmade paper that I make from the trimmings of those other cards. I love the texture and softness of the paper I make, and I adore the fact that it means I’m contributing less to the landfills. (Want to know more about making paper? 123)
I’ve also just started to experiment with printing on fabric…. I have ideas….
So that’s my old guy. Our love is still new, but I think it’s made to last.
Time will pass– I will get more ragged and he will get less, and he’ll always have new things to press.
I’ll keep learning.
Visit the 3rd Historic Shell Holiday Shop in Downtown Issaquah. We’ve put together a fun collection of useful gifts from more than 35 local artists, designers and makers. You can find ceramics, art kits, cards, journals, screen printed clothing, knitted goods, jewelry, holiday decoration…. you get the idea!
Come see us at the Historic Shell Station, 232 Front Street North
Open Nov 24-Dec 30, Fri-Sun 12-6PM.
For more photos and up-to-date info, visit our Facebook page
Thank you to everyone who applied! If you are interested in applying for future pop-up shops with us, please join our mailing list, and keep an eye on our Facebook page.
***
Calling Local Artists and Makers!
We’re looking for talented local artists and craftspeople to feature in our third holiday shop at the Historic Shell Station in Downtown Issaquah: 232 Front St N. If you make great gifty goods we want to feature you!
This holiday shop is curated and run by Alison Lang of So, There (andsothere.com); and will focus on fun, unique, handmade gifts of all sorts. The shop will be open weekends, from Thanksgiving to New Year 2017 in the beautiful, festive Downtown Issaquah corridor.
No table or booth fees! No booth to tend! Chosen products will be sold on consignment, and artists will receive payment (minus commission) for sales following the shop’s closure in December. Artists will be responsible for dropping off stock on November 19-20, and picking it up on January 1-2.
If you make it, we want to see it! We are looking for handmade: packaged food items, fashion accessories, jewelry, pillows, candles, textiles, home accessories, small furniture pieces, journals, stationery, books, office accessories, electronic gadgets, games, children’s toys, and more! Original art pieces will also be considered.
A few more important things
Artists must be able to drop off stock on November 19th or 20th, and pick up on January 1st or 2nd.
Shop commission is 40% to cover insurance, display, processing fees, and venue. Artist will receive 60% of sales, via check or PayPal by January 30th, 2018.
Artists must affix a price tag and business name to each item. Special packaging or tags are welcome.
Priority will be given to early applicants and those that are very local to Issaquah.
If you have a display or furniture you love to use, and are willing to lend, let us know!
Join Us!
Please fill out the form below by October 30th to be considered for the Historic Shell Holiday Shop
We should confirm your application within a week. If you don’t hear from us, or have any questions, please email info@andsothere.com.
2016 Featured Artists and Makers
Aline’s Cardboard
Beehive Creations
Britt Greenland
Catshy Crafts
Camp Smartypants
Globetrotting Artist
Glass Elements
Kitten Mittens
Christine Stoll Designs
Lexi Kreutzer
Mayhem Here
Moulton
Mrs. Robinson’s Affair
Orange Twist
Quineli
Rocaille for a Cause
Sarah Bak
Sunday Drive Designs
Scented Gypsy
So There
Uzura
Vye
Wild Born Foods
Yardia
Zoe Beth Jewelry
This post originally appeared on our DIY blog, Adventures-in-Making in 2015.
I think that it’s one of life’s small miracles that no one has to listen to all the noises that go on in my head while I’m working. The cajoling, the reassuring, the brainstorming, the problem solving, the bickering, the promises, the compromises… you get it. It’s noisy, but generally productive (“What were you thinking, Ali?” “You can do it, Ali!”) That’s my process.
Since this month’s craft challenge is all about LETTERS, and so am I, I thought I’d give you a little glimpse into the sketching steps of my lettered pieces.
I showed you my travel kit of supplies, but my sketches rely on just a few tools. A mechanical pencil, a ruler, a compass, clipboard, lots of erasers, and some thin white card stock.
I usually have a concept that I’m trying to convey in words. Often it’s one of the mantras I repeat to myself while I’m working (which makes the whole process very meta.) I will write down a bunch of phrases, and think about…
• Priority of words (Visual Hierarchy) – The most important words should generally be biggest and easiest to read to reinforce the message of your piece. I like to think that if you only read the big words, it would be like a summary of the whole statement. As fun as it is to make a really big and elaborate THE, it doesn’t make much sense. (THE message gets hidden.) You can also use visual hierarchy to hide a message and make people really look.
• What shapes I can use in the phrase: Is there a representative shape I can work into the overall form of the lettering? If I’m writing about lemonade, should I make it fit into the shape of a glass?
• What kind of typography would best represent the words? – Some words want to be formal (“Typography”) and some want to be flourishy (“Passionate”). Sometimes it’s fun to mix those up.
I’ll also start looking at the way a word is structured so I’m sure to give it enough space per letter.
When I have a general idea of the shapes I’d like to play around with, I’ll build myself a make-shift grid with the ruler and compass. I find that I like to make mostly symmetrical pieces, so I’ll map out the middle of the page and go from there. I end up with a lot of extra reference lines, but that’s fine.
Then I will start very lightly penciling in the skeleton form of letters. I do A LOT of erasing, so light lines are important. Usually while I’m working on the basic structure of the letters, I will start to think about the shape they will take in the end.
I am constantly working to find the center of a word or phrase. I can count letters in my head, but nothing beats a quick jot down of the phrase. I’ll then count (including spaces) and mark the middle. (This is also helpful because if a word has a lot of skinny letters – like Ilif – it will be much shorter than one with fat letters – MmNn)
(More penciling.)
At some point I will inevitably get a “better idea” and shift a bunch of letters to work better. In this case I shifted my grid up, erased and re-lettered.
Practice makes better.
One of the best consequences of lettering practice is that I’ve started to think of writing as “drawing letters” which makes it sometimes possible to write backwards or sideways. This helps with lots of things including spacing words from the center line (see above). It is also SUPER handy when you’re a lefty who tends to drag your hand through wet ink all the time.
When I have the skeleton of the letters basically where I want them, I will make decisions about how to flesh them out. My first inspiration was the word “Letter” which reminded me of a typeface I love in my very precious American Wood Type book. (We’ll be showing our favorite lettering books later in the month!)
I love to keep printed samples of type on hand to look at. I used to try to look at inspiration on a screen, but it never translated right in my brain. I’ve started saving all sorts of printed materials (filed by style) to look at when I’m lettering.
Again using a light touch, I will start to add details to the letter using my inspiration pieces. Sometimes I make little changes in a letter form to better fit my space (hey, I can do what I want!)
Sometimes the skeleton of my letters will have to move to allow for more space for some letters
and sometimes the letters stretch outside of my borders.
Once I’m happy with the general form of everything, I’ll start erasing the extraneous pencil marks.
Once they are gone, I will sometimes look at the whole thing and decide to make changes.
Like for instance, I might change the phrase itself.
But that’s okay- it’s just a sketch. If I love it I’ll take it to the next level with paints and ink, and if I don’t love it I’ll put it away to inspire me another day.
From 2014-2016 I chronicled my crafty endeavors on the site Adventures-in-Making. I’ve selected a few of those DIY’s, Recipes, and other posts to share on the site.
PHOTOS
At his heart, Safety Husband is as crafty as anyone, so when he surprised me with truffle making lessons* for Valentine’s Day I wasn’t that surprised. Turns out truffles are the perfect combination of messy (for me), science (for him), and chocolate (for the both of us.)
Let’s break it down…
Kitchen Tools
In addition to the usual mixing bowls, platters, and spatulas, there are a few things that make chocolate a lot easier. I’ve listed the tools below, along with work-arounds if you’re missing them.
Microwave: You’ll need to melt your chocolate, without getting it too hot. We used a short zaps in the microwave to do so. If you don’t have one, you can use a well-monitored double boiler. Another option is to fill a large bowl up with hot water from the tap, and set a bowl on top of it: given enough time, the steam should bring the chocolate up to a nice liquid temperature.
Infared Thermometer: Just point this sucker at a surface and you get a quick sanitary temperature. Other kitchen thermometers will work in a pinch, just make sure to stir well before testing the temperature and leave the thermometer in until you get a true reading.
Chocolate Chipper: This guy is a huge help in breaking up the slab of chocolate into smaller pieces, but it’s not absolutely necessary. You could use a strong knife, ice pick, or many other kitchen tools to do the same thing (just not as easily.)
Kitchen Scale: There’s not really a work around on this one. You’ll need a scale that will tare (to ignore the weight of your bowl). We use both a digital scale and a simpler (non-digital) taring scale for various things when cooking.
Small Scoop: You will scoop small balls of chocolate and roll them with your hand. If you don’t care as much about the shape of the truffle, a spoon will work too.
Good Chocolate makes Good Chocolate
In the class, the teacher stressed that it’s best to use quality chocolate and fresh cream- and to try a bunch of different types to see what you like best. We’ve been using a Gourmet Bittersweet purchased from the Chocolate Man in Seattle, and used cocoa from them as well. I’m excited to try a million different kinds of chocolate- but I have learned the lesson that having truffles readily available stretches self control to its limits.
Garden Mint Chocolate Truffles
Recipe Type: Dessert
Author: Alison – Adapted from the Chocolate Man in Seattle
Serves: 36 pieces
Use fresh mint and a touch of mint extract to build a well rounded and very minty truffle. (Not a fan of mint? Leave it out and you’ll have amazing basic truffles.)
Ingredients
1/2 cup Cream?
8 oz. Bittersweet Chocolate
1 oz. Fresh Chopped Mint
1-4 drops of peppermint extract (to taste)
1 cup Cocoa Powder
Instructions
Measure out 8oz. of chunks of chocolate in a large microwavable bowl.
Microwave in small zaps– 10-20 seconds at a time– stirring in between until most of the chocolate has begun to melt. The warmer portions should melt the remaining chunks while you stir. (It takes us approx. 60 seconds to melt the chocolate.) The chocolate should never get above 165˚; it should be more like 100˚
Pour cream and mint into a small sauce pan and bring to a boil, then remove it from heat. Allow cream to cool to approximately 105˚.
Taste cream and add a 1-4 drops of peppermint extract to taste.
Pour the cream and mint mixture over a strainer into your melted chocolate. Immediately begin to mix the cream and chocolate with quick strong strokes. Make sure to get all the cream and chocolate off the sides of the bowl into the main mixture.
When the chocolate mixture is completely mixed, cover your bowl and set in a cool dry place to harden overnight.
When the chocolate and cream mixture (ganache) has cooled, it’s time to roll the truffles.
Fill a small bowl with cocoa.
Scoop a ball of ganache, and drop it into your hand. Quickly roll the ball into a sphere, then drop it in the cocoa.
Roll the ball through the cocoa powder to coat the sides, then gently place it on a platter.
Repeat until you have turned all the ganache into truffles.
Cover and refrigerate the truffles for up to 10 days.
3.4.3177
Day 1: Making the Ganache
Measure out 8oz. of chunks of chocolate in a large microwavable bowl.
Microwave in small zaps– 10-20 seconds at a time– stirring in between until most of the chocolate has begun to melt.
The warmer portions should melt the remaining chunks while you stir. (It takes us approx. 60 seconds to melt the chocolate.) The chocolate should never get above 165˚; it should be more like 100˚
Pour cream and mint into a small sauce pan and bring to a boil, then remove it from heat. Allow cream to cool to approximately 105˚.
Taste cream and add a 1-4 drops of peppermint extract to taste.
Pour the cream and mint mixture over a strainer into your melted chocolate.
Immediately begin to mix the cream and chocolate with quick strong strokes. Make sure to get all the cream and chocolate off the sides of the bowl into the main mixture.
When the chocolate mixture is completely mixed, cover your bowl and set in a cool dry place to harden overnight.
Day 2: Forming the Truffles
When the chocolate and cream mixture (ganache) has cooled, it’s time to roll the truffles. Fill a small bowl with cocoa.
It’s handy to have cool, dry hands when you’re working with the ganache; but no matter what you do, you will be covered in chocolate. Might I recommend an apron?
Scoop a ball of ganache, and drop it into your clean, dry hand. Quickly roll the ball into a sphere, then drop it in the cocoa.
Roll the ball through the cocoa powder to lightly coat all sides, then gently place it on a platter.
Repeat until you have turned all the ganache into truffles, or you get too full to finish and just start eating it with a spoon.
Storing and Gifting
Cover any remaining truffles and store in your refrigerator. They are usually best eaten in the first week.
If you’d like to share the love, you can get really creative with your presentation, or keep it simple by wrapping them in a small covering of parchment paper.
Ours didn’t last long enough. We really like chocolate.
*If you’re in the Seattle area, I highly recommend the “Introduction to Truffles” class at Chocolate Man. It was a great experience, and made us feel really confident about experimenting with different methods. You can tell Bill really loves chocolate, and science, and teaching. Chocolate Man also has a great selection of pre-made chocolate creations, chocolate supplies, and even tools to rent (CHOCOLATE. FOUNTAIN.)
From 2014-2016 I chronicled my crafty endeavors on the site Adventures-in-Making. I’ve selected a few of those DIY’s, Recipes, and other posts to share on the site.
In typical cat fashion, my kitties seem to like toys that are not intended to be toys at all. You might think it’s a child-safe plug cover, but they think it’s the neatest thing since canned tuna. For a while they have been sharing a repurposed jack-o-lantern drawstring bag filled with catnip- and I decided it was time to give them something a little nicer. They do love the scale of the jack-o-lantern bag, which is long and wide unlike most catnip toys, so I decided to replicate the scale with a super-simple catnip kicking bag.
I wanted to customize the bags a bit, and I kept thinking about the lovely art Tara Bliven shared with us last month. I asked if she would write up a few feline words for us, and she did! You can use the free printable below to make this cat toy even cattier!
Download and print out the Cat Fabric according to the specifications on the package.
Cut the fabric in half to make a sheet 10″ x 3.75″. Peel the backing paper off the fabric and stack it on top of the two pieces of thick fabric- with “right sides” facing out.
Stitch, 1/2″ in, around three sides and leave the fourth open.
Pour at least a teaspoon of dried catnip in the middle of your pocket…
Close the last side of the bag, and trim around it with pinking shears to limit fraying (and add character.)
Repeat with the second set of materials, and you’re done! A super cute sewing project that’s quick enough that you won’t mind when your kitties shed all over it. Now for the fun part…
(Warning, you are about to be bombarded with too many pictures of my kitties.)
The dangers of catnip trips. Very unflattering photos.
Success.
A couple of notes
The printable fabric is quite thin and I didn’t trust it to contain the catnip for very long, so I used it as an outside layer only. The catnip itself is contained within two layers of thicker fabric.
If you’re feeling adventurous, try this tutorial to make your own printable fabric!
Tara is a wizard at decorative writing (and many other arts). Visit her website tarabliven.com to find out how you can bring more of her awesomeness into your life.
From 2014-2016 I chronicled my crafty endeavors on the site Adventures-in-Making. I’ve selected a few of those DIY’s, Recipes, and other posts to share on the site.
I like to “joke” that I have a kitten biological clock. Every couple of years I start thinking about how much fun kittens are, and how cute, and how nice it would be to have the pitter patter of little feet.
Dangerous.
To nip this in the bud this year, I’ve signed up for some future fostering, and came up with this little kitten pocket to bridge the gap. It’s based on a picture of Wee Cooper (our last kitten) and I thought I would share it so you can all have a kitten pocket of your very own.
Supplies
Cotton Tote that kneads needs a kitten. It’s important to use cotton or another natural material because acetone can eat through a lot of synthetic materials.
This kitten template* printed with a laser printer or copier. Use the reversed image on the right for transferring.
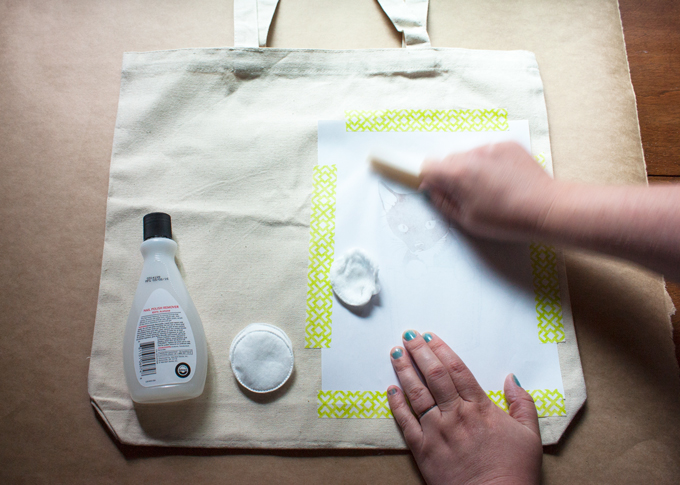
Step One: Printing and Prepping Your Template
Use a Laser Printer or Copier to print the Kitten Template* on a normal sheet of paper. Black and white is fine. It’s important to use a printer or copier that has TONER instead of ink. The transfer process with move some of that toner onto the fabric. If you try it with ink you’ll end up with a mess!
If you don’t have access to a toner-based printer or copier, or this process doesn’t work for some other reason, never fear! You can use a light table to trace the kitten on your bag, or use transfer paper to apply the design. You can see examples of those processes here and here.
After you have printed your page, cut out the cat and pocket on the right, leaving a large border.
Step Two: Layout Your Design
Decide where you want to put your kitten, and tape it firmly face down on your bag. Make sure everything is as straight and tight as you can make it.
Step Three: Blot and Burnish
Saturate a cotton pad with acetone, and press it into the paper. You will start to see the design through the paper. Saturate a small portion of the design with acetone, then switch to burnishing with your bone folder. Rub the side of the bone folder on the paper to press it firmly down into the fabric. Repeat on small sections of the design, then go back over each portion one or two times, adding more acetone and pressure.
If you can, peak to make sure that you have transferred the kitten. If not, you may want to repeat the process with more acetone and more pressure. If you see the design, move to the next step!
If you don’t see anything at all, there’s a chance your printer won’t work for this process. Don’t fear! You can use a light table to trace the kitten on your bag, or use transfer paper to apply the design. You can see examples of those processes here and here.
Step Four: Fill it in
If you used a smooth material and have a good transfer you could skip this step altogether– it’s up to you. If you’d like, use a black Sharpie to darken in the design. You can use the left side of the template as a reference for portions you can’t see as well on the transfer.
When you have the kitten filled in, use a silver Sharpie to add in the whiskers. It will show up on the black of the kitten and on the light bag as well!
When you’re done let it dry for a couple of minutes, pile all your stuff in it, and take a kitten everywhere you go.
Purrfect.
*Kitten template includes an original illustration by Alison Lang. We’re happy to share files for personal and educational purposes, but please don’t use it for anything else without our permission. Thanks!
From 2014-2016 I chronicled my crafty endeavors on the site Adventures-in-Making. I’ve selected a few of those DIY’s, Recipes, and other posts to share on the site.
Rainbows are amazing. They’re awe inspiring in the sky, they are a great way to organize things*, and they are just plain magical.
This little recycled rainbow mobile tries to be a few of those things- and has the added bonus of being a nifty reason to doodle.
SUPPLIES
Thin plastic boxes and containers- like those that salads come in
A scrap ring, one cut from a plastic container lid
Thin string or baker’s twine
Thread
Safety Pin or Awl
Ruler
Use the thick material punch to cut circles out of every piece of plastic you can find. Don’t worry, the idea of using recycleables for art will make you look insane. Embrace it. (;
Use your rainbow of markers to doodle decorations on each circle. It’s okay if you have an uneven amount of some color because you think orange is terrible, just have fun!
Tie three strings to your top ring, and tie those three together to hang the ring parallel to the ground. Find a place to hang this ring while you work.
Choose one of your most popular colors (purple for me), and poke a small hole near the top of each piece with a safety pin. Cut a piece of thread approximately 12″ long, and string it through one of the holes. Tie the ends of the thread together, and attach it to the hanging ring using a lark’s head knot. Repeat this for each circle of this color.
Choose the next color in the rainbow (blue in my case) and poke each piece like you did before. This time add two inches to your thread for a length of 14″. Attach each of these pieces to your ring.
Continue by adding 2 inches to the length of each new color until you have tied all of your pieces to the ring.
When you have finished, hang it in a bright window and watch it sway and catch the light.
See, sometimes trash-art is fun!
*I may or may not be one of those people who sorts books by color. My librarian mother may be driven insane by this fact.


 Measure out 8oz. of chunks of chocolate in a large microwavable bowl.
 The warmer portions should melt the remaining chunks while you stir. (It takes us approx. 60 seconds to melt the chocolate.) The chocolate should never get above 165˚; it should be more like 100˚

 Immediately begin to mix the cream and chocolate with quick strong strokes. Make sure to get all the cream and chocolate off the sides of the bowl into the main mixture.


You must be logged in to post a comment.