AIM DIY: Add a Kitten Pocket with Polish Remover and Sharpies

img_6722kittenpocket

From 2014-2016 I chronicled my crafty endeavors on the site Adventures-in-Making. I’ve selected a few of those DIY’s, Recipes, and other posts to share on the site.

I like to “joke” that I have a kitten biological clock. Every couple of years I start thinking about how much fun kittens are, and how cute, and how nice it would be to have the pitter patter of little feet.

Dangerous.

To nip this in the bud this year, I’ve signed up for some future fostering, and came up with this little kitten pocket to bridge the gap. It’s based on a picture of Wee Cooper (our last kitten) and I thought I would share it so you can all have a kitten pocket of your very own.

img_6609kittenpocket

Supplies

  • Cotton Tote that kneads needs a kitten. It’s important to use cotton or another natural material because acetone can eat through a lot of synthetic materials.
  • 100% Acetone finger nail polish remover.
  • Cotton pads, balls, or rags.
  • Bone folder or similar tool for burnishing
  • Masking Tape
  • Sharpie Markers – Black and Silver
  • This kitten template* printed with a laser printer or copier. Use the reversed image on the right for transferring.

Step One: Printing and Prepping Your Template

Use a Laser Printer or Copier to print the Kitten Template* on a normal sheet of paper. Black and white is fine. It’s important to use a printer or copier that has TONER instead of ink. The transfer process with move some of that toner onto the fabric. If you try it with ink you’ll end up with a mess!

If you don’t have access to a toner-based printer or copier, or this process doesn’t work for some other reason, never fear! You can use a light table to trace the kitten on your bag, or use transfer paper to apply the design. You can see examples of those processes here and here.

After you have printed your page, cut out the cat and pocket on the right, leaving a large border.

img_6612kittenpocketb

Step Two: Layout Your Design

Decide where you want to put your kitten, and tape it firmly face down on your bag. Make sure everything is as straight and tight as you can make it.

img_6617kittenpocketb

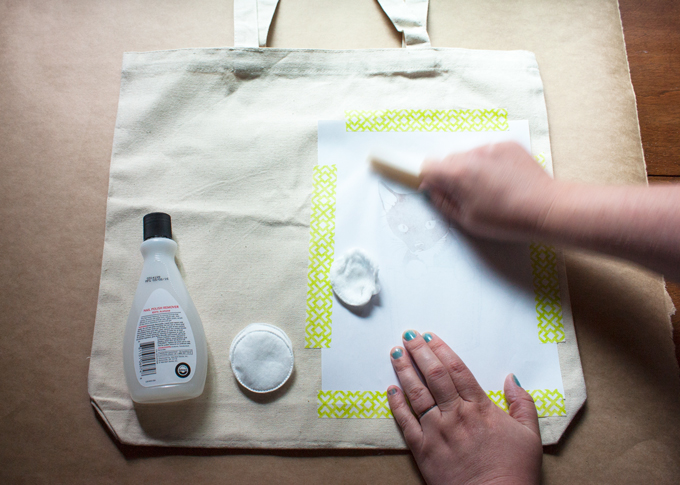
Step Three: Blot and Burnish

Saturate a cotton pad with acetone, and press it into the paper. You will start to see the design through the paper. Saturate a small portion of the design with acetone, then switch to burnishing with your bone folder. Rub the side of the bone folder on the paper to press it firmly down into the fabric. Repeat on small sections of the design, then go back over each portion one or two times, adding more acetone and pressure.

img_6620kittenpocketb

If you can, peak to make sure that you have transferred the kitten. If not, you may want to repeat the process with more acetone and more pressure. If you see the design, move to the next step!

If you don’t see anything at all, there’s a chance your printer won’t work for this process. Don’t fear! You can use a light table to trace the kitten on your bag, or use transfer paper to apply the design. You can see examples of those processes here and here.

img_6623kittenpocketb

Step Four: Fill it in

If you used a smooth material and have a good transfer you could skip this step altogether– it’s up to you. If you’d like, use a black Sharpie to darken in the design. You can use the left side of the template as a reference for portions you can’t see as well on the transfer.

img_6626kittenpocketb

When you have the kitten filled in, use a silver Sharpie to add in the whiskers. It will show up on the black of the kitten and on the light bag as well!

img_6658kittenpocket

When you’re done let it dry for a couple of minutes, pile all your stuff in it, and take a kitten everywhere you go.

img_6713kittenpocket

Purrfect.

*Kitten template includes an original illustration by Alison Lang. We’re happy to share files for personal and educational purposes, but please don’t use it for anything else without our permission. Thanks!

AIM DIY: Recycled Rainbow Mobile

From 2014-2016 I chronicled my crafty endeavors on the site Adventures-in-Making. I’ve selected a few of those DIY’s, Recipes, and other posts to share on the site.

IMG_6311_rainbowmobile

Rainbows are amazing. They’re awe inspiring in the sky, they are a great way to organize things*, and they are just plain magical.

This little recycled rainbow mobile tries to be a few of those things- and has the added bonus of being a nifty reason to doodle.

IMG_6152_rainbowmobile

SUPPLIES

IMG_6164_rainbowmobile

Use the thick material punch to cut circles out of every piece of plastic you can find. Don’t worry, the idea of using recycleables for art will make you look insane. Embrace it. (;

IMG_6179_rainbowmobile

Use your rainbow of markers to doodle decorations on each circle. It’s okay if you have an uneven amount of some color because you think orange is terrible, just have fun!

IMG_6185_rainbowmobile

Tie three strings to your top ring, and tie those three together to hang the ring parallel to the ground. Find a place to hang this ring while you work.

IMG_6425_rainbowmobile

Choose one of your most popular colors (purple for me), and poke a small hole near the top of each piece with a safety pin. Cut a piece of thread approximately 12″ long, and string it through one of the holes. Tie the ends of the thread together, and attach it to the hanging ring using a lark’s head knot. Repeat this for each circle of this color.

IMG_6197_rainbowmobile

Choose the next color in the rainbow (blue in my case) and poke each piece like you did before. This time add two inches to your thread for a length of 14″. Attach each of these pieces to your ring.

IMG_6202_rainbowmobile

Continue by adding 2 inches to the length of each new color until you have tied all of your pieces to the ring.

IMG_6213_rainbowmobile

When you have finished, hang it in a bright window and watch it sway and catch the light.

IMG_6227_rainbowmobile

IMG_6317_rainbowmobile

See, sometimes trash-art is fun!

*I may or may not be one of those people who sorts books by color. My librarian mother may be driven insane by this fact.

AIM DIY: Patio Friendly Pile-Up Cushions filled with Styrofoam Peanuts

IMG_6027_pileoncushions

From 2014-2016 I chronicled my crafty endeavors on the site Adventures-in-Making. I’ve selected a few of those DIY’s, Recipes, and other posts to share on the site.

The weather was nice for a few days in April, uncharacteristically, and began the countdown to the Pacific Northwest Summer. Ahhh; the handful of blissful weeks that makes you fall in love with the trees again, and wipes the memory of the last 8 gray months.

Safety Husband and I have been trying to be more mindful, and that extends to the way we interact with our home. We are who we are [not catalog people] and we want everything at our house to be conducive to the way we live. We have several outdoor areas that would make great external living spaces, but we haven’t done a great job of outfitting them for the task.

All this to explain why I decided I needed to make a giant pile of outdoor cushions that I could lay upon like the Princess and the Pea. I wanted them to be cheap, washable, refurbishable, and also work with our inside decor. Fabric and wood don’t do well outside over the Seattle winter, and I can’t store things in out non-existent storage space. So I put together a handful of pillow forms from scrap material, filled with recycled styrofoam peanuts; then covered them with painted canvas covers. In one afternoon I had 7 assorted cushions, and dreams of the perfect summer.

SUPPLIES

  • Fabric scissors and optional pinking shears
  • Sewing machine and thread
  • Pillow Form Fabric: approximately 24″ (2/3 yard) of 45″-wide lightweight scrap fabric per pillow
  • Pillow Cover: approximately 24″ (2/3 yard) of 52″ to 60″-wide canvas-type material per pillow
  • Styrofoam Peanuts: about a grocery sack full per pillow. Make sure that you are using styrofoam peanuts instead of the cornstarch ones that melt under water. Imagine the mess!

DECORATING SUPPLIES

Step 1: Making the Pillow Forms

IMG_5863_pileoncushions

Take your scrap pillow-form material and fold it so that the selvedged edges touch. Cut the other two sides with pinking shears so that you have an approximately 23″ square (45″x23″ unfolded.) Sew a 1/2″ seam along the two pinked edges, then do the same for about half of the remaining side.

IMG_5869_pileoncushions

Fill the form about halfway full with peanuts, then sew the opening closed to seal your pillow form.

IMG_5888_pileoncushions

Hire a professional to test the security of your stitching.

IMG_5932_pileoncushions

Repeat until you have run out of material. (I made 7 pillows so that I could make a GIANT PILE.)

Step 2: Making the Pillow Covers

IMG_5891_pileoncushions

There is dirt outside, so you want to make sure that your pillow cover can be easily removed and laundered; this also means you want to pre-wash your fabrics so there is no future shrinkage.

Cut your fabric to about 23″ wide. With the back side showing, fold the width of the fabric into a tube about 22″ wide. The overlapped pieces will make the flap for inserting and removing your pillow form.

IMG_5902_pileoncushions

Stitch up the two open ends of your tube approximately 1/4″ in.

IMG_5904_pileoncushions

Then turn the cover inside out using the open flaps. Make sure to press the corner all the way out with your finger or a pencil.

IMG_5905_pileoncushions

Stitch around the outside edges of your pillow cover, about 3/8″ in- then you’re done!

Step 3: Decorating the Cushions to Match your Life.

IMG_5911_pileoncushions

Decorating the pillows was definitely the biggest fun in this project (other than sitting in the sun on the cushions later.) If you’re a selfless person, you could share that fun with your family and friends, and let each person design a mask for their own pillow. Masking the pillow is as easy as using tape and scissors. Build shapes out of strips of tape, or cut shapes out of contact paper. (ABOVE: I used a compass to draw circles, then cut and arranged them on the front of my cover.) You could have the initials of everyone in your family, silhouettes of your pets and favorite animals… anything really.

IMG_5917_pileoncushions

Once you’ve settled on a masked design, take it outside and spray it down with your fabric spray paint. (I used Tulip Color Shot Fabric Color which is washable and flexible.) Remember that spray paint doesn’t ever go on consistently, so embrace the irregularity and leave some patches lighter than others.

After you’ve got a nice coat of paint on, let your cover dry for an hour or so before pulling off the mask.

IMG_5920_pileoncushions

Then let your covers air out for a few more hours.

When everything is dry (not sticky or smelly) you can put your pillow forms into your covers. Slip the form into the open flap, then push it down under the inner over-lapping flap. Press the corners of the form into the corners of the cover and shake and stomp it until everything looks nice.

IMG_6022_pileoncushions

Then build the tower of pillow on which you will reign.

IMG_6010_pileoncushions

IMG_6039_pileoncushions

Or, you know. Share with your friends.

IMG_6032_pileoncushions

Wheeee! Pillows.

IMG_6002_pileoncushionsB

AIM DIY: Playing Card Ornaments

IMG_3564_playingcardornamentsFrom 2014-2016 I chronicled my crafty endeavors on the site Adventures-in-Making. I’ve selected a few of those DIY’s, Recipes, and other posts to share on the site.

An old deck of cards in one hand, and the perfect Christmas Tree outside… something weird’s gonna happen.

We love games at this house. Card games, board games… you name it. I love to buy my children card games for Christmas or on their birthday as we love being able to play games with each other as a family. There are so many different card games out there that 8 year olds love to play with and so I try and find ones that are suitable for their age. We enjoy playing with them that much that I’m replacing them more regularly than I’d like to be. I don’t love worn-out cards, though, so I’ve been looking for a clever way of getting rid of a couple of our older decks. After playing with strips of paper as Christmas ornaments, I started thinking about ways to turn flat cards into 3-d shapes. Internet searches gave me a few options, including this great tutorial for making ornaments out of MTG playing cards. After following the tutorial, I made a couple of tweaks and ended up with another great collection of ornaments for our outdoor holiday tree.

IMG_3459_playingcardornaments

Supplies

  • A deck of cards
  • Thin-ish wire: I used 22 Gauge floral wire
  • Assorted beads or buttons: Make sure the wire will fit through the holes.
  • Wire clippers and pliers
  • Craft knife or paper cutter
  • Awl or large needle for piercing cards
  • Ribbon or string

IMG_3465_playingcardornaments
To begin you will cut several playing cards into 1/2″ strips. Choose 16 of those pieces to turn into your first ornament.

IMG_3471_playingcardornaments
Poke a hole, at the bottom and top of each piece, approximately 1/4″ from the end. (You should be able to pierce through multiple cards at once.)

IMG_3543_playingcardornaments
Trim a length of wire, approximately 10″ long, and put a small loop in one end. String at least one bead as a stopper, then start feeding your card pieces on, one at a time. This will be the bottom of your ornament, and the side showing from the bottom (shown above) will be the side of the card facing out on your ornament.

IMG_3527_playingcardornaments
The red side will be hidden on the inside of this ornament.

Once you have all your card pieces fed on the wire, add about 1-1/2″ of beads as spacers.

IMG_3544_playingcardornaments
Starting with the bottom piece of card, gently feed the wire through the pierced hole at the other end.

IMG_3545_playingcardornaments
Do the same with the next lowest piece of card, letting it rest against one side. Repeat with the next lowest piece of card EXCEPT let it rest on the other side of the center.

IMG_3547_playingcardornaments
Repeat this action on each piece, going back and forth between each side of the ornament. It should begin to form a sphere.

IMG_3538_playingcardornaments
There should be just enough space to feed the last (most interior) piece through. If you feel like the pieces are too cramped, you may want to gently tear a piece or two off your wire.

IMG_3550_playingcardornaments
When you have all the pieces wrapped back around, add another bead or two, make a loop in the wire, and trim. Feed a ribbon through the loop, and you have a nifty ornament!

IMG_3606_playingcardornaments

IMG_3569_playingcardornaments

Other things to try

  • Make the spacer inside the ornament longer for a more spherical ornament, or make it shorter for a more compressed “space saucer” ornament. The different shapes will need a slightly different number of card pieces, but I’ve found that they all use between 14 and 16 pieces.
  • String two ornaments on the same wire for a more complex shape.
  • Mix and match back pieces and front pieces for a striped pattern.
  • String an extra piece of beaded wire or string to the bottom of the ornament for even more decoration.
  • Go crazy with bead spacers and see what happens.

IMG_3576_playingcardornaments
What do you think? Trash to treasure?

AIM DIY: Scrap Paper Strip Ornaments

IMG_3203_paperstripornamentFrom 2014-2016 I chronicled my crafty endeavors on the site Adventures-in-Making. I’ve selected a few of those DIY’s, Recipes, and other posts to share on the site.

***

Up until the last couple of years, Safety Husband and I would go home to Texas for the holidays, and we never felt the need to decorate for the season. For the last couple of years we’ve talked about decorating the “Christmas Tree” that just happens to be growing in our upper yard, and this year we’re making it happen. I’ve been putting my brain power into making ornaments that are either weatherproof, or are meant to be thrown away in January. It’s been a great chance to work through some of the materials I’ve been… ahem… collecting.

I love vintage ornaments and paper, and after a couple of years of experimentation I was ready to combine those two loves in this one ornament design. Super quick, because they are held together by staples, a couple of basic techniques can build a whole tree’s worth of decoration.

IMG_2828_paperstripornament

Supplies

  • Stapler
  • Ribbon (3/8″ to 1/2″ wide is great)
  • Scrap Paper: I used leftover 12×12 scrapbooking paper, but catalog or magazine pages would work well too! If you’re using thin paper, you might want to double up on the number of strips per ornament.
  • Clips: binder clips work great for this, but a clothespin will work in a pinch. (Pun intended.)
  • Scissors

IMG_2867_paperstripornament
To begin, cut about eight 1/2″ strips off your paper. (You can vary the number, just make sure you have an even number of strips.)

IMG_2871_paperstripornament
Cut a length of ribbon about twice the length of your paper strips.

IMG_2900_paperstripornament
Fold the ribbon in half, and stack half the strips on each side. Staple near the bottom of the stack, away from the loop of ribbon.

IMG_2904_paperstripornament
The staple will go through all the paper and the ribbon, securing that point. (Staples must be cheating, because they make this too easy.)

IMG_2921_paperstripornament
Put a clip about halfway down the paper, clamping the whole stack of paper and ribbon. With one hand, hold the clip, and with the other gently pull on the loop of the ribbon.

IMG_2923_paperstripornament
This should cause the paper to pooch out a little on the other side of the clip. Repeat the holding and pulling step, but this time grab the ribbon loop and the two strips of paper closest to it on either side.

IMG_2926_paperstripornament
Repeat again and again, adding another strip on either side, until you reach the outer strip.

IMG_2927_paperstripornament

IMG_2931_paperstripornament
Then carefully put a staple through the area the clip was holding.

IMG_2934_paperstripornament

IMG_2936_paperstripornament
Trim any excess paper with a pair of scissors.

IMG_2950_paperstripornament
If you want, you can curl some of the extra paper to add a little decorative detail. Simply roll the paper around a small pencil or paintbrush to curl it.

IMG_2959_paperstripornament
Once you get the hang of the whole pull method, you can shake things up by doing a similar technique, upside-down.

IMG_2977_paperstripornament
Staple in the middle of your ornament, and turn each strip back down. Once you’ve turned each strip, staple them at the bottom to form a heart shape.

IMG_3014_paperstripornament
Using these two techniques you can make a whole range of funky vintage ornaments.

IMG_3448_paperstripornament
If you get sick of looking at the staples, you can replace them with a couple of stitches. Simply poke a hole in the middle of the stack, and make stitches back and forth to secure the ornament.

IMG_3457_paperstripornament
Remove the staple, and you’ll never know it was there.

IMG_3130_paperstripornament
Or spend that time making a whole army or ornaments. It’s up to you!

IMG_3271_paperstripornament
One set down, more to go.

AIM DIY: Chipboard Village with Free House Template

IMG_3735_chipboardvillage
From 2014-2016 I chronicled my crafty endeavors on the site Adventures-in-Making. I’ve selected a few of those DIY’s, Recipes, and other posts to share on the site.

***

You might have noticed things have slowed down a little over here at A-I-M. Life goes in cycles, as we know, and unfortunately it’s been tripping us up lately. I’m still making things (some of them more therapeutic than others- like the DIY below), but the timing is tricky, and sometimes things don’t make it online as quickly as they should. We’d like to ask you to be patient with us, and give us time to refresh and collect ourselves. We’ll be back to full speed before you know it.

I’ve been trying to simplify my life because I have accumulated too many “things”; and I’ve made a resolution to truly embrace the making of things, rather than the buying or the keeping. (Our house is getting smaller by the second. Someone’s cursed us, I swear!)

So rather than storing ornaments, sparkles, trees and lights, I’m making new temporary baubles from recycled materials.

With that in mind I sat down to make my version (sweet and simple) of a winter village. I built a template that you can use to start your own winter wonderland, and I hope you’ll get as much peace and joy out of it as I did.

IMG_3286_chipboardvillage

Supplies

  • Scrap Chipboard: I like to save the backs of paper pads for projects like this, or you can grab a food package out of the recycling.
  • Pen and pencil
  • bone folder or scoring device
  • Craft knife
  • Paper glue: Elmer’s works great!
  • The printed template: click here or on the pdf below.

chipboardvillage_template

IMG_3287_chipboardvillage
Chipboard is great because you can mark it simply by pressing down hard on it. To trace the template on my piece, I clipped the paper down, then…

IMG_3300_chipboardvillage
used a bone folder and ruler to score the dotted lines (that will eventually be folded).

IMG_3308_chipboardvillage
Then I traced over the rest of the lines by pressing down firmly with a pen.

IMG_3312_chipboardvillage
Once I finished tracing all the lines I had a faint guide to work with. (If you like, trace the lines lightly with a pencil to help when you’re cutting.)

IMG_3316_chipboardvillage
Like most cutting projects, it’s easier to start by removing the small pieces of the template. In this case that meant cutting out the windows, the notch on the back, and two sides of the door. (Refer to the template to make sure you are cutting only the solid line pieces.)

IMG_3322_chipboardvillage
When I had the building and roof all cut out, I used a bone folder to score the folds a little more deeply. Then I began folding each flap gently away from the score mark. (Including the roof piece.)

IMG_3333_chipboardvillage
When I had the main part of the building folded, I applied glue to the flap (shown in gray on the template sheet) and held the pieces together until the glue held firmly. (You can also use clips or clothespins to hold it closed for a bit.) Once the base of the house was holding firmly, I added glue to the roof flaps (also shown in gray) and aligned and attached the roof. (You will want to hold this together by putting your hand into the house-box and pressing the flaps against the roof.)

IMG_3414_chipboardvillage
To frost the windows, I took a piece of cello tape slightly larger than the window, and attached it to a piece that was even larger. Then I taped that frosted pane right into the window-sash. I left the door bent slightly in, to welcome little chipboard guests!

Now that you’ve got the hang of home-building, you can reuse this template by resizing it, or come up with your own design!

IMG_3347_chipboardvillage
For my second building, I used the natural folds in a cracker box, and drew windows and a door with a pencil before trimming it out. Remember to leave flaps to attach the roof! (But in a pinch, a piece of tape will work as well.) Simply erase the lines, glue everything together, and plop it into your village… and when it gets dark…

IMG_3438_chipboardvillage
slip a few LED Christmas lights under your buildings for ambiance. (The notch I included in the template is super handy for running the wires out the back of the house.) Make sure to use low-heat lights, since they will be surrounded by paper!

IMG_3730_chipboardvillage
If you’re anything like me, you won’t be able to stop at chipboard houses. I really want to add some chipboard critters… These little houses make my imagination run free.

One thing that’s for sure, they need to be surrounded by a forest. Next week I’ll show you a quick and easy way to build your own magic woods.

One note: I’m a big fan of letting the materials show in my projects, but remember you can camouflage the materials quickly by adding a little paint (spray or acrylic would work great) or by using it as a base for decoupage or collage (like our shadowbox project). Go crazy!

AIM SHOW+TELL: Easy Tiered Cardboard Display

IMG_2753_cardboarddisplay_1
From 2014-2016 I chronicled my crafty endeavors on the site Adventures-in-Making. I’ve selected a few of those DIY’s, Recipes, and other posts to share on the site.

Whenever I write a post about my favorite tools or methods I often get this wistful feeling; imagining someone inspired by the step-by-step instructions. I’m always so interested in figuring out how to use new tools, how to make everything myself– and I picture a couple of people taking some of my ideas and really making them their own. Changing up the steps, making use of their materials, and generally going crazy.

Viva creativity!

In the vacuum of cyberspace, I don’t get a chance to see too many examples of this, so while these little scenarios exist mainly in my brain, I thought I would share a simple display project inspired by my friend Tara (who LOVES spray paint), using the method from the box tutorial.

IMG_2735_cardboarddisplay_1
I’ve been wanting a nice tiered display for my Doodleware glasses, and finally I decided to build one. It simply consists of two boxes and a back flap that I painted black…

IMG_2743_cardboarddisplay_1
so that the etching detail can stand out.

Easy peasy, and basically free. It’s the perfect dimension to display the glasses in the cube I have available.

IMG_2775_cardboarddisplay_1
Now it’s that much easier to find the letter you’re looking for!

If you’ve done one of our projects, we’d love to see your finished piece! Email us at [email protected] to tell us how it went.

Have something you’re dying to know about! We love questions. Send them to us and we’ll see if we can figure it out!

AIM DIY: Finger Crochet a Round T-shirt Rag Rug

IMG_2201_roundtshirtrugFrom 2014-2016 I chronicled my crafty endeavors on the site Adventures-in-Making. I’ve selected a few of those DIY’s, Recipes, and other posts to share on the site.

****

Despite my sister’s best efforts I’ve never been able to make sense of real crochet. The “finger crochet” method I describe below is something that came out of a lot of experimentation, but I’m guessing you fiber wizards could whip up something even better! If you’ve done a similar project, or have suggestions to make this DIY more clear, please feel free to tell us about it in the comments below.

When I finished re-weaving my t-shirt rug (updated photos at the bottom of that post) I figured out two important things.

  1. There is better way to cut a t-shirt into strips (fewer, longer strips.)
  2. Once you know how to cut t-shirts into long strips, no t-shirt is safe.

IMG_1957_roundtshirtrug
Which translates to: I had a lot of leftover strips of jersey, and wanted to use them up! I started braiding, tying knots, and eventually settled on a method that can best be described as the frumpy cousin of crochet.

PREP: Cutting one long strip

Knotting small strips of jersey (demonstrated in the woven rug post) is time-consuming, so the longer the strip the better. After digging around a bit I found this video that shows how to turn a loop into one long strip.

IMG_2100_roundtshirtrugI started by cutting the large loop of the shirt from the top, and sliced across from one side, stopping about an inch from the other edge.


Then I slipped the loop over my arms, and starting at the end of one cut I cut diagonally towards the end of the next cut on the other side of the fabric. Then the whole thing unwound in a continuous strip.

MAKING THE RUG


To begin I tied a slip-knot near the end of the string by making a loop, reaching through and grabbing the strip, pulling it though and gently pulling to tighten. (There’s a great demonstration of a slip knot at the beginning of this video.)

IMG_1975_roundtshirtrug
Then I reached through that loop, pinched the strip, and pulled it through to create my first chain stitch. (See steps 2 thru 4 on this Red Heart blog post). This whole project breaks down into pulling a new loop through an old loop.

I repeated this chain stitch about 5 times, then…


tucked the loose string end through the last chain stitch to loosely close the first set of chains into a circle.

IMG_2045_roundtshirtrug
To connect the next ring of chains I pulled the next strip (navy) through two existing loops– the one I just made (pictured here closest to my thumb), and the inside of an earlier chain that lined up with my new one (closer to my fingertip).

IMG_2047_roundtshirtrug
This way my newest loop connected my existing chain to the one inside of it. I then started a pattern of 3 chain stitches, 1 connecting stitch, 3 chain stitches, 1 connecting stitch, 3 chain stitches, 1 connecting stitch, 3 chain stitches, 1 connecting stitch, 3 chain stitches, 1 connecting stitch…

IMG_2070_roundtshirtrug
going around and around the circle.

IMG_2073_roundtshirtrug
When I ran out of strips, I pulled the end of my string through the last loop, and tucked it into the rug– because one day I will have more t-shirts to dismantle, and this rug will keep getting bigger!

IMG_2253_roundtshirtrug_1

TIPS

  • As you are working, make sure not to pull your loops too tight, or stretch your chain when you’re doing a connecting stitch. The looser you work the flatter the rug will sit.
  • Different shirts will make thicker or thinner strings based on the thickness of their fabric. I opted for a very irregular look with lots of inconsistencies in my strips (width ranging from 1″ – 2″) but if you want a more regular look, stick with shirts of a similar weight, and cut your strips about 1.25″ wide.
  • If it’s looking weird, pull out your loops and start over! Once you get the hang of this version of finger crochet you’ll fly through this project, so you will quickly make up the time redoing it. Practice has never been more fun.
  • If you can, work for longish stretches to keep your tension consistent. This is a great “while watching tv or daydreaming” activity.
  • As always, plan to make one more rug than you have cats.

IMG_2196_roundtshirtrug_1

AIM DIY: Spookily Free and Easy Ghosts

IMG_1479_spookyghosts
From 2014-2016 I chronicled my crafty endeavors on the site Adventures-in-Making. I’ve selected a few of those DIY’s, Recipes, and other posts to share on the site.

When I was a kid my mom came up with all sorts of awesome crafts for us to do, and being a typical goth-in-the-making I loved the halloween crafts most of all. One year we made cheesecloth ghosts with balloons and glue and it’s a project that has haunted me to this day.

I decided that I really wanted some ghost friends, but lacking balloons and cheesecloth I decided to make some up, Alison style. (IE: Free, Quick, and Fun.)

IMG_1396_spookyghosts

SUPPLIES

  • At least a couple of feet of sheer or thin fabric – old sheets or window sheers work great!
  • All-purpose flour
  • Bottles: Soda, water, or wine. Glass or plastic.
  • Wire or wire coat hangers
  • Plastic bags
  • Rubber bands
  • Scissors
  • A bucket or bin to mix your flour paste in

Step 1: The Form

IMG_1417_spookyghosts
To begin will make a simple armature out of wire (or out of a wire hanger). Cut a piece about 24″ long, and twist it together to form one big loop.

IMG_1426_spookyghosts
Slip the loop over the neck of your bottle, and twist the arms slightly so that they sit securely on the bottle and point slightly upwards. Using a scrap piece of fabric or paper, form a ball shaped head over the neck of the bottle and secure it with a rubber band.

IMG_1440_spookyghosts
To make the armature (form of the ghost) easier to remove, cover it with a plastic grocery bag, and secure it with a rubber band.

Measure the height of your ghost form from the base, across the head, and to the base on the back side. Cut a square of fabric this size to cover your form. (This is a great time to tear your fabric instead of cutting, if you want. Frayed edges are a bonus!)

Step 2: Stiffening and Forming the Fabric

IMG_1447_spookyghosts
Although flour may not last forever when used as a paste, it works perfectly for a ghost that will only haunt your house for a year or two. Combine 4 parts water with 1 part all-purpose flour in a large container and mix well with your fingers. Soak your ghost fabric, and wring it gently.

IMG_1448_spookyghosts
Spread the fabric over the ghost form, with a corner of the fabric pointing forwards.

IMG_1450_spookyghosts
Using your creativity (and maybe a clip or two) shape the cloth as creepily as you want! (I loved adding a fold along the “hair line” so that it looked like my ghost was in a cloak.)

IMG_1456_spookyghosts
If you’d like, remove some of the excess fabric from the “arms” of your ghost. (Make sure to leave fabric puddled at the front and back; this will ensure that your ghost will sit up when it’s all dry.)

Leave your new little friend to dry overnight, with a fan blowing if you can. When it’s completely dry, gently pull the bottle form out of the stiff fabric. (If it’s not firm enough to stand, you can mix up some more of the flour and water and paint it onto your fabric while it’s still on the form. You may want to use a higher ratio of flour to water.)

IMG_1477_spookyghosts
Boo!

IMG_1485_spookyghosts

IMG_1505_spookyghosts
If you’re feeling extra crafty, you can paint right on your ghosts with watercolor or acrylic paints. I have some scary plans for one of mine.

IMG_1482_spookyghosts

Use What You’ve Got!

If you don’t have scraps of fabric lying around, this project is also fun with thin paper, tissue paper, or even paper towels. Just make one adjustment: instead of soaking the paper in your paste, lay the paper across your form and paint the paste on with your fingers or a craft paint brush. Saturate the paper slowly and let it fall again the form. You can add multiple layers of paper for more texture (like the tissue paper ghost above) and even cut out a mouth and eyes!

Stick an LED “candle” in it, and things get even creepier!

IMG_1626_spookyghosts
Scary Ghost Sound!

What’s frightening you this season?

AIM DIY: No Sew Woven T-Shirt Rag Rug

IMG_1337_tshirtrug
From 2014-2016 I chronicled my crafty endeavors on the site Adventures-in-Making. I’ve selected a few of those DIY’s, Recipes, and other posts to share on the site.

A couple of months ago I tore up the carpet in my office and replaced it with a wood-ish surface. It’s been great through these warm months, but I want something to stand on when the cold sneaks in. Couple that need with a stack of t-shirts left over from the quilt project, and you have my newest best friend, the t-shirt rag rug.

IMG_1019_tshirtrug
I built a 30″x30″ make-shift loom out of a piece of plywood and scrap wood, but if you search online you can find frames built from pretty much anything. (A Beautiful Mess used cotton scraps and a big piece of cardboard. Also, Pinterest)

IMG_1016_tshirtrug
I put nails along each end, 1 inch apart. Good hammer practice for a hammer novice.

IMG_1063_tshirtrug
With the loom assembled, I moved to materials.

SUPPLIES

Stripping

The rug was built with 1.5″ loops for the warp (base strips) of my rug, and 1.75″ strips woven through.

IMG_1044_tshirtrug
I used a large straight rotary blade and a metal ruler to cut three navy shirts into the 1.5″ loops, then cut the rest of the shirts into 1.75″ strips. (This is a very forgiving fabric, so estimation is ok!)

IMG_1072_tshirtrug
I hooked the navy warp pieces on each side of the loom using the natural loop and stretch of the t-shirt.

IMG_1086_tshirtrug
I prepared to weave by attaching the first strip to the first warp loop. I cut a slit in one end of the strip, fed the other end around the first warp piece and back through the slit. Then I pulled it tightly and began to weave.

Not a normal knot.

I connected a lot of strips to finish this rug using the method shown below. It’s quick and tidy, and ensured you don’t have a lot of extra bulk at your connection points.

IMG_1222_tshirtrug

  1. Cut a small slit in the ends of each strip.
  2. Feed the new strip into the hole at the end of the other.
  3. Take the other end of the new strip and feed it through the slit on the same strip.
  4. Pull on the new end to tighten the knot. Smooth or trim extra material if needed.

(The video below shows how I knotted at the end of a strip.)

Now Weave!

IMG_1112_tshirtrug
Starting at that first warp piece, I wove in and out of each loop to the end of the loom. At the end I wrapped either over or under the last piece to start back down the loom. The second strand went over the strands that the first went under, and vice versa.

IMG_1122_tshirtrug
From there it was basically rinse and repeat. I wove back and forth, connecting strips and changing colors.

IMG_1139_tshirtrug
When possible I fed the strip through the warp flat, then pulled it down with my fingers to bunch it up.

IMG_1223_tshirtrug
The pattern and color combination were very important to me, and I got more and more excited as I worked on it. When I put the final strip in, I tied it off using a normal knot on the last piece of navy.

Finishing it off

Here’s where I admit this rug is really just a gigantic pot holder, and I finished it off the same way. I pulled the first warp loop free and fed the second through it, then fed the third through that one, and so on down the line. (Video Below)

IMG_1330_tshirtrug
Once I was down to the last two loops, I changed tactics. I cut the loop of the last piece, fed one strip through the second to last loop and tied it off.

IMG_1334_tshirtrug
I did the same thing on the other end and suddenly had a rug in front of me.

IMG_1350_tshirtrug

IMG_1344_tshirtrug
After basking in the last moments of sunshine, I rolled up the rug and brought it inside.

IMG_1360_tshirtrug
Where it was immediately claimed by another friend…

IMG_1368_tshirtrug
Cooper.

IMG_1380_tshirtrug
Looks like I’ll have to weave another rug for myself.

Next Time

  • The next rug will be bigger. Once I took this one off the loom it shrunk down a bit, and I love it too much for it to be small.
  • I won’t pull the woven strands as tightly, which will hopefully help with the shrinking.
  • Maybe I’ll try non-stretch cotton scraps?
  • I will plan to move the loom frame around a lot, and possibly rig up some way of leaning it upright while I’m weaving. Working flat gave me a back-ache.
  • I will take it in little batches, weaving in front of the tv or in public. If I weave in public I will look very serious about turning scraps into a comfy rug.

A sign of a successful project is the ability to look forward to the next one.

UPDATE: I enjoyed this project so much that I decided to remake this rug- BIGGER! I built a much larger loom using scrap wood and screws, then followed the same process to build this monstrosity. It sits cozily by my work table now, warms my feet, and makes me happy.

IMG_2188_roundtshirtrug