AIM DIY: Chipboard Village with Free House Template

IMG_3735_chipboardvillage
From 2014-2016 I chronicled my crafty endeavors on the site Adventures-in-Making. I’ve selected a few of those DIY’s, Recipes, and other posts to share on the site.

***

You might have noticed things have slowed down a little over here at A-I-M. Life goes in cycles, as we know, and unfortunately it’s been tripping us up lately. I’m still making things (some of them more therapeutic than others- like the DIY below), but the timing is tricky, and sometimes things don’t make it online as quickly as they should. We’d like to ask you to be patient with us, and give us time to refresh and collect ourselves. We’ll be back to full speed before you know it.

I’ve been trying to simplify my life because I have accumulated too many “things”; and I’ve made a resolution to truly embrace the making of things, rather than the buying or the keeping. (Our house is getting smaller by the second. Someone’s cursed us, I swear!)

So rather than storing ornaments, sparkles, trees and lights, I’m making new temporary baubles from recycled materials.

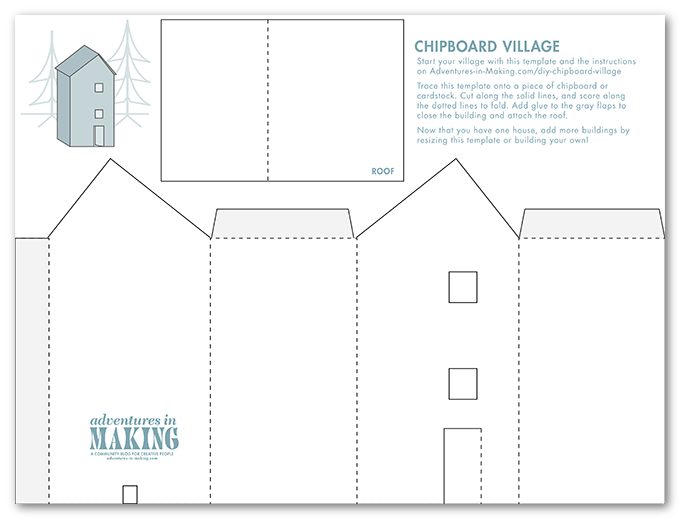
With that in mind I sat down to make my version (sweet and simple) of a winter village. I built a template that you can use to start your own winter wonderland, and I hope you’ll get as much peace and joy out of it as I did.

IMG_3286_chipboardvillage

Supplies

  • Scrap Chipboard: I like to save the backs of paper pads for projects like this, or you can grab a food package out of the recycling.
  • Pen and pencil
  • bone folder or scoring device
  • Craft knife
  • Paper glue: Elmer’s works great!
  • The printed template: click here or on the pdf below.

chipboardvillage_template

IMG_3287_chipboardvillage
Chipboard is great because you can mark it simply by pressing down hard on it. To trace the template on my piece, I clipped the paper down, then…

IMG_3300_chipboardvillage
used a bone folder and ruler to score the dotted lines (that will eventually be folded).

IMG_3308_chipboardvillage
Then I traced over the rest of the lines by pressing down firmly with a pen.

IMG_3312_chipboardvillage
Once I finished tracing all the lines I had a faint guide to work with. (If you like, trace the lines lightly with a pencil to help when you’re cutting.)

IMG_3316_chipboardvillage
Like most cutting projects, it’s easier to start by removing the small pieces of the template. In this case that meant cutting out the windows, the notch on the back, and two sides of the door. (Refer to the template to make sure you are cutting only the solid line pieces.)

IMG_3322_chipboardvillage
When I had the building and roof all cut out, I used a bone folder to score the folds a little more deeply. Then I began folding each flap gently away from the score mark. (Including the roof piece.)

IMG_3333_chipboardvillage
When I had the main part of the building folded, I applied glue to the flap (shown in gray on the template sheet) and held the pieces together until the glue held firmly. (You can also use clips or clothespins to hold it closed for a bit.) Once the base of the house was holding firmly, I added glue to the roof flaps (also shown in gray) and aligned and attached the roof. (You will want to hold this together by putting your hand into the house-box and pressing the flaps against the roof.)

IMG_3414_chipboardvillage
To frost the windows, I took a piece of cello tape slightly larger than the window, and attached it to a piece that was even larger. Then I taped that frosted pane right into the window-sash. I left the door bent slightly in, to welcome little chipboard guests!

Now that you’ve got the hang of home-building, you can reuse this template by resizing it, or come up with your own design!

IMG_3347_chipboardvillage
For my second building, I used the natural folds in a cracker box, and drew windows and a door with a pencil before trimming it out. Remember to leave flaps to attach the roof! (But in a pinch, a piece of tape will work as well.) Simply erase the lines, glue everything together, and plop it into your village… and when it gets dark…

IMG_3438_chipboardvillage
slip a few LED Christmas lights under your buildings for ambiance. (The notch I included in the template is super handy for running the wires out the back of the house.) Make sure to use low-heat lights, since they will be surrounded by paper!

IMG_3730_chipboardvillage
If you’re anything like me, you won’t be able to stop at chipboard houses. I really want to add some chipboard critters… These little houses make my imagination run free.

One thing that’s for sure, they need to be surrounded by a forest. Next week I’ll show you a quick and easy way to build your own magic woods.

One note: I’m a big fan of letting the materials show in my projects, but remember you can camouflage the materials quickly by adding a little paint (spray or acrylic would work great) or by using it as a base for decoupage or collage (like our shadowbox project). Go crazy!

AIM SHOW+TELL: Easy Tiered Cardboard Display

IMG_2753_cardboarddisplay_1
From 2014-2016 I chronicled my crafty endeavors on the site Adventures-in-Making. I’ve selected a few of those DIY’s, Recipes, and other posts to share on the site.

Whenever I write a post about my favorite tools or methods I often get this wistful feeling; imagining someone inspired by the step-by-step instructions. I’m always so interested in figuring out how to use new tools, how to make everything myself– and I picture a couple of people taking some of my ideas and really making them their own. Changing up the steps, making use of their materials, and generally going crazy.

Viva creativity!

In the vacuum of cyberspace, I don’t get a chance to see too many examples of this, so while these little scenarios exist mainly in my brain, I thought I would share a simple display project inspired by my friend Tara (who LOVES spray paint), using the method from the box tutorial.

IMG_2735_cardboarddisplay_1
I’ve been wanting a nice tiered display for my Doodleware glasses, and finally I decided to build one. It simply consists of two boxes and a back flap that I painted black…

IMG_2743_cardboarddisplay_1
so that the etching detail can stand out.

Easy peasy, and basically free. It’s the perfect dimension to display the glasses in the cube I have available.

IMG_2775_cardboarddisplay_1
Now it’s that much easier to find the letter you’re looking for!

If you’ve done one of our projects, we’d love to see your finished piece! Email us at [email protected] to tell us how it went.

Have something you’re dying to know about! We love questions. Send them to us and we’ll see if we can figure it out!

AIM DIY: Finger Crochet a Round T-shirt Rag Rug

IMG_2201_roundtshirtrugFrom 2014-2016 I chronicled my crafty endeavors on the site Adventures-in-Making. I’ve selected a few of those DIY’s, Recipes, and other posts to share on the site.

****

Despite my sister’s best efforts I’ve never been able to make sense of real crochet. The “finger crochet” method I describe below is something that came out of a lot of experimentation, but I’m guessing you fiber wizards could whip up something even better! If you’ve done a similar project, or have suggestions to make this DIY more clear, please feel free to tell us about it in the comments below.

When I finished re-weaving my t-shirt rug (updated photos at the bottom of that post) I figured out two important things.

  1. There is better way to cut a t-shirt into strips (fewer, longer strips.)
  2. Once you know how to cut t-shirts into long strips, no t-shirt is safe.

IMG_1957_roundtshirtrug
Which translates to: I had a lot of leftover strips of jersey, and wanted to use them up! I started braiding, tying knots, and eventually settled on a method that can best be described as the frumpy cousin of crochet.

PREP: Cutting one long strip

Knotting small strips of jersey (demonstrated in the woven rug post) is time-consuming, so the longer the strip the better. After digging around a bit I found this video that shows how to turn a loop into one long strip.

IMG_2100_roundtshirtrugI started by cutting the large loop of the shirt from the top, and sliced across from one side, stopping about an inch from the other edge.


Then I slipped the loop over my arms, and starting at the end of one cut I cut diagonally towards the end of the next cut on the other side of the fabric. Then the whole thing unwound in a continuous strip.

MAKING THE RUG


To begin I tied a slip-knot near the end of the string by making a loop, reaching through and grabbing the strip, pulling it though and gently pulling to tighten. (There’s a great demonstration of a slip knot at the beginning of this video.)

IMG_1975_roundtshirtrug
Then I reached through that loop, pinched the strip, and pulled it through to create my first chain stitch. (See steps 2 thru 4 on this Red Heart blog post). This whole project breaks down into pulling a new loop through an old loop.

I repeated this chain stitch about 5 times, then…


tucked the loose string end through the last chain stitch to loosely close the first set of chains into a circle.

IMG_2045_roundtshirtrug
To connect the next ring of chains I pulled the next strip (navy) through two existing loops– the one I just made (pictured here closest to my thumb), and the inside of an earlier chain that lined up with my new one (closer to my fingertip).

IMG_2047_roundtshirtrug
This way my newest loop connected my existing chain to the one inside of it. I then started a pattern of 3 chain stitches, 1 connecting stitch, 3 chain stitches, 1 connecting stitch, 3 chain stitches, 1 connecting stitch, 3 chain stitches, 1 connecting stitch, 3 chain stitches, 1 connecting stitch…

IMG_2070_roundtshirtrug
going around and around the circle.

IMG_2073_roundtshirtrug
When I ran out of strips, I pulled the end of my string through the last loop, and tucked it into the rug– because one day I will have more t-shirts to dismantle, and this rug will keep getting bigger!

IMG_2253_roundtshirtrug_1

TIPS

  • As you are working, make sure not to pull your loops too tight, or stretch your chain when you’re doing a connecting stitch. The looser you work the flatter the rug will sit.
  • Different shirts will make thicker or thinner strings based on the thickness of their fabric. I opted for a very irregular look with lots of inconsistencies in my strips (width ranging from 1″ – 2″) but if you want a more regular look, stick with shirts of a similar weight, and cut your strips about 1.25″ wide.
  • If it’s looking weird, pull out your loops and start over! Once you get the hang of this version of finger crochet you’ll fly through this project, so you will quickly make up the time redoing it. Practice has never been more fun.
  • If you can, work for longish stretches to keep your tension consistent. This is a great “while watching tv or daydreaming” activity.
  • As always, plan to make one more rug than you have cats.

IMG_2196_roundtshirtrug_1