AIM DIY: Turn a Tea Towel into the Simplest Apron

IMG_4401_teatowelapronFrom 2014-2016 I chronicled my crafty endeavors on the site Adventures-in-Making. I’ve selected a few of those DIY’s, Recipes, and other posts to share on the site.

My cooking style is much like a cartoon: with ingredients flying everywhere, sauces spilling across every surface, and flour covering every inch of my clothing.

Aprons and abundant cleaning cloths are an absolute necessity. Since I like to cook my aprons need frequent washing, so I set out to make one to spare from a fun tea towel. (Before you ask, this lovely tea towel is from Seattle local Sunday Drive Designs.)

IMG_4029_teatowelapron

SUPPLIES

  • One pre-washed and lightly ironed tea towel
  • About 3 yards of fabric ribbon
  • Corresponding thread
  • Straight pins
  • Scissors
  • A sewing machine or hand needles

IMG_4053_teatowelapron
This design breaks down very simply into a tie around your waist, and a loop around the back of your neck.

Start by holding the tea towel up in front of you, and marking with a straight pin where your natural waist is. (For me, it was about 1/3 of the way from the top of the tea towel, at about 9″.) Cut a length of about 2 yards from your ribbon, and pin it across your tea towel at the point you marked.

IMG_4055_teatowelapron
Cut two more lengths of ribbon, on 12″ long and one 24″ long. One each piece, fold about 1″ underneath, and pin to one of the upper corners of the tea towel.

IMG_4056_teatowelapron
Now to the sewing! I used a straight stitch on my machine to attach the ribbons to the tea towel (which I show below) but if you don’t have a machine, don’t fret! You can hand stitch these pieces on without too-much trouble, just give yourself a little time.

IMG_4072_teatowelapron
If you’re using a machine, follow the waist tie with a straight stitch, about 1/4″ from the edges.

IMG_4064_teatowelapron
Then tack the neck straps on each side. (I stitched an “X” shape across the tab for reinforcement.)

With all the ribbon ties attached, slip on the apron and tie the pieces.(The knot of the neck strap will be on one side, since one strip is longer than the other.) Check the length of all the pieces, and trim the ends off of any of the pieces that are way too long. Make sure not to trim any of the pieces too short! You might want to share the apron with someone who is a different size.

Once the pieces are trimmed, take off the apron to finish the edges of the ribbon.

IMG_4081_teatowelapron
Fold about 3/4″ of the ribbon under, then fold again to hide the raw edge of the ribbon. Pin it flat, and repeat on all of the raw edges.

IMG_4082_teatowelapron
Finish by stitching the fold down on each end. Bang! Done.

IMG_4413_teatowelapron
Super simple (and cute) protection from dangerous food-shrapnel.
No more will people know everything about you by the stains on your clothing. You can hide those stains on an apron instead.

IMG_4398_teatowelapron
Sneaky.

AIM DIY: Photo Album Pop-up Ornaments

From 2014-2016 I chronicled my crafty endeavors on the site Adventures-in-Making. I’ve selected a few of those DIY’s, Recipes, and other posts to share on the site.

Okay. I’ll admit it. I have possibly been making too many ornaments.

The floor is covered in little bits of paper, the ribbons are everywhere, and cat is oh so happy. (Happy and thus in the background of many of my photos.) I can’t help it. I’ve given myself over to the ornament bug, and even though I’ve told myself that these are ‘just this year’s ornaments’, I’m not sure I’ll have the self control to throw them all away.

I need a crafter help line… or maybe I can just spread the decoration disease and have you all join me in the madness. (*evil laughter*)

My sister recently handed over a large bag of family photos, and after the proper period of mortification I decided that I needed to do something with them. The best part about being in charge of photo projects is that you can include only adorable pictures of yourself, and edit out the slightly more awkward times.

I pulled together a selection of photos of family that yelled “HAPPY HOLIDAYS, Y’ALL!” Scanned and shrank them, then pulled out a few basic tools to turn the faces I love into ornaments I’ll cherish.

IMG_3792_photoalbumornaments

SUPPLIES

  • Resized photos printed on medium-heavy weight paper
  • Extra colored paper or cardstock
  • Medium to large hole punches– any symmetrical shape will work, I used circles and ovals
  • Ribbon or string
  • Buttons, bells, or beads
  • Paper glue or adhesive

IMG_3802_photoalbumornaments
To begin I punched my favorite people out of my favorite photos, and the same number of circles out of cardstock. Then I chose between 4 and 6 of my favorites, the same number of solid circles, and folded each in half– top to bottom.

IMG_3806_photoalbumornaments
I chose a button than matched my cardstock, then cut about 16 inches of string and fed it through the button.

IMG_3811_photoalbumornaments
I used my Scotch ATG gun to apply adhesive to each folded piece (glue works too).

IMG_3817_photoalbumornaments
I attached each piece to the one before it in a stack, alternating photos and cardstock. (Make sure that you don’t accidentally glue your sister in upside-down. She wouldn’t like that. All photos should point the same way.)

IMG_3823_photoalbumornaments
I laid the string and button across the spine of my stack (button on the bottom), added a little adhesive to one of the folded pieces, and attached the top and bottom piece to form a ball shape.

IMG_3825_photoalbumornaments
Then I fed another button on above the ball, tied a knot, and fluffed open all the pages.

IMG_3827_photoalbumornaments
I love how simple they look from far away, but each page is a memory of the holidays and of my family.

IMG_3842_photoalbumornaments
I did a few variations, using different punches, and combining shapes on one ribbon; but they are all put together the same way which means I could spend more time remembering good times than obsessing over the process.


It also means it’s a great project for kids, who might get a thrill out of punching holes out of photos.
IMG_3898_photoalbumornaments
and keeping them forever.

AIM DIY: Finger Crochet a Round T-shirt Rag Rug

IMG_2201_roundtshirtrugFrom 2014-2016 I chronicled my crafty endeavors on the site Adventures-in-Making. I’ve selected a few of those DIY’s, Recipes, and other posts to share on the site.

****

Despite my sister’s best efforts I’ve never been able to make sense of real crochet. The “finger crochet” method I describe below is something that came out of a lot of experimentation, but I’m guessing you fiber wizards could whip up something even better! If you’ve done a similar project, or have suggestions to make this DIY more clear, please feel free to tell us about it in the comments below.

When I finished re-weaving my t-shirt rug (updated photos at the bottom of that post) I figured out two important things.

  1. There is better way to cut a t-shirt into strips (fewer, longer strips.)
  2. Once you know how to cut t-shirts into long strips, no t-shirt is safe.

IMG_1957_roundtshirtrug
Which translates to: I had a lot of leftover strips of jersey, and wanted to use them up! I started braiding, tying knots, and eventually settled on a method that can best be described as the frumpy cousin of crochet.

PREP: Cutting one long strip

Knotting small strips of jersey (demonstrated in the woven rug post) is time-consuming, so the longer the strip the better. After digging around a bit I found this video that shows how to turn a loop into one long strip.

IMG_2100_roundtshirtrugI started by cutting the large loop of the shirt from the top, and sliced across from one side, stopping about an inch from the other edge.


Then I slipped the loop over my arms, and starting at the end of one cut I cut diagonally towards the end of the next cut on the other side of the fabric. Then the whole thing unwound in a continuous strip.

MAKING THE RUG


To begin I tied a slip-knot near the end of the string by making a loop, reaching through and grabbing the strip, pulling it though and gently pulling to tighten. (There’s a great demonstration of a slip knot at the beginning of this video.)

IMG_1975_roundtshirtrug
Then I reached through that loop, pinched the strip, and pulled it through to create my first chain stitch. (See steps 2 thru 4 on this Red Heart blog post). This whole project breaks down into pulling a new loop through an old loop.

I repeated this chain stitch about 5 times, then…


tucked the loose string end through the last chain stitch to loosely close the first set of chains into a circle.

IMG_2045_roundtshirtrug
To connect the next ring of chains I pulled the next strip (navy) through two existing loops– the one I just made (pictured here closest to my thumb), and the inside of an earlier chain that lined up with my new one (closer to my fingertip).

IMG_2047_roundtshirtrug
This way my newest loop connected my existing chain to the one inside of it. I then started a pattern of 3 chain stitches, 1 connecting stitch, 3 chain stitches, 1 connecting stitch, 3 chain stitches, 1 connecting stitch, 3 chain stitches, 1 connecting stitch, 3 chain stitches, 1 connecting stitch…

IMG_2070_roundtshirtrug
going around and around the circle.

IMG_2073_roundtshirtrug
When I ran out of strips, I pulled the end of my string through the last loop, and tucked it into the rug– because one day I will have more t-shirts to dismantle, and this rug will keep getting bigger!

IMG_2253_roundtshirtrug_1

TIPS

  • As you are working, make sure not to pull your loops too tight, or stretch your chain when you’re doing a connecting stitch. The looser you work the flatter the rug will sit.
  • Different shirts will make thicker or thinner strings based on the thickness of their fabric. I opted for a very irregular look with lots of inconsistencies in my strips (width ranging from 1″ – 2″) but if you want a more regular look, stick with shirts of a similar weight, and cut your strips about 1.25″ wide.
  • If it’s looking weird, pull out your loops and start over! Once you get the hang of this version of finger crochet you’ll fly through this project, so you will quickly make up the time redoing it. Practice has never been more fun.
  • If you can, work for longish stretches to keep your tension consistent. This is a great “while watching tv or daydreaming” activity.
  • As always, plan to make one more rug than you have cats.

IMG_2196_roundtshirtrug_1

AIM TOOLBOX: Water Color Masking Fluid

IMG_7722
From 2014-2016 I chronicled my crafty endeavors on the site Adventures-in-Making. I’ve selected a few of those DIY’s, Recipes, and other posts to share on the site.

I love playing with watercolors, I’m going to admit that right now. I love the way the colors run together, the little blotches of pigment, and basically everything else about it. I’m not a watercolor expert, which means that whenever the paint does something unexpected I have the giddy feeling that I just discovered something amazing. (What did I tell you? I love the process.)

My philosophy teacher in high school used to amazing things with watercolor, and I would always try to sneak a look at his paintings before and after class. One day I noticed him using something to cover up portions of the paper while he was working– cut to 15 years later and I finally decide to buy myself a little bottle of masking fluid to play around with. (I bought Winsor & Newton Colorless Art Masking Fluid.)

IMG_7588
Still a little overwhelmed to jump in, I watched this introductory video, decided on a test project; and gathered my brushes, paints, and spirit of exploration.

IMG_7677
A note: the first time I used the fluid, I ruined my brush. It was a cheap brush, granted, but after that I sharpened up and coated the next brush in dish soap before dipping it in the masking fluid. I coated the whole thing in the dish soap, then squeezed the excess out. (This video shows you how.) Trust me. It’s better that way.

IMG_7610
I drew a basic outline of the words I wanted to mask out with pencil. After coating the brush in soap, and gently rolling the bottle of masking fluid to mix it up, I dipped my brush in and saturated it.

IMG_7611
Bit by bit, I covered the words with the masking fluid.

IMG_7612
All the lines are covered in the fluid now. I’ll be able to erase the pencil lines once everything is done.

IMG_7619
I let the masking fluid dry COMPLETELY before I began to paint with my watercolor. (The dry masking compound feels like rubber cement. You’ll know it’s dry when it is only slightly shiny, and your finger does not stick to it.) The watercolor will not stick to the mask, so you will be able to see what you’re working with.

IMG_7685
When I had finished my first layer of paint, I let it dry COMPLETELY, then added a little more masking to what would be the little abstract windows in the buildings.

IMG_7691
Then I let those dry COMPLETELY (do you see a theme here?) before I went in and darkened all the fields of color.

IMG_7703
When I was done working around my masked areas, and everything was dry, I lightly rubbed the masking agent off with the tips of my fingers. (This alone is worth the trouble. I love pulling glue off of things.)

IMG_7708
Once the mask was off, and I did a little erasing, I had crisp white lines to work with.

IMG_7712
The masked areas were pale enough to let me add a little light yellow watercolor. I love the way the white letters stand out.

Tips to remember

• Test out the water color paper you’re going to be using before you start your artwork. Some of the papers I tried stuck to the masking fluid terribly, and I had to tear the paper to get the dried mask off.
• Coat your brush in soap, or you will ruin a brush, and most likely the piece of paper you’re working on. The first brush started to pull the drying mask fluid back off the paper, and it totally ruined one of my projects.
• Let everything dry COMPLETELY before moving from fluid to paint, or paint to fluid. The fluid will cling to wet paper, or your wet paint and make a wet mess.
• Remember to have fun! Let that childish sense of wonder take over for an afternoon… and when you’re done experimenting, send us the outcome! April’s DIY Challenge is Watercolor, after all.

AIM DIY: Pom-pom Cat Toy

From 2014-2016 I chronicled my crafty endeavors on the site Adventures-in-Making. I’ve selected a few of those DIY’s, Recipes, and other posts to share on the site.

Cooper, who is now becoming a-big-cat, has finally demolished his favourite toy (seen here with kitten Cooper.)

DIY: Pom-pom Cat Toy from Adventures In Making blog #craft #yarn #tutorial

In a typical bout of consumeristic frenzy, I searched high and low for a replacement. NEEDS : Yarn pom-pom with bell. FINDS : Nothing. At some point I thought “I have yarn, I have bells… lets craft this thing.”

What You Need

• Yarn
• Cardboard
• Circle shape to trace
• Scissors
• Bell (optional)

DIY: Pom-pom Cat Toy from Adventures In Making blog #craft #yarn #tutorial

Patrick, Kat, and I traced two concentric circles on a piece of cardboard, and cut along them to make a ring with an opening. Then we did it again so we had two rings. We cut a piece of yarn or heavy-duty thread about a foot long and sandwiched it between the two cardboard rings with the ends sticking out at each side of the opening. Using our fingers to hold the sandwich together, we starting wrapping the whole thing with yarn.

DIY: Pom-pom Cat Toy from Adventures In Making blog #craft #yarn #tutorial

So we wrapped…

DIY: Pom-pom Cat Toy from Adventures In Making blog #craft #yarn #tutorial

and wrapped…

DIY: Pom-pom Cat Toy from Adventures In Making blog #craft #yarn #tutorial

and wrapped…

DIY: Pom-pom Cat Toy from Adventures In Making blog #craft #yarn #tutorial

until it was about this thick.

DIY: Pom-pom Cat Toy from Adventures In Making blog #craft #yarn #tutorial

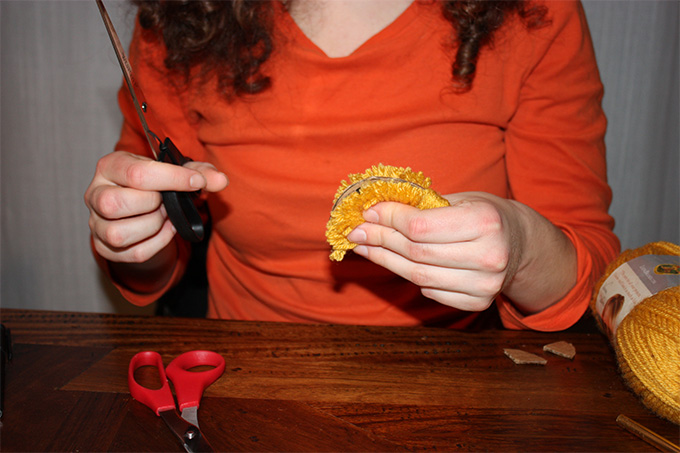
Then, while holding it carefully, we cut between the layers of cardboard, pulling the inside string to gather up the pieces.

DIY: Pom-pom Cat Toy from Adventures In Making blog #craft #yarn #tutorial

and we cut…

DIY: Pom-pom Cat Toy from Adventures In Making blog #craft #yarn #tutorial

and pulled until it made a pom-pom.

DIY: Pom-pom Cat Toy from Adventures In Making blog #craft #yarn #tutorial

We tied up the strings, used them to attach a jingle bell, and gave it a haircut.

DIY: Pom-pom Cat Toy from Adventures In Making blog #craft #yarn #tutorial

Here’s one…

DIY: Pom-pom Cat Toy from Adventures In Making blog #craft #yarn #tutorial

and here are three.

During this adventure I learned…

• Cheap yarn works best for pom-poms.
• It is faster and easier to make a pom-pom than shop for a cat toy.
• I should always employ a quality control expert for crafty inspections.