From 2014-2016 I chronicled my crafty endeavors on the site Adventures-in-Making. I’ve selected a few of those DIY’s, Recipes, and other posts to share on the site.
***
You might have noticed things have slowed down a little over here at A-I-M. Life goes in cycles, as we know, and unfortunately it’s been tripping us up lately. I’m still making things (some of them more therapeutic than others- like the DIY below), but the timing is tricky, and sometimes things don’t make it online as quickly as they should. We’d like to ask you to be patient with us, and give us time to refresh and collect ourselves. We’ll be back to full speed before you know it.
I’ve been trying to simplify my life because I have accumulated too many “things”; and I’ve made a resolution to truly embrace the making of things, rather than the buying or the keeping. (Our house is getting smaller by the second. Someone’s cursed us, I swear!)
So rather than storing ornaments, sparkles, trees and lights, I’m making new temporary baubles from recycled materials.
With that in mind I sat down to make my version (sweet and simple) of a winter village. I built a template that you can use to start your own winter wonderland, and I hope you’ll get as much peace and joy out of it as I did.
Supplies
- Scrap Chipboard: I like to save the backs of paper pads for projects like this, or you can grab a food package out of the recycling.
- Pen and pencil
- bone folder or scoring device
- Craft knife
- Paper glue: Elmer’s works great!
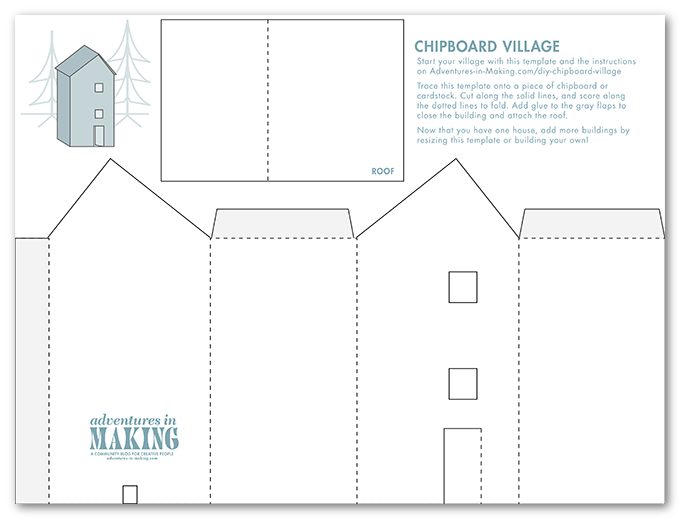
- The printed template: click here or on the pdf below.

Chipboard is great because you can mark it simply by pressing down hard on it. To trace the template on my piece, I clipped the paper down, then…

used a bone folder and ruler to score the dotted lines (that will eventually be folded).

Then I traced over the rest of the lines by pressing down firmly with a pen.

Once I finished tracing all the lines I had a faint guide to work with. (If you like, trace the lines lightly with a pencil to help when you’re cutting.)

Like most cutting projects, it’s easier to start by removing the small pieces of the template. In this case that meant cutting out the windows, the notch on the back, and two sides of the door. (Refer to the template to make sure you are cutting only the solid line pieces.)

When I had the building and roof all cut out, I used a bone folder to score the folds a little more deeply. Then I began folding each flap gently away from the score mark. (Including the roof piece.)

When I had the main part of the building folded, I applied glue to the flap (shown in gray on the template sheet) and held the pieces together until the glue held firmly. (You can also use clips or clothespins to hold it closed for a bit.) Once the base of the house was holding firmly, I added glue to the roof flaps (also shown in gray) and aligned and attached the roof. (You will want to hold this together by putting your hand into the house-box and pressing the flaps against the roof.)

To frost the windows, I took a piece of cello tape slightly larger than the window, and attached it to a piece that was even larger. Then I taped that frosted pane right into the window-sash. I left the door bent slightly in, to welcome little chipboard guests!
Now that you’ve got the hang of home-building, you can reuse this template by resizing it, or come up with your own design!

For my second building, I used the natural folds in a cracker box, and drew windows and a door with a pencil before trimming it out. Remember to leave flaps to attach the roof! (But in a pinch, a piece of tape will work as well.) Simply erase the lines, glue everything together, and plop it into your village… and when it gets dark…

slip a few LED Christmas lights under your buildings for ambiance. (The notch I included in the template is super handy for running the wires out the back of the house.) Make sure to use low-heat lights, since they will be surrounded by paper!

If you’re anything like me, you won’t be able to stop at chipboard houses. I really want to add some chipboard critters… These little houses make my imagination run free.
One thing that’s for sure, they need to be surrounded by a forest. Next week I’ll show you a quick and easy way to build your own magic woods.
One note: I’m a big fan of letting the materials show in my projects, but remember you can camouflage the materials quickly by adding a little paint (spray or acrylic would work great) or by using it as a base for decoupage or collage (like our shadowbox project). Go crazy!


You must be logged in to post a comment.