AIM DIY: Chipboard Village with Free House Template

IMG_3735_chipboardvillage
From 2014-2016 I chronicled my crafty endeavors on the site Adventures-in-Making. I’ve selected a few of those DIY’s, Recipes, and other posts to share on the site.

***

You might have noticed things have slowed down a little over here at A-I-M. Life goes in cycles, as we know, and unfortunately it’s been tripping us up lately. I’m still making things (some of them more therapeutic than others- like the DIY below), but the timing is tricky, and sometimes things don’t make it online as quickly as they should. We’d like to ask you to be patient with us, and give us time to refresh and collect ourselves. We’ll be back to full speed before you know it.

I’ve been trying to simplify my life because I have accumulated too many “things”; and I’ve made a resolution to truly embrace the making of things, rather than the buying or the keeping. (Our house is getting smaller by the second. Someone’s cursed us, I swear!)

So rather than storing ornaments, sparkles, trees and lights, I’m making new temporary baubles from recycled materials.

With that in mind I sat down to make my version (sweet and simple) of a winter village. I built a template that you can use to start your own winter wonderland, and I hope you’ll get as much peace and joy out of it as I did.

IMG_3286_chipboardvillage

Supplies

  • Scrap Chipboard: I like to save the backs of paper pads for projects like this, or you can grab a food package out of the recycling.
  • Pen and pencil
  • bone folder or scoring device
  • Craft knife
  • Paper glue: Elmer’s works great!
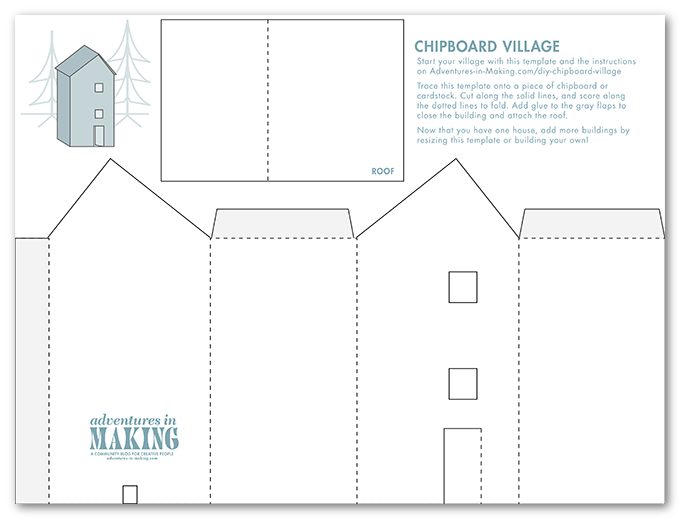
  • The printed template: click here or on the pdf below.

chipboardvillage_template

IMG_3287_chipboardvillage
Chipboard is great because you can mark it simply by pressing down hard on it. To trace the template on my piece, I clipped the paper down, then…

IMG_3300_chipboardvillage
used a bone folder and ruler to score the dotted lines (that will eventually be folded).

IMG_3308_chipboardvillage
Then I traced over the rest of the lines by pressing down firmly with a pen.

IMG_3312_chipboardvillage
Once I finished tracing all the lines I had a faint guide to work with. (If you like, trace the lines lightly with a pencil to help when you’re cutting.)

IMG_3316_chipboardvillage
Like most cutting projects, it’s easier to start by removing the small pieces of the template. In this case that meant cutting out the windows, the notch on the back, and two sides of the door. (Refer to the template to make sure you are cutting only the solid line pieces.)

IMG_3322_chipboardvillage
When I had the building and roof all cut out, I used a bone folder to score the folds a little more deeply. Then I began folding each flap gently away from the score mark. (Including the roof piece.)

IMG_3333_chipboardvillage
When I had the main part of the building folded, I applied glue to the flap (shown in gray on the template sheet) and held the pieces together until the glue held firmly. (You can also use clips or clothespins to hold it closed for a bit.) Once the base of the house was holding firmly, I added glue to the roof flaps (also shown in gray) and aligned and attached the roof. (You will want to hold this together by putting your hand into the house-box and pressing the flaps against the roof.)

IMG_3414_chipboardvillage
To frost the windows, I took a piece of cello tape slightly larger than the window, and attached it to a piece that was even larger. Then I taped that frosted pane right into the window-sash. I left the door bent slightly in, to welcome little chipboard guests!

Now that you’ve got the hang of home-building, you can reuse this template by resizing it, or come up with your own design!

IMG_3347_chipboardvillage
For my second building, I used the natural folds in a cracker box, and drew windows and a door with a pencil before trimming it out. Remember to leave flaps to attach the roof! (But in a pinch, a piece of tape will work as well.) Simply erase the lines, glue everything together, and plop it into your village… and when it gets dark…

IMG_3438_chipboardvillage
slip a few LED Christmas lights under your buildings for ambiance. (The notch I included in the template is super handy for running the wires out the back of the house.) Make sure to use low-heat lights, since they will be surrounded by paper!

IMG_3730_chipboardvillage
If you’re anything like me, you won’t be able to stop at chipboard houses. I really want to add some chipboard critters… These little houses make my imagination run free.

One thing that’s for sure, they need to be surrounded by a forest. Next week I’ll show you a quick and easy way to build your own magic woods.

One note: I’m a big fan of letting the materials show in my projects, but remember you can camouflage the materials quickly by adding a little paint (spray or acrylic would work great) or by using it as a base for decoupage or collage (like our shadowbox project). Go crazy!

AIM DIY: Finger Crochet a Round T-shirt Rag Rug

IMG_2201_roundtshirtrugFrom 2014-2016 I chronicled my crafty endeavors on the site Adventures-in-Making. I’ve selected a few of those DIY’s, Recipes, and other posts to share on the site.

****

Despite my sister’s best efforts I’ve never been able to make sense of real crochet. The “finger crochet” method I describe below is something that came out of a lot of experimentation, but I’m guessing you fiber wizards could whip up something even better! If you’ve done a similar project, or have suggestions to make this DIY more clear, please feel free to tell us about it in the comments below.

When I finished re-weaving my t-shirt rug (updated photos at the bottom of that post) I figured out two important things.

  1. There is better way to cut a t-shirt into strips (fewer, longer strips.)
  2. Once you know how to cut t-shirts into long strips, no t-shirt is safe.

IMG_1957_roundtshirtrug
Which translates to: I had a lot of leftover strips of jersey, and wanted to use them up! I started braiding, tying knots, and eventually settled on a method that can best be described as the frumpy cousin of crochet.

PREP: Cutting one long strip

Knotting small strips of jersey (demonstrated in the woven rug post) is time-consuming, so the longer the strip the better. After digging around a bit I found this video that shows how to turn a loop into one long strip.

IMG_2100_roundtshirtrugI started by cutting the large loop of the shirt from the top, and sliced across from one side, stopping about an inch from the other edge.


Then I slipped the loop over my arms, and starting at the end of one cut I cut diagonally towards the end of the next cut on the other side of the fabric. Then the whole thing unwound in a continuous strip.

MAKING THE RUG


To begin I tied a slip-knot near the end of the string by making a loop, reaching through and grabbing the strip, pulling it though and gently pulling to tighten. (There’s a great demonstration of a slip knot at the beginning of this video.)

IMG_1975_roundtshirtrug
Then I reached through that loop, pinched the strip, and pulled it through to create my first chain stitch. (See steps 2 thru 4 on this Red Heart blog post). This whole project breaks down into pulling a new loop through an old loop.

I repeated this chain stitch about 5 times, then…


tucked the loose string end through the last chain stitch to loosely close the first set of chains into a circle.

IMG_2045_roundtshirtrug
To connect the next ring of chains I pulled the next strip (navy) through two existing loops– the one I just made (pictured here closest to my thumb), and the inside of an earlier chain that lined up with my new one (closer to my fingertip).

IMG_2047_roundtshirtrug
This way my newest loop connected my existing chain to the one inside of it. I then started a pattern of 3 chain stitches, 1 connecting stitch, 3 chain stitches, 1 connecting stitch, 3 chain stitches, 1 connecting stitch, 3 chain stitches, 1 connecting stitch, 3 chain stitches, 1 connecting stitch…

IMG_2070_roundtshirtrug
going around and around the circle.

IMG_2073_roundtshirtrug
When I ran out of strips, I pulled the end of my string through the last loop, and tucked it into the rug– because one day I will have more t-shirts to dismantle, and this rug will keep getting bigger!

IMG_2253_roundtshirtrug_1

TIPS

  • As you are working, make sure not to pull your loops too tight, or stretch your chain when you’re doing a connecting stitch. The looser you work the flatter the rug will sit.
  • Different shirts will make thicker or thinner strings based on the thickness of their fabric. I opted for a very irregular look with lots of inconsistencies in my strips (width ranging from 1″ – 2″) but if you want a more regular look, stick with shirts of a similar weight, and cut your strips about 1.25″ wide.
  • If it’s looking weird, pull out your loops and start over! Once you get the hang of this version of finger crochet you’ll fly through this project, so you will quickly make up the time redoing it. Practice has never been more fun.
  • If you can, work for longish stretches to keep your tension consistent. This is a great “while watching tv or daydreaming” activity.
  • As always, plan to make one more rug than you have cats.

IMG_2196_roundtshirtrug_1

AIM DIY: Spookily Free and Easy Ghosts

IMG_1479_spookyghosts
From 2014-2016 I chronicled my crafty endeavors on the site Adventures-in-Making. I’ve selected a few of those DIY’s, Recipes, and other posts to share on the site.

When I was a kid my mom came up with all sorts of awesome crafts for us to do, and being a typical goth-in-the-making I loved the halloween crafts most of all. One year we made cheesecloth ghosts with balloons and glue and it’s a project that has haunted me to this day.

I decided that I really wanted some ghost friends, but lacking balloons and cheesecloth I decided to make some up, Alison style. (IE: Free, Quick, and Fun.)

IMG_1396_spookyghosts

SUPPLIES

  • At least a couple of feet of sheer or thin fabric – old sheets or window sheers work great!
  • All-purpose flour
  • Bottles: Soda, water, or wine. Glass or plastic.
  • Wire or wire coat hangers
  • Plastic bags
  • Rubber bands
  • Scissors
  • A bucket or bin to mix your flour paste in

Step 1: The Form

IMG_1417_spookyghosts
To begin will make a simple armature out of wire (or out of a wire hanger). Cut a piece about 24″ long, and twist it together to form one big loop.

IMG_1426_spookyghosts
Slip the loop over the neck of your bottle, and twist the arms slightly so that they sit securely on the bottle and point slightly upwards. Using a scrap piece of fabric or paper, form a ball shaped head over the neck of the bottle and secure it with a rubber band.

IMG_1440_spookyghosts
To make the armature (form of the ghost) easier to remove, cover it with a plastic grocery bag, and secure it with a rubber band.

Measure the height of your ghost form from the base, across the head, and to the base on the back side. Cut a square of fabric this size to cover your form. (This is a great time to tear your fabric instead of cutting, if you want. Frayed edges are a bonus!)

Step 2: Stiffening and Forming the Fabric

IMG_1447_spookyghosts
Although flour may not last forever when used as a paste, it works perfectly for a ghost that will only haunt your house for a year or two. Combine 4 parts water with 1 part all-purpose flour in a large container and mix well with your fingers. Soak your ghost fabric, and wring it gently.

IMG_1448_spookyghosts
Spread the fabric over the ghost form, with a corner of the fabric pointing forwards.

IMG_1450_spookyghosts
Using your creativity (and maybe a clip or two) shape the cloth as creepily as you want! (I loved adding a fold along the “hair line” so that it looked like my ghost was in a cloak.)

IMG_1456_spookyghosts
If you’d like, remove some of the excess fabric from the “arms” of your ghost. (Make sure to leave fabric puddled at the front and back; this will ensure that your ghost will sit up when it’s all dry.)

Leave your new little friend to dry overnight, with a fan blowing if you can. When it’s completely dry, gently pull the bottle form out of the stiff fabric. (If it’s not firm enough to stand, you can mix up some more of the flour and water and paint it onto your fabric while it’s still on the form. You may want to use a higher ratio of flour to water.)

IMG_1477_spookyghosts
Boo!

IMG_1485_spookyghosts

IMG_1505_spookyghosts
If you’re feeling extra crafty, you can paint right on your ghosts with watercolor or acrylic paints. I have some scary plans for one of mine.

IMG_1482_spookyghosts

Use What You’ve Got!

If you don’t have scraps of fabric lying around, this project is also fun with thin paper, tissue paper, or even paper towels. Just make one adjustment: instead of soaking the paper in your paste, lay the paper across your form and paint the paste on with your fingers or a craft paint brush. Saturate the paper slowly and let it fall again the form. You can add multiple layers of paper for more texture (like the tissue paper ghost above) and even cut out a mouth and eyes!

Stick an LED “candle” in it, and things get even creepier!

IMG_1626_spookyghosts
Scary Ghost Sound!

What’s frightening you this season?

AIM DIY: No Sew Woven T-Shirt Rag Rug

IMG_1337_tshirtrug
From 2014-2016 I chronicled my crafty endeavors on the site Adventures-in-Making. I’ve selected a few of those DIY’s, Recipes, and other posts to share on the site.

A couple of months ago I tore up the carpet in my office and replaced it with a wood-ish surface. It’s been great through these warm months, but I want something to stand on when the cold sneaks in. Couple that need with a stack of t-shirts left over from the quilt project, and you have my newest best friend, the t-shirt rag rug.

IMG_1019_tshirtrug
I built a 30″x30″ make-shift loom out of a piece of plywood and scrap wood, but if you search online you can find frames built from pretty much anything. (A Beautiful Mess used cotton scraps and a big piece of cardboard. Also, Pinterest)

IMG_1016_tshirtrug
I put nails along each end, 1 inch apart. Good hammer practice for a hammer novice.

IMG_1063_tshirtrug
With the loom assembled, I moved to materials.

SUPPLIES

Stripping

The rug was built with 1.5″ loops for the warp (base strips) of my rug, and 1.75″ strips woven through.

IMG_1044_tshirtrug
I used a large straight rotary blade and a metal ruler to cut three navy shirts into the 1.5″ loops, then cut the rest of the shirts into 1.75″ strips. (This is a very forgiving fabric, so estimation is ok!)

IMG_1072_tshirtrug
I hooked the navy warp pieces on each side of the loom using the natural loop and stretch of the t-shirt.

IMG_1086_tshirtrug
I prepared to weave by attaching the first strip to the first warp loop. I cut a slit in one end of the strip, fed the other end around the first warp piece and back through the slit. Then I pulled it tightly and began to weave.

Not a normal knot.

I connected a lot of strips to finish this rug using the method shown below. It’s quick and tidy, and ensured you don’t have a lot of extra bulk at your connection points.

IMG_1222_tshirtrug

  1. Cut a small slit in the ends of each strip.
  2. Feed the new strip into the hole at the end of the other.
  3. Take the other end of the new strip and feed it through the slit on the same strip.
  4. Pull on the new end to tighten the knot. Smooth or trim extra material if needed.

(The video below shows how I knotted at the end of a strip.)

Now Weave!

IMG_1112_tshirtrug
Starting at that first warp piece, I wove in and out of each loop to the end of the loom. At the end I wrapped either over or under the last piece to start back down the loom. The second strand went over the strands that the first went under, and vice versa.

IMG_1122_tshirtrug
From there it was basically rinse and repeat. I wove back and forth, connecting strips and changing colors.

IMG_1139_tshirtrug
When possible I fed the strip through the warp flat, then pulled it down with my fingers to bunch it up.

IMG_1223_tshirtrug
The pattern and color combination were very important to me, and I got more and more excited as I worked on it. When I put the final strip in, I tied it off using a normal knot on the last piece of navy.

Finishing it off

Here’s where I admit this rug is really just a gigantic pot holder, and I finished it off the same way. I pulled the first warp loop free and fed the second through it, then fed the third through that one, and so on down the line. (Video Below)

IMG_1330_tshirtrug
Once I was down to the last two loops, I changed tactics. I cut the loop of the last piece, fed one strip through the second to last loop and tied it off.

IMG_1334_tshirtrug
I did the same thing on the other end and suddenly had a rug in front of me.

IMG_1350_tshirtrug

IMG_1344_tshirtrug
After basking in the last moments of sunshine, I rolled up the rug and brought it inside.

IMG_1360_tshirtrug
Where it was immediately claimed by another friend…

IMG_1368_tshirtrug
Cooper.

IMG_1380_tshirtrug
Looks like I’ll have to weave another rug for myself.

Next Time

  • The next rug will be bigger. Once I took this one off the loom it shrunk down a bit, and I love it too much for it to be small.
  • I won’t pull the woven strands as tightly, which will hopefully help with the shrinking.
  • Maybe I’ll try non-stretch cotton scraps?
  • I will plan to move the loom frame around a lot, and possibly rig up some way of leaning it upright while I’m weaving. Working flat gave me a back-ache.
  • I will take it in little batches, weaving in front of the tv or in public. If I weave in public I will look very serious about turning scraps into a comfy rug.

A sign of a successful project is the ability to look forward to the next one.

UPDATE: I enjoyed this project so much that I decided to remake this rug- BIGGER! I built a much larger loom using scrap wood and screws, then followed the same process to build this monstrosity. It sits cozily by my work table now, warms my feet, and makes me happy.

IMG_2188_roundtshirtrug

AIM DIY: Marble Paper with Oil Paints

marbledpaper_IMG_0800
From 2014-2016 I chronicled my crafty endeavors on the site Adventures-in-Making. I’ve selected a few of those DIY’s, Recipes, and other posts to share on the site.

Whenever Rachel and I get together there is always a lot of making. We hang out, paint, draw, and then we party (ie: DIY TIMES). In anticipation for this visit, we made lists of possible crafts, and “Paper Marbling” appeared on both lists. Done!

We’d seen several methods, but we had almost all the supplies to marble with oil paints so we decided to try that out first. Having the best oil paints can make creating these easier. But it was a long, fun day; full of “oooooh” and “aaaaahhh,” sunshine, and turpentine fumes. We wanted to share our method and tips with you, so that you can make your own marble marvel.

marbledpaper_IMG_0712

Basic Supplies

  • Oil Paint Colors – cheap oil paints should work just fine, we used the M. Graham paints we had on hand.
  • Turpentine – Easily found at a hardware store.
  • Big plastic bin to float the paint in
  • Small containers to mix paint colors and turpentine
  • Cardstock (We loved the colored card stock best!)
  • Disposable bamboo skewers or spoons for stirring
  • Nitrile Gloves

marbledpaper_IMG_0692

Step 1: Prep

Before we got started we made a comb by taping toothpicks into a small strip of card stock. The comb was handy for pulling through the colors, and encouraging more “swirly bits.”

We set up our marbling table outside, which I recommend highly. You want to use a table or cover that it’s okay to get paint on. This is a messy craft, to be sure. We set out a tarp for drying our finished papers, put on our gloves and starting mixing things up.

We filled two plastic bins with about an inch or water and set them aside. Then we put out several colors of oil paints in our mixing containers.

marbledpaper_IMG_0737
It was a little trick to get the right mix of turpentine and paint, initially. We discovered that the ideal texture was somewhere around the thickness of whole milk.

marbledpaper_IMG_0740We added turpentine to the paint containers in small pours, and mixed it thoroughly with a bamboo skewer. If we needed to add more turpentine we did it as soon as we had the paint mixed to a consistent texture.

marbledpaper_IMG_0785

Step 2: Pouring the Paint

Then we just poured the paints on top of the water! Simple. Sometimes we did little drops, sometimes we just chunked it all in.

marbledpaper_IMG_0786
Our first batch of color was always full of the same color family, so that as the colors mixed in the water we didn’t end up with a bunch of brown paper. (Towards the end we got a little more daring, and had great results adding in complementary colors to the batches.)

marbledpaper_IMG_0788

marbledpaper_IMG_0789
We got a lot of mileage out of our toothpick combs, pulling them through the paint to swirl the colors together.

marbledpaper_IMG_0793

Step 3: Dipping the Papers

Once we were happy with a design, we laid the card stock quickly on top of the swirled colors, and removed it as delicately as we could. (Rachel had a great dunking method that involved bending the card stock down the middle– hamburger style– then rolling down from the middle to the outside edges before lifting from the water.)

marbledpaper_IMG_0794
Tada! It was amazing how unpredictable the results were. What you saw on the water might not be at all what showed up on the paper. We loved the look we got towards the end, when there was less paint and it all seemed to be thinner.

marbledpaper_IMG_0799
We did two different color stories, one was reds and golds and one was blues and greens. The reds tended to get a little “gory” at times, but looked beautiful on colored papers.

marbledpaper_IMG_0816

Step 4: Drying and Future Projects with Marbly Goodness

We laid the paged out for a few hours, while we cleaned all the paint up. When we were ready to go inside we stacked the sheets and set them aside to dry. It took a good 5 days for the oil to be dry to the touch, but now they are, and I have all kinds of ideas about what to do with my collection.

Maybe I’ll revisit an old DIY, what do you think?

The possibilities are endless. I’m okay with that.

marbledpaper_IMG_0825

Things We Learned

  • Working outside is key. The Turpentine is kinda smelly, and even with a light breeze we felt like we were standing in the fumes. Working outside also made cleanup a lot easier, with a big trash can and a hose available. Make sure to dispose of turpentine properly!
  • Initially we tried thinning the oil paint with walnut oil, but it did not allow the paint to spread out across the water. We had to drop everything and head to the store for turpentine to make the project come together. I have seen a couple of recommendations online for turpentine alternatives, but we didn’t try any (after the oil fiasco.)
  • If your paint drops to the bottom instead of floating, add a little more turpentine.
  • Sometimes less paint is better. I loved the last sheets we printed from each batch.
  • Opaque paint on black paper is tres cool.
  • Each sheet is cooler than the last, which means you won’t ever want to stop. Ever.

AIM SHOW + TELL: A-Frame Canvas Card Wall

canvascardwall_IMG_0083
From 2014-2016 I chronicled my crafty endeavors on the site Adventures-in-Making. I’ve selected a few of those DIY’s, Recipes, and other posts to share on the site.

One of the best things about having “a summer off” is that I am slowly getting to the projects that have been stacking up, with the help and company of Safety Husband. As you’re probably aware, my hubby is a big woodworker and enjoys DIY projects. When he starts a job, he wants it to be done properly so he won’t start doing some of the projects if we don’t have the right materials. A few of the things he wanted, like a router table, seemed silly at first but then he explained the many router table uses and I understood why a woodworker would want one. Despite not being able to do all the projects I wanted to so, it still feels great to make forward progress, but it is INSANE how much I expected to have done in a couple of weeks.

This weekend I finally got to a pressing project, and built an a-frame portable card wall out of two canvases and some scrap wood. There are a million options when it comes to displaying cards, but I wanted something light-weight with a little character, and I think this project absolutely fit the bill.

canvascardwall_IMG_9878
Safety Husband makes a great arm model. Safety goggles not shown, but surely present.

Since these canvases were big (~30″ x 48″) they were reinforced on the back, so our first step was knocking those bars out. Fortunately they came out pretty easily with a couple of smacks from a mallet.

canvascardwall_IMG_9884
We decided to use some trim leftover from the shop, and ripped it (on a table saw) to be the same depth as the canvas. That left us a scrap that made a perfect lip for the front of the card rails. We cut the trim to fit inside the frame of the canvas.

canvascardwall_IMG_9891
Once all 10 card rail pieces and lips were cut, I glued and clamped them together and left them overnight to dry. Once they were dry, I used a semi-gloss white spray paint to cover all the green painted sides (all that would be visible from the front of the display.)

canvascardwall_IMG_0043
I made a mark along my frame every 9 inches to allow for enough room for the cards, and the occasional journal.

canvascardwall_IMG_0044
The shelf pieces ended up being a tight fit in the frame of the canvas, so I decided that wood glue would be enough to hold up the light weight of the cards. I put glue on the ends to mount into the frame. I also put glue along the long back of the rails to attach to the canvas and keep cards from falling behind the shelves.

canvascardwall_IMG_0050
I then gently put the rails in place, using a piece of scrap wood and a mallet to tap some of the tighter pieces in.

canvascardwall_IMG_0052
I used painters tape to secure shelves in that were more likely to shift around. Most were held in place by friction and perfectly measured cuts.

canvascardwall_IMG_0059canvascardwall_IMG_0070
When the glue had set, I finished by attaching the two canvases together with old door hinges. (The best hardware has a little character.)

canvascardwall_IMG_0109
I love the simple but rustic look of the a frame, and I adore how light weight and durable it is. It will soon find a home in a local store, and I’m excited to see how it looks.

canvascardwall_IMG_0092
I always get a sense of satisfaction when I finish a project like this, when I get over all the “What if I…” ideas and just get it done. This one is especially rewarding because I only used materials leftover from the shop and previous projects.

canvascardwall_IMG_0101canvascardwall_IMG_0091canvascardwall_IMG_0086canvascardwall_IMG_0097

What are you working on?

AIM DIY: Convertible Harvest Apron / Produce Bag

IMG_9712BFrom 2014-2016 I chronicled my crafty endeavors on the site Adventures-in-Making. I’ve selected a few of those DIY’s, Recipes, and other posts to share on the site.

There’re still a million and a half things to do around here, but the garden has been calling. (Literally. The robins are LOUD.)

More often than not I find myself walking around with a hose and eating vegetables right off the plants like an animal; but the harvests are getting to be too big for me to eat immediately, too unwieldy to juggle in my hands, and while my first instinct is to bundle them up in my skirt I’m not too excited about flashing the neighbors.

All of this to explain why I decided to turn a half a yard of cotton material and some bias tape into a harvest apron- not just an apron, but an apron that converts to a drawstring produce bag.

For those of you who like to reverse engineer projects (and improve them!) the concept is simple. It’s a rectangular drawstring bag with one string that’s large enough to tie around your waist. For the rest of you who want to see what I did, follow along!

IMG_9419

Supplies

• 1/2 yard of printed cotton fabric. (18 inches x 45 inches wide, typically.)
• At least 3 yards of a durable, sewable trim to use as a drawstring and tie. I used Double Wide Bias Tape from Wrights.
• Sewing machine (or a needle and thread if you’re handy)
• Complementary thread and bobbin
• Ruler
• Straight pens
• Fabric Scissors
• Pinking Shears (optional).

Tips

• Remember to take it slow, and maybe start with a piece of material that you’re not in love with. The second one will go faster/easier.
• This project will hide a bunch of mistakes, so don’t fret!
• I used pinking shears to keep my edges from fraying. If you prefer, you can ignore all the steps that use the pinking shears and instead do a zig zag stitch down the fraying edge of the material. (This post on Craftsy is quite helpful.)
• Whenever you get to the end of a line of stitches, always go backwards and forwards on the spot with a few stitches to tie off the ends.
• A seam ripper is always useful if you’re as prone to mistakes as I am.
• An iron is also useful, if you have one handy. I use it to iron fabric flat, to fold seams over, and sometime I just push the steam button to listen to the hiss.

Step 1 – Making the Pocket

To begin, you will cut or tear the 18″x45″ piece of material down the fold so that you have two pieces of 18″x22.5″. You will be stitching the edges to form something almost like a pillow case, leaving one of the 22.5″ sides open (this will be the top of your pocket.) To remind myself which way went up, I used the pinking shears to trim one of the 22.5″ sides of each piece of material.

IMG_9440
Lay the two pieces together, with the right sides in. From your pinked “top” measure down 3 inches and put a bright pin or mark to show that your stitches will end here. (Don’t stitch above the markers.)

IMG_9449
Now sew a straight stitch 1/2 inch starting at your marker and going down to the bottom of the bag, across the bottom, and back up the other side (stopping 3″ below the top of the bag.)

IMG_9452
Voila! Pocket made!

IMG_9454
Now trim the other sides with your pinking shears to stop fraying.

IMG_9468

Step 2 – Drawstring Casing

IMG_9475
This first step is a little finicky– the goal is to fold under the raw edge of the fabric so it’s out of the way of the drawstring casing. First, fold back your unstitched raw edge (the 3″  from the top on each side we skipped before) and pin flat.

IMG_9479
Use a zig-zag or straight stitch to permanently pin down that edge on each edge of the flap (leaving the flaps open.  One side shown open below.)

IMG_9484

IMG_9494
Now for the drawstring casing, itself. Fold each open flap backwards to make a 1.5″ hem. Pin each side separately so that the pocket remains open.

IMG_9502
Run a straight stitch around the bottom of each flap, about 0.5″ from the pinked edge.

IMG_9505
Then run a second straight stitch approximately 0.5″ from the top of each side. The space between those stitches is where the drawstring will run.

IMG_9512

Step 3 – Drawstrings and Ties

IMG_9516
Cut your drawstring material into the following 3 pieces:
• Apron Tie: Wrap the string around your waist, add 12-18″ to your measurement and cut.
• Short Drawstring: Measure one piece that is 24″ to act as your other drawstring.
• Wrist Loop: The final piece will be a loop that you can use around your wrist to hold open your apron. I used about 12″ for my loop, but you may want to make yours longer or shorter (or omit this step, if you want!)

IMG_9525
For your wrist loop, cross the ends, and stitch to the middle of one of the open sides. (Make sure to stick above or below the drawstring casing area.

IMG_9530
The side with your loop will now be the front of your apron. Use a large safety pin to feed the 24″ piece through the casing on this side. Repeat with the long piece, through the casing on the other side.

IMG_9541
Fold over and stitch each of the four ends to form a 1.5″ loop. If you have a trim that will fray at the ends, it’s a good idea to do a tight zig-zag here to limit the fray over time.

IMG_9549
To keep your short drawstring from disappearing into the casing, feed the long piece through the loops on each side.

Trim all your little threads, and you’re ready to harvest!

IMG_9610
Tie the long tie at your natural waist, and get into the garden!

IMG_9575
Use the wrist loop when you need to hold open the apron, but keep your hands free. (Especially handy when you’re picking tricky berries.)

IMG_9602

IMG_9646
When you’re ready to go in, untie the apron and pull the drawstrings for an instant produce bag.

IMG_9652
When the bag gets just too dirty, throw it into the wash on hot. (Turn the bag inside out to get rid of those stubborn bits of dirt.)

IMG_9701

IMG_9712

Things to Try

• Add a pocket for a garden knife or shears.
• Add vintage cotton trim to make it even more vintage-girly.
• Add a bib and neck strap – more pockets?

Any suggestions? Do you have a favorite garden project you’re rocking this summer?

AIM DIY: Funky T-shirt Rag Quilt for Summer Picnics and Winter Snuggling

tshirt_rag_quilt_IMG_8844
From 2014-2016 I chronicled my crafty endeavors on the site Adventures-in-Making. I’ve selected a few of those DIY’s, Recipes, and other posts to share on the site.

I come by both my weird sense of humor and my borderline hoarderness honestly. What that means is I have collections of really funny/awesome/unique/vintage/sentimental stuff that I can’t use, but I really don’t want to part with.

Like a bin of old t-shirts.

Now, I don’t really wear t-shirts. I don’t often find the need to wear old shirts from my ballet or flag twirling days. I stopped wearing the worn-out vintage tees that my mom passed down, and I never really found the guts to wear the t-shirts with sweats.

So they all just sat in a bin in the closet until I found this amazing tutorial at “Sweet Tea in the South” to turning them into a quilt. I made a few adjustments to use supplies I had on hand, but she does an amazing job of going through the process step by step.

As I wasn’t familiar with what to do, I did some research into finding the best t shirt quilts online, just so I could take some inspiration from other designs. I also watched some tutorials too, which helped.

tshirt_rag_quilt_IMG_8942

I just want to get this out of the way- this is a labor intensive project with lots of steps, and a metric ton of cutting. Jess at Sweet Tea in the South recommends splitting it up over a few days, and I have to agree. It takes a long time to do, and is exhausting, but here’s the thing…

I think this is my favorite sewing project, ever. After I saw some of the

I think there might be some romantic love brewing between me and this blanket. It’s thick and soft, and smells lovely. It’s washable and gigantic (mine is 6′ x 6′) and each square is a symbol of who I am and where I come from– the classic rock station I grew up to, the matching t-shirts Safety Husband and I wore to our after prom party, band shirts, and festival shirts.

Supplies

• Old T-shirts- You will need two squares of shirt for each square of your quilt. I used the fronts and backs of shirts, and all-in-all I used about 36 large shirts for my quilt.
• Batting or flannel for the inside of the quilt. I used Cotton quilt batting that I had around. You will need one square for each square of the quilt.
• A template for cutting your squares (instructions below) I used some scrap chipboard.
• A sewing machine with a ballpoint needle and a lot of thread. (I used white all-purpose thread.)
• Straight pins
• Sewing scissors. Optional but recommended – a fabric rotary cutter, and probably a pair of embroidery scissors for snipping.

To Make your Square template

Measure across each of your shirts to see what size square would cut easily out of all of them. My shirts ranged from large to extra-large, and from 14″ – 16″. I used scrap chipboard to cut a 14″ x 14″ square template for my t-shirt blocks, and made another template that was 1″ smaller on all sides (12″ x 12″) for my batting blocks. You can cut your template from cardboard, wood, or anything else you have around.

tshirt_rag_quilt_IMG_8048

Step 1: Cutting the Squares

Lay a t-shirt out smoothly across a protected surface, and center your t-shirt block template around the art.

tshirt_rag_quilt_IMG_8053
Carefully cut around the template.

tshirt_rag_quilt_IMG_8060
Repeat this with each shirt.

When you’re done with all of your shirts, use your batting template to cut out one piece of batting for every 2 pieces of shirt.

Step 2: Building the Quilt Squares

Each square of your quilt will start out as a stack of shirt|batting|shirt. One of your t-shirt pieces will be on the front, the other on the back. I decided that I wanted to make one side of my blanket cool colors, and the other side warm colors, so each of my stacks was coolcolorshirt|batting|warmcoloredshirt. You can arrange them however you want!

To build your block, lay out your first piece of t-shirt, face-down, then center the smaller piece of batting.

tshirt_rag_quilt_IMG_8073
Cover with the other piece of t-shirt, face-up and secure with several pins, making sure to go through the batting layer.

tshirt_rag_quilt_IMG_8077
Repeat with all your squares, until you have a tidy little stack.

tshirt_rag_quilt_IMG_8182
(At this point I laid all of my squares out on the floor and arranged them how I wanted. I marked each square with a letter and number so I knew how to put them back together. It was a lot of work, and I wouldn’t necessarily do it again. Random is OK!)

Step 3: “Quilting” your Squares

There are several ways to quilt the block together, the important thing is to stitch through every layer to keep the batting and quilting fabric from shifting. I used a combination of straight stitches and a zig zag stitches on my machine to make lines across each block horizontally and vertically.

tshirt_rag_quilt_IMG_8187

tshirt_rag_quilt_IMG_8199
Repeat in each square, and you’re ready to start putting them all together!

Step 4: Assembling the Quilt

The “rag” in this rag quilt means that instead of hiding your seams, you will leave them out to fray and fringe. With that in mind, you need to decide which side will have the extra fluff. One side will be clean and flat like

tshirt_rag_quilt_IMG_8948
The other will be fringed and crazy

tshirt_rag_quilt_IMG_8924
Start with two blocks, and stack them with the future fringed sides facing out.

tshirt_rag_quilt_IMG_8214
You will pin and sew the two pieces together on one edge, about 3/4 of an inch in (seam allowance). I used a zig-zag stitch for these seams to allow a little more stretch and flexibility.

tshirt_rag_quilt_IMG_8220
Attach the next block in the row the same way until you’ve completed a whole row, then start with the next row.

When you have every row sewn, sew each one to the ones beside it the same way. Make sure you keep your seams facing the same way so that all your fringe is on the front or back.

tshirt_rag_quilt_IMG_8234
Breath deeply and look at all that you’ve accomplished! Now take a break, the next part is tedious.

Step 5: Fringing and Clean-up

The final step is to fringe all those seams so that they will roll up and hide any mistakes you may have made on this quilt, and to cut all your little threads. The embroidery scissors are great for this task, but regular sewing scissors work as well. To fringe the seams make a small cut almost to your seam, every half an inch or so. You will do this around the outside edge of your blanket, as well as at every seam. I suggest a watching a movie.

IMG_8814
It may take a while (several evenings) of trimming in front of the tv, with your blanket in your lap, and your cat cuddled underneath, but when you’re done you might be as in love as I am.

tshirt_rag_quilt_IMG_8919
Now that I’ve done the work, I’m going to use this blanket for everything: picnics, cold nights, hammock times, even make-shift shelter. So if you see a pile of funny/awesome/unique/vintage/sentimental old t-shirts walking around, make sure say hi.

tshirt_rag_quilt_IMG_8826

AIM DIY: The Simplest Paper Flowers

simplest_paper_flowers_IMG_8752
From 2014-2016 I chronicled my crafty endeavors on the site Adventures-in-Making. I’ve selected a few of those DIY’s, Recipes, and other posts to share on the site.

A while back my friend Susan made a bunch of simple paper flowers that found a home on a shelf in my store.

Every few weeks a kid would ask me about the flowers, and I would give them one and tell them to take it home and try to figure out how to make their own. Without fail the kid would stare at the flower until it was time to leave, and I could see the parents trying to work out what materials they needed to make it happen.

Sometimes they asked me to demonstrate, but mostly I just loved the idea that I had inspired a kiddo to use their imagination and ingenuity to make something fun.

I think this is a great project to do with kids of all ages, and you just need a few simple supplies to make it happen.

simplest_paper_flowers_IMG_8766

Supplies

• Scrap Paper – Anything from text weight paper, to light weight card stock will work. Big pieces will make big flowers, small pieces will make small flowers. Susan used some old book pages for her flowers, you could use wrapping paper, catalog pages, or anything really!
• Scissors
• Your favorite glue – I used Aleene’s Tacky Glue but Elmer’s would also work.

Step 1

Cut an oval out of your piece of paper. It doesn’t have to be perfect, but try to keep the corners rounded.

simplest_paper_flowers_IMG_8773

Step 2

Starting from one side, cut the oval into a spiral. You should have a pointed end on the outside, and a rounded end on the other.

simplest_paper_flowers_IMG_8774

Step 3

Take the pointed end, and fold it down toward the center of the spiral.

simplest_paper_flowers_IMG_8775

Step 4

Starting at that fold, begin rolling the paper into a flower shape.

simplest_paper_flowers_IMG_8776

Step 5

When you get to the center portion of the spiral, tighten the bloom up by twisting the paper around the folded piece.

simplest_paper_flowers_IMG_8780

simplest_paper_flowers_IMG_8785

Step 6

Hold the bloom in your hand, and apply a drop of glue to the folded portion you started the flower with, then

simplest_paper_flowers_IMG_8788
fold it over and hold it for a few seconds until the glue holds.
simplest_paper_flowers_IMG_8793

simplest_paper_flowers_IMG_8797
The whole process takes a couple of minutes, and gives you a lovely simple flower to brighten up your day. You can put them in a basket, like I did, hang them like a mobile, or decorate a table with them. They don’t fade, and the possibilities are endless!

simplest_paper_flowers_IMG_8761

So make a bunch and send us a picture of your creation for the DIY Craft Challenge this month! Or share your favorite flower craft.

AIM DIY: Simple Flowers from Old T-Shirts + Free Templates


From 2014-2016 I chronicled my crafty endeavors on the site Adventures-in-Making. I’ve selected a few of those DIY’s, Recipes, and other posts to share on the site.

I’ve been in a major cleaning and organization mood, so most of my projects have been focused on “using up” materials I have around. One giant project used a bin full of old printed t-shirts (I’ll show you when I’m done!) and I ended up with so many colorful t-shirt scraps that I over-ran my rag box. I decided it was a perfect time to combine those scraps, and the May DIY Challenge theme to make some simple jersey flowers.

After playing with the fabric for a day or two, I came up with two basic flower-making methods that you can use to make a whole army of blossoms.

simple_jersey_flowers_IMG_8398

Supplies

• T-Shirt or jersey scraps
• Fabric scissors and paper scissors
• Needle and thread
• These printed template files : Stitch & Draw-up Petal Template, Pinch & Piece Petal Template

Optional Extras

• Shredding scissors, or other decorative edging scissors
• Straight pins
• Buttons
• Felt for leaves and backing. I used wide grosgrain ribbon.
• Pin-backs, bobby pins, or other clips to attach to the back
• Fabric Paints, or floss, or other decorating tools.

The Stitch & Draw-up Method

stitch&drawpetals_template
This is by far the quickest way I made flowers, and was also especially useful for adding details to the center of other flowers, or for making the smallest simplest bonus blooms to add to a flower bunch. The template includes two example petal shapes to play with, and a feathered shape that I used for a center detail. It works with basically any shape you want to use, though, so be sure to try your own ideas for rows of petals.

simple_jersey_flowers_IMG_8421

Step One

Cut the template shape out of a piece of jersey. (This is from the arm of a t-shirt.)

simple_jersey_flowers_IMG_8441
Then stitch a loose line starting close to one edge and ending close to the other.

simple_jersey_flowers_IMG_8454

Step Two

Put a stitch through the end you started on, to pull it into a ring.

simple_jersey_flowers_IMG_8455

Step Three

Pull both ends of the thread to gather the fabric into a round shape. Make sure the extra puckered fabric from below your stitch line if on one side of the flower.

Step Four

Take a couple more stitches through the puckered side of the flower (which will be the back side, tie your favorite knot, and cut the thread.

simple_jersey_flowers_IMG_8464

Step Five

Flip the flower over and add a button or other decoration. You can also stitch a clip or pin to the back side.  I put a button in the center of this one by stitching through the middle of the bloom,

simple_jersey_flowers_IMG_8479
and added a couple of leaf-shaped pieces and a piece of ribbon to the back, by stitching them through the back of the petal.

simple_jersey_flowers_IMG_8481
Voila, a quick simple flower that I can use on a package, as a pin, or in my hair. (Or all of the above.)

The Pinch & Piece Method

pinch&piecepetals_template
This method takes a little more work, but I loved the way it makes a fuller and more complicated flower shape. I’ve given you four petal shapes to try on the template– each with a different number of petals per flower– but you can try all sorts of shapes for different results.

simple_jersey_flowers_IMG_8494

Step One

Cut the indicated number of petal pieces out of jersey material. For this flower, I also used the “Center Detail” piece from the other template page to create a fuzzy center for my flower (shown above in dark purple.)

simple_jersey_flowers_IMG_8497

Step Two

Stitch a loose line across the middle of each the petal (shown as a dotted line on the template) starting close to one edge and ending close to the other.

simple_jersey_flowers_IMG_8508
Put a stitch through the end you started on, and pull to gather the fabric.

simple_jersey_flowers_IMG_8521

Step Three

Bend the petal piece in half, and put a stitch in the fold. Then do the same to each petal to connect them all together. Tighten them together, and tie a knot at the first petal.

simple_jersey_flowers_IMG_8522

Step Four

Wrap your thread between each petal  section to draw the center together and fluff the petals out. Then stitch through the back of the flower, & tie off the thread using your favorite knot. For the center on this flower, I used the “Stitch and Draw-up” method on my dark purple center detail piece, and then sewed through it and the center of my bloom. I attached a leaf shape and a piece of ribbon to the back like my first flower, and used that to bobby pin it in my hair.

simple_jersey_flowers_IMG_8548
I’ve started flipping through my flower books for inspiration, and I love the flexibility and the whimsy of using old t-shirts like this.

simple_jersey_flowers_IMG_8546
Soft, sweet, flowers.

simple_jersey_flowers_IMG_8572

Remember that if you do this or any other flower project, send us a picture to enter the May DIY Craft Challenge.