AIM TOOLBOX: Saddle Stapler Review

IMG_7106
From 2014-2016 I chronicled my crafty endeavors on the site Adventures-in-Making. I’ve selected a few of those DIY’s, Recipes, and other posts to share on the site.

You may or may not have heard of a saddle stapler– but let me tell you, I love this sucker. I mainly use it for binding small booklets, but it’s handy for any project that you need to staple further “in” than the 1-inch you get with a regular stapler. Plus they are heavy-duty, sturdy, and have lovely lines. (I’m not sure why I’m quite so fond of a piece of metal.)

IMG_7120
My journals and booklets typical have about 10 sheets of text weight paper, and a 100# weight cover. I use a bone-folder to fold the inside sheets in half (with the grain) 3-4 sheets at a time for a crisp fold throughout. I like to score my covers before I fold them (also with the grain) to make sure that I have a nice smooth spine.


When I’m ready to bind, I’ll slip one side of the paper into the curved opening of the stapler, and the spine with lay smoothly along the stapling edge.

IMG_7130
My stapler is a little picky about where it staples, so I usually have to hold the paper down with a finger on either side of the spine. Then I staple, trim, and voila…

IMG_7156
Journals! (You might notice I used the corner rounder on these, as well.)

IMG_7161Although my saddle stapler isn’t very old, they have discontinued the model. You may be able to find this exact model online (it’s a Swingline 615 Saddle Stapler) you can buy the very similar Stanley Bostitch Booklet Stapler at Amazon*. Both use standard staples found just about anywhere, so you don’t need to stockpile anything.

IMG_7178

The one feature that appears to be missing on the Stanley version is the measurement guide, a little piece of metal that can be adjusted to line up the staple location if you’re doing multiple books. I typically make a mark where my staples should go or eyeball it, so I seldom use the guide anyways.

If you love journals, or staplers, this is a must-have. If you’re in a pinch, and local, I might even let you use mine.

*Support Adventures-in-Making by shopping from our Amazon store. We’ve selected a few things that we love, and think you will too. If you purchase through us, you pay no more for those items, but we get a small portion of the sales to further the adventures.

AIM TOOLBOX: Shredding (or Fringe) Scissors are too much fun.

IMG_5273
From 2014-2016 I chronicled my crafty endeavors on the site Adventures-in-Making. I’ve selected a few of those DIY’s, Recipes, and other posts to share on the site.

My Christmas list is getting kinda boring. Well, not boring to me, but maybe to anyone who wants to get me something other than a book (on making stuff) or a tool (to make stuff with.)

This year I got a big ole pair of Shredding Scissors.

IMG_5275
Also called “Fringe Scissors” in the crafting/scrapbooking community, these suckers are basically 5 pairs of scissors bolted together. Practically, they can be used to shred documents (without using an electric shredder). Less practically you can (and will) turn anything…

IMG_5297
into confetti.

IMG_5279
I got them for the ability to fringe paper quickly and consistently for my crafty projects. (Example coming soon.)

Things to love

• It’s pretty easy to get a consistent fringe by eye.
• Turns colorful trash paper into a craft supply!
• Gives you more control than a paper shredder. Plus it’s smaller, quieter and easier to store. (I’ll be using these to shred paper for paper making.)
• They seem pretty heavy duty, and the blades line up almost perfectly.
• The sense of power you get from using 5 sets of scissor blades at once. Also, Edward Scissorhands themed imagination trips.

IMG_5289

Things to Hate

• They do seem to get plugged up pretty easily. Most of the pieces can be pushed out by closing the scissors all the way, but a few will have to be pulled out with your little fingers.
• Cutting with 5 sets of scissor blades takes as much force as cutting with five pairs of scissors. My hands got tired pretty quickly. They are also pretty heavy to hold in your delicate artist hands for a long period of time.

IMG_5294
All in all, they are a hit! I love having another multifunctional compact tool to use, and I’ve already got another tutorial headed your way.

AIM TOOLBOX: Dremel Micro Review for Glass Etching

IMG_2839

From 2014-2016 I chronicled my crafty endeavors on the site Adventures-in-Making. I’ve selected a few of those DIY’s, Recipes, and other posts to share on the site.

I have a secret. I’ve been hoarding glass bottles… and jars. Sure, I’ve been drinking out of a set of 6 jars, but what no one knows is I have a whole box of them in my closet.

Shoot. Now you know.

The big plan was to use etching cream to mask and etch them into glass masterpieces– but something always stopped me. It may have been that the first time I pulled out the etching cream, Safety Husband insisted on reading the ingredients and warnings. He then set out a strict list of suggestions for using the DANGEROUS stuff I got from the craft store. I followed the suggestions once, but lived in fear of getting out the cream ever again. I had the PPE for it, but even so, it was a little scary. “Wear gloves. You don’t want it eating through your skin… to your bones.

We live in a world of excess caution, over here.

Safety Husband recommended safety goggles and a respirator- talked down to spectacles and a dust mask.
For Dremel Etching, Safety Husband recommended safety goggles and a respirator- accepted spectacles and a dust mask.

The box of glass lived to taunt me. Sitting in there, instead of going to the recycling bin where it belonged; until I got the bright idea of looking for alternate etching options. There are a lot of great, videos, but the one from Dremel sold me. It was time to replace our old rotary tool, so after some shopping I decided on the…
Dremel Micro, which is cordless.
•I bought two diamond bits, but I’ve only got around to playing with the one that looked most useful, the Dremel Diamond Wheel Point Bit.
** UPDATED 12/14 – I’ve since started using two different diamond bits with more success. 7105 Diamond Ball Pointand 7103 5/64-Inch Diamond Wheel Point

Experiments

I tried several different ways of getting my initial artwork laid out, including drawing the design on with a Sharpie, as well as using masks that we had made with the intention of using the etching cream.

Tara Bliven drew and cut out this beautiful mask for me.

We drew and cut these masks out of contact paper, but you could also use masking tape. They are a great way to start out, because the mask will help you learn to control the tool. Thankfully, this is a cordless dremel tool so you don’t have to worry about the wire tangling whilst you’re trying to follow the guide. If you jog out of the lines, the mask material will shred before you mark the glass, giving you one chance to screw up without consequences.

IMG_2849
The mask is definitely the most time consuming and tedious way to go. I’ve moved on to freehand patterns, and occasionally use paper templates that taped to the other side of the glass. (More on that later.)

IMG_2873

Tips

•Higher Speeds (controlled with a button on this model) work much better for etching glass. I usually use the second to highest speed. The highest works even better, but the sound is skull-splitting, so I only use it when absolutely necessary.
•Using the bit I’ve listed above, you will mainly be making thinnish lines, so plan on going over your artwork a couple of times. It works best to hold the bit as close to parallel with the surface of the piece.
•Make a jig for round items. I took a couple of wood scraps and made a kind of rail for the glasses to lay in. (See in the photos above.) Make sure it’s small enough to move around, as you will want to be able to approach your piece for all angles. After my experiments, I sprayed the whole jig black so I could see my work more easily.
•Wear Protective Gear… or you’ll get in trouble. I found a dust mask and glasses worked for me, but it might be good to start out with even more coverage, so you might want to look for personal protective equipment to suit you and the job you’re about to undertake. Remember that your glass could shatter at any time.
•Start with thick glass pieces, and don’t grind too much in one place. This is not a tool for drilling, so you’re more likely to shatter your pieces than cut cleanly through.
•Start with trash pieces you’re not afraid to throw away. There’s definitely a learning curve.
•Hand-wash any pieces, to make sure you’re not shocking the thinned glass with hot water.
•Work outside. You’ll be generating a ton of dust. While I haven’t had any sharp pieces (yet) it’s nice to let nature get rid of the dust.
•This is a no-distraction project. Don’t plan on watching TV while you work with power tools.

Things to Love

•It’s lightweight. Initially I was planning to use a flex shaft like they use in the video, but the cable is not very flexible, and I decided the lack of cord would be a benefit.
•It compact and easy to transport (although it does not come with a carrying case.)
•The battery lasts longer than I do. I haven’t had to stop what I was doing to recharge.
•I haven’t hurt myself (yet). This is always remarkable.

Things to Hate

•The “Lock” button sticks out just above the power button, and I have hit it accidentally a couple of times while the Dremel is running. It makes a terrible sound to tell me I’m killing it to death.
•It’s still a little clumsy. Even though the end is tapered so you can hold on to it, it’s more like trying to write legibly with a Squiggle Pen than an actual writing implement.
•It is quite tricky to get make a curve. A lot of this has to do with skill, and the kind of bit I’ve been using.
•The sound, especially at higher speeds. It makes a high keening when you’re using it on the glass. The birds have been complaining about this as well. It’s just life in the etching game.

Things to Try

•More bits. I tried scratching the glass with non-diamond bits with little result, but now that I’m hooked on the etchin’, I’m going to try everything. (If you have suggestions, I’d love to hear from you.)
•More freehand designs.
•On flat surfaces, like plates, trays, etc. On mirrors.
•Make a set of matching glasses, with patterned numbers, using paper templates. That’s pretty specific, huh? I guess a DIY is in the works… but until then, have fun!

IMG_2858

AIM DIY: Tiny Marker Stamps

IMG_2272
From 2014-2016 I chronicled my crafty endeavors on the site Adventures-in-Making. I’ve selected a few of those DIY’s, Recipes, and other posts to share on the site.

I was invited to join the local gallery at an Art Outside event this summer, and put together a mini-version of my paper flower class for kiddos who were attending. I brought a bunch of pre-dyed flower petals so that they could form a little flower on a bobby-pin, to use anywhere.

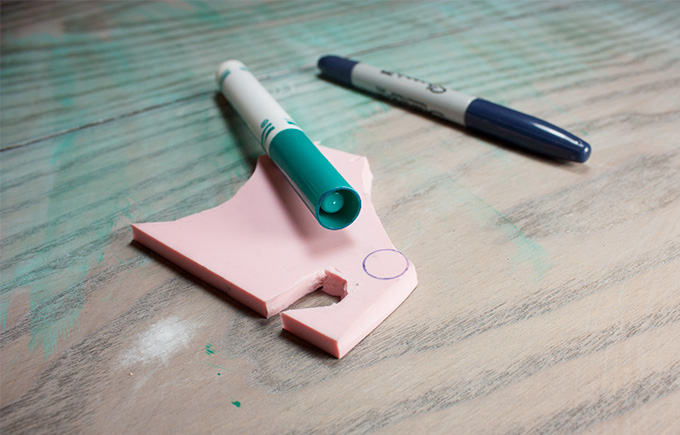
I thought it would be fun to let them hide some bugs in their buds, so I carved a few mini-stamps of beetles, spiders, and bees to stamp amongst the petals. In order to make the tiny stamps easier to use, I came up with a way of sticking them in the end of Crayola Broad Line Markers. I thought I’d share!

IMG_2195
First I cut out a circle to fit the end of the marker by coloring the cap of the marker with a Sharpie
then immediately stamped it onto a piece of Speedy Carve Rubber Stamp Block.

IMG_2198
I cut the tiny circle out with a craft knife and then

IMG_2201
drew a tiny spider to carve out.

IMG_2204
Then I pushed and shoved and slowly worked the pieces of rubber into the end of the marker. It’s good to have a tight fit so it won’t work itself out as you use it.

IMG_2207
I used Speedball Linoleum Cutter to carve the extra pieces out of the rubber. Because the stamp is so small, it’s important to work slowly on small sections. Actually, the marker makes it a lot easier to carve, and kept my other hand away from the sharp tools.

I tested the stamp repeatedly, by using the marker it was attached to to color the stamp. I ran the marker over the design, stamped, and used that information to remove more of the rubber. The more stamps I made, the simpler they got. It is really difficult to keep a lot of detail on such a small surface.

IMG_2232
Finally I had a sweet little bug stamp to add to the flowers. Bwahahaha.

IMG_2260
I have all sorts of stamps I want to make using this method. Some of them might even be un-creepy!

If you’d like to try this project yourself, check out the supplies at the Adventures in Making Amazon Store . If you buy through our store you’ll pay the usual Amazon price, but we’ll get a small percentage to help us power our creative adventures. You’re great!

AIM TOOLBOX: Alison’s Essential Drawing Supplies

TOOLBOX: Alison's Essential Supplies #drawing #tools

From 2014-2016 I chronicled my crafty endeavors on the site Adventures-in-Making. I’ve selected a few of those DIY’s, Recipes, and other posts to share on the site.

My favorite supplies have changed a lot over the years. Right now I have a loose-leaf system that works great for me, and along with my travel kit, it’s incredibly portable. (Portable tools mean you’ll get more done, more places!)

Since I have a tendency to do things a little differently, I thought I’d share a little about my process and supplies; then let you decide if you think I’m crazy- or a crazy genius.

I’ve included links to many of the supplies, in case you’d like to try them yourself*.

Paper and Stuff

TOOLBOX: Alison's Essential Supplies #drawing #tools

I like to work on 8.5 x 11 inch loose-leaf pages because I can carry them around easily. From time-to-time I’ll cut pages down so I can have an even more portable set- but I keep the same selection of papers.

A. Papers

I use Smooth White Cardstock  for early sketches and drawing. Cardstock handles a lot of erasing a redrawing.
When I can’t erase any more, I’ll do additional edits on  cheap tracing paper.

I use higher quality Canson Marker Paper for final drawings, and for inking. I tried a bunch of different papers, and this was the best with my Uni-ball pens. It doesn’t bleed too much, and dries quickly enough that I’m less likely to drag my left hand through wet ink.

Graph Paper and Miscellaneous Guide Sheets  I’ve found it’s handy to keep guide sheets that I can use with tracing paper. I usually have sheets of graph paper, script slant guides, and other handy shapes I use a lot.

B. Clipboard

I love this low profile aluminum clipboard. It’s lightweight and means I can draw anywhere.

C. Project Filing

I keep each project I’m working on in a clear page protector. When I’m done, I can discard the pieces of my process I no longer need, and retire the whole protector to a binder or other file for safekeeping.

Tool Kit

TOOLBOX: Alison's Essential Supplies #drawing #tools

I do as much work at the store as I do in my studio, so I’ve come up with a very extensive travel kit to carry. (I like to be prepared for everything.)

A. Pencils

I love using Woodless Graphite Pencils  for shading, thick lines, and because they are awesome. I use BIC Mechanical Pencils  a lot in my early sketching phases. Blackwing Pencils are my newest obsession. The erasers are especially useful, and replaceable! I prefer the harder “Pearl Pencils”.

B. Pencil Sharpener

This small metal pencil sharpener is essential if you want to use anything other than a mechanical pencil.

C. Erasers

I use a Mars Plastic Eraser for heavy duty changes and a narrow eraser for getting into tight spots

D. White Pencil

I often us a white Prismacolor Pencil to correct mistakes that can’t be erased, I also like to be able to draw on surfaces that aren’t white. (See the pictures of my work table.)

E. Ruler

This 6″ Ruler was one of the best things I added to my kit. You can’t eye-ball every line.

F. Compass

For years I used a cheap school compass, and when I upgraded to this guy, suddenly my life got so much better. Perfect for making curves, and circles.

G. Inking Pens

Uni-ball Pens are my preferred pen for inking on marker paper.

H. Scissors

A tiny pair of scissors like this comes in handy often.

I. Permanent Marker

I love the twin tipped Sharpie Markers. Sometimes I want to go nuts and make a permanent drawing impact (ie. leave my tag somewhere.) I don’t usually do that, but a permanent marker is great to have on hand.

J. X-acto Knife

I think everyone should have a quality X-acto Knife. I use this one from Martha Stewart Crafts because the lid stays on well, which is important in a tool that travels around with me. I also like to keep a few extra blades on hand; this box set does just that, and has a place to store the old blades.

K. Glue

It’s important to keep glue around for when you want to add something to your drawings. A glue stick works well, and leaves less mess in your bag. I also carry around a small roll of scotch tape.

L. Miscellaneous Tools

You probably need a Bone folder. I also try to keep something that will poke, but isn’t sharp, like this embossing tool, or a small wooden skewer. Think of other miscellaneous tools you might need – a needle and thread?

M. Pencil Bag

A gorgeous pencil bag will inspire your work. Check out this lovely one from Slide Sideways (now Year End Co.)


Well, now you’ve seen what I’ve been working with lately. It’s not your usual collection of art supplies, but life is all about trying unusual things!

*Support Adventures-in-Making by shopping from our Amazon store. We’ve selected a few things that we love, and think you will too. If you purchase through us, you pay no more for those items, but we get a small portion of the sales to further the adventures. Check out the whole store at http://astore.amazon.com/adveinmaki-20

AIM TOOLBOX: Martha’s Score Board Review

Toolbox: Martha's Score Board Review #productreview #marthastewart #craft #paper #tool
From 2014-2016 I chronicled my crafty endeavors on the site Adventures-in-Making. I’ve selected a few of those DIY’s, Recipes, and other posts to share on the site.

My awesome mother-in-law got me this Martha Stewart Score Board for Christmas. I have to admit I was excited by the possibilities (envelopes!) but didn’t see immediately how often I would use it.

Cut forward to the invention of the FlipOver planner and my elbow, sore from using a rotary scoring blade. I pulled out the score board, and I’ve been using it since.

Toolbox: Martha's Score Board Review #productreview #marthastewart #craft #paper #tool

To Love:

• I heart the square corner to line up in, and the ruler. I often will put a piece of masking tape on a score point I plan on using again and again.
• The 1/8 inch divisions usually give you all the options you need. Also, if you would like to make something like a curved/flexible spine you can do a few scores in a row, and they are all parallel and perfect.
• There’s a little box at the top of the board that stores your bone folder, or anything else you might like to keep in there. There is also a corner guide for scoring on 45 degrees that slips into a slot at the bottom of the board.
• The score result is lovely, straight, consistent, and deep
• I really like how flat and compact it is (especially compared to my rotary cutter). It’s a lot easier to find a home for it.

To Hate:

• DO NOT TAKE YOUR EYES OFF OF WHAT YOU’RE DOING. Do not glance away. Do not blink. If you blink the Angels will make your bone folder slip and will ruin what you are doing. I plan for 10% failure rate on this because I get distracted easily.
• The bone folder they provide is clumsy at best, and danged uncomfortable at worst. I replaced mine with a slightly sharpened bone folder from an art store. (I’ll tell you how I sharpened it, if you ask nicely.)
• I want to score everything, and I really don’t have time to make all my own envelopes.

Note: I did not receive any kind of compensation for this product review. At Adventures in Making we love sharing information about our favorite tools and resources because we believe knowledge should be shared and that we can all learn from each other’s experiences.

AIM TOOLBOX: Diamond 1 Corner Rounder Review

Toolbox: Diamond 1 Corner Rounder #tool #review #paper
From 2014-2016 I chronicled my crafty endeavors on the site Adventures-in-Making. I’ve selected a few of those DIY’s, Recipes, and other posts to share on the site.

I’m pleased as punch (no pun intended) with the Diamond 1 Corner Rounder I recently bought. It comes with a 1/4″ corner rounding die, which is great, plus ordered a couple of other dies as well.

It will punch a whole stack of paper/cardstock/etc at a time, which is super handy for rounding the corners on pads or books. The extra scrap falls down a hole at the back, into a trash drawer. There is another drawer at the front for extra dies, and tools.

Toolbox: Diamond 1 Corner Rounder #tool #review #paper

The extra dies I ordered are namely a wider diameter rounder, and a 45 degree straight cut (possibly because I was watching BSG at the time.) In total I have 4 blades, from a very small professional curve to a nice big friendly one. The blade pieces are a bit oily- I would advise wiping them down with a paper towel before hooking them on. The oil has never been on the blade portion, so it doesn’t transfer to the paper.

They look like this…

Toolbox: Diamond 1 Corner Rounder #tool #review #paper

Here are the cutting results from each blade: M (45 degree die), S (1/8″ die), M (1/4″ die comes with the cutter) and L (3/8″ die).

Toolbox: Diamond 1 Corner Rounder #tool #review #paper

Each die bolts onto the cutter with an Ikea style hex key. It’s very important to re-adjust the blue guides after replacing the blade, and from time-to-time while you’re using it. (If the blade is too close to the paper, or if it is slightly turned you get a small notch in the side of the curve. Look at the “S” example in the sample picture above. The curve goes into the paper, instead of going straight into the straight side.)

Toolbox: Diamond 1 Corner Rounder #tool #review #paper

Once you have your die blade bolted into place, the blue guides are loosened and adjusted.

Toolbox: Diamond 1 Corner Rounder #tool #review #paper

I cut several scrap pieces of Crane Lettra. It does well, but with a large stack there is a little variation in the shape of the curve from top to bottom. A stack 1/4 inch or smaller works best. These sheets were cut as a stack…

Toolbox: Diamond 1 Corner Rounder #tool #review #paper
The cutter has a nifty hole and drawer for catching paper scraps (though they will still get EVERYWHERE). The front drawer holds some of the things you need; a couple of blades, the hex keys, etc.

IMG_6749

All in all I’m happy- my biggest complaint is the constant adjusting of the blue guides. But it’s worth it to get rid of those sharp, pointy edges (and so much better than craft rounders.)

What I love about this tool

• It’s simple and easy to use.
• I’m able to change out the dies for different purposes.
• It cuts clean and fairly consistently on a variety of different papers and card stocks.
• Good quality and value

A couple of drawbacks I’ve found

• The blade really cuts into the blue plastic underneath. The set comes with a few replacements, and I can see I’ll need to replace the original pad more quickly than I’d hoped.
• It’s really important to get the paper lined up in the corner just right, so you have to really keep your eye on how you are putting the paper under the blade. There are guides, but for some reason it’s easy to slant the paper one way or another.
• I want to round everything. In fact, I just might.

I bought this guy from Binding101 because they were the cheapest. It’s also available from an Amazon dealer. It took about 5 business days to get to me, which was great.

Note: I did not receive any kind of compensation for this product review. At Adventures in Making we love sharing information about our favorite tools and resources because we believe knowledge should be shared and that we can all learn from each other’s experiences.

DIY TOOLBOX: Corner Rounder Craft Punch Review

From 2014-2016 I chronicled my crafty endeavors on the site Adventures-in-Making. I’ve selected a few of those DIY’s, Recipes, and other posts to share on the site.

I once watched a plucky design student cut 60 rounded corners with an Xacto knife. This is a painstaking process that I will not illustrate for you because it involves too much work and too many accidents. Although I had not been exposed to all of the crafting materials out there, I knew there must be a better way.

One of the major perks to working in a paper store was that we had access to almost all of the tools we sold, and to the wisdom of the older crafters around us. So when I decided to buy a corner rounder for myself, I bought this one…

IMG_4786

It’s called the Corner Adorner – Medium Corner Rounder by EK Success.

Don’t expect too much. It can only handle one piece of cover stock at a time, and after a few years (of abuse) some of the flimsy parts in mine broke. However, compared to the quality of most of the craft corner rounders it worked better from the beginning to the end with less finger strength needed. (Some of the others were just plain tough to use.) I replaced the broken punch with an identical one if that says anything.

A Hint- if you have punches like this (or any punches really) there are a couple of good ways to keep them working smoothly. If you punch through aluminum foil (which I usually fold over a few times) it is said to sharpen the blade. Punching through wax paper makes the whole thing move a little smother.

I think that rounded corners can be the touch that makes a paper project, but if you’re working on something with quantity make sure you have the necessary finger strength and time to get it done with this little sucker OR invest in the Diamond 1 Corner Rounder.

Note: I did not receive any kind of compensation for this product review. At Adventures in Making we love sharing information about our favorite tools and resources because we believe knowledge should be shared and that we can all learn from each other’s experiences.