From 2014-2016 I chronicled my crafty endeavors on the site Adventures-in-Making. I’ve selected a few of those DIY’s, Recipes, and other posts to share on the site.
When you’re setting up a shop, or a booth for the first time, it seems like everyone has advice. What they don’t tell you about is the agony, exhilaration, and frustration that is display.
I think that I could spend every waking hour working on display pieces in my store, and never be done– and yet, I love putting together something unique that shows off the artist’s work (and my cleverness.)
I’d been using this stripped-down silverware box for display, but didn’t feel like if was as useful as it should be. I starting thinking about buying a piece of cork board to hang jewelry pieces from the back- then realized I was ignoring a free material right at my fingertips, those wine corks someone had been hoarding. (Just so you don’t worry about me being crushed in a pile of old newspaper and wine corks, I wasn’t the one saving them; and this project used up almost all of them.)
I decided to line the back of the box in little slivers of cork. So I laid each cork out on a cutting board, and
cut it into four pieces. (It’s not an exact science. I wanted the cork backing to be a little uneven, like old masonry.)
After I had cut a whole bunch of corks, I got ready to glue.
I used Aleene’s Tacky Glue to glue each cork sliver down, packing them in tightly to fill the space.
At the edges, I cut the cork slivers in half to fill in where needed.
Once I filled in the whole back, I let it dry overnight, before filling the bottom portion with dry rice. (Rice is a display staple, not just a food!)
I pressed straight pins into the cork to hang jewelry. (I’ve found that the less fidgety a display is, the more comfortable people are using it. The pins are easier to pull earrings off of than clips.)
One more display case down.
(The jewelry pieces seen here are from Christine Stoll jewelry, available at the So There store, and her shop ChristineStoll.com.)
From 2014-2016 I chronicled my crafty endeavors on the site Adventures-in-Making. I’ve selected a few of those DIY’s, Recipes, and other posts to share on the site.
Most of their flowers use crepe paper, but I decided to try out a basic fringed flower with catalog pages that I had nearby to make multicolored, Nearly Free Fringe Flowers. (I usually use instruction books like this for inspiration and reference rather than following their tutorials.)
They were quick and easy, and I like the edgier look of the printed paper (compared to the bright soft dyed flowers I usually make.)
Supplies
• Fringe or Shredding Scissors – You could also fringe with regular scissors, but where’s the fun in that?
• Colorful Catalog pages from the recycling bin
• Regular Scissors
• Floral Wire
• Wire Cutters
• Floral Tape
OPTIONAL – Some sort of base. I used a baby food jar and a square of fabric or paper.
Droopy Flowers
I cut one catalog page into a 4″-5″ strip, then folded that strip in half. (I tried to choose pages that were heavy with one color on the front and back, so that the flower had a more consistent coloring.)
I used the fringing scissors to cut towards the fold, and left about 1/4 inch of the fold uncut.
I then cut a length of wire (about 24″) and folded it half gently to leave a little loop of wire at the top.
Starting at one end, I began to wrap my fringed strip of paper around the loop…
pulling it tight as I went.
Once I rolled the whole thing up, I secured the bottom of the paper with floral tape.
(A word on floral tape- if you haven’t worked with it before, it can be a little tricky. Most typed only become sticky when they are stretched, which means as you wrap it around the stem, you will want to pull it taut. If you’re having trouble, cut the tape and try holding it a different way. I typically hold the roll of tape in my left hand, and pull it firmly while spinning the flower stem in my right hand. Also, not all brands of floral tape are created alike. this one was a recommendation from a flower pro.)
I kept wrapping the stem all the way to the bottom, and voila…
a droopy paper flower! (Instructions for the base to follow.)
Puffball Flowers
To make the fluffier flowers, I started much the same way, with a 4″-5″ strip of paper. Again I fringed it, leaving a little uncut in the center.
I left the strip unfolded, and rolled it up.
Once it was completely rolled, I secured the center with a length of wire (Approx. 24″). I twisted the wire to tighten it around the paper roll.
Then I fluffed up the paper to make a poof, and wrapped the whole stem in floral tape.
I happened to have a few clean baby food jars around, so I used them as a base. I just cut a square of fabric (or wet paper) and pulled it firmly up around the jar and flower. Then I secured the top with wire.
They turned out very whimsical, and I won’t feel bad about tossing them when it’s time to dust.
I especially like the way they look with these pieces by Kate Endle.
From 2014-2016 I chronicled my crafty endeavors on the site Adventures-in-Making. I’ve selected a few of those DIY’s, Recipes, and other posts to share on the site.
After I had everything inked up for the hand printed wrapping paper, I looked over at the ink brayer and decided I wasn’t done printing. The 3″ surface of the brayer seemed perfect for decorating smaller surfaces and decorating gift bags.
For this design, I used the same basic shapes- lines and circles- but on a smaller scale.
Supplies I used
• 3″ Ink Brayer like this one
• Packaging Tape
• A piece of craft foam
• A hole punch
• Block or relief printing Ink- I used oil-based relief ink from Daniel Smith, in white. Speedball inks should work well too. (Make sure to read the cleanup instructions when you’re choosing an ink.)
• A smooth piece of glass or ceramic to spread ,my ink out on. (I used an old fridge shelf.)
• Plain gift bags, boxes, and everything else you can get your hands on. (Cats are off-limits.)
Since my brayer was doing double duty for this project, I made sure I rolled out a good amount of ink out on my glass palate. Then I cleaned the brayer with soap and water and dried it thoroughly.
Didn’t clean the brayer too well. But so what!?
Since I was going to be working with smaller pieces, I began by wrapping the brayer with packaging tape– sticky side out. This allowed me to stick small pieces of foam to the roller without fuss.I used two shapes to form my pattern- short strips and dots. I cut the craft foam into strips with a knife and put the pieces to the side, then
punched small holes out with two sizes of hole punches.
I cut and tore small pieces off the foam strip, and placed them in a kind of branchy pattern, decorating the ends with foam dots. The pieces stuck easily to the packaging tape making the whole thing easy peasy.
To ink up the design, I ran it back and forth across the ink palate until the foam was coated.
I tried a couple of different ways of decorating the gift bags, and settled on a basic “stripe” of design across the sides. The small pattern was a lot of fun to work with, and made a nice complement to the larger paper pattern.
The whole printing experience was such a joy. I printed everything I could get my hands on, and still want to do more. It’s such a simple way to make a gift really special.
and it’s so darn fun!!
What are you doing? Go print some gift wrap…
and send me photos.
From 2014-2016 I chronicled my crafty endeavors on the site Adventures-in-Making. I’ve selected a few of those DIY’s, Recipes, and other posts to share on the site.
For some reason I can’t quite master gift wrapping. I get the folding and the taping; but when it comes time to add bows or other decoration, everything just sort of unravels. (Literally, at times.)
So I discovered a trick- if you start with something unique and eye-catching, no one will ever notice your mistakes.
This year I decided to print a whole line of gift wrapping options– paper, bags, and boxes– for myself and for the store. It was easier (and much more satisfying) than I expected, and I ended up printing happily for a whole day.
I thought I would share the craft happiness by showing you two of the methods I used to turn basic kraft/craft stuff into something I love to look at.
First off, let’s talk great big, bold, wrapping paper…
Supplies I used
• Rolling pin
• Contact Paper to wrap around, and protect the rolling pin
• Craft Foam sheets and Craft Foam Stickers
• Double Stick Tape
• Block or relief printing Ink- I used oil-based relief ink from Daniel Smith, in white. Speedball inks should work well too. (Make sure to read the cleanup instructions when you’re choosing an ink.)
• A smooth piece of glass or ceramic to spread ,my ink out on. (I used an old fridge shelf.)
• A Brayer like this one.
• Plain kraft butcher paper.
To build a pattern like this one…
First I wrapped my rolling pin in contact paper to protect it from the stickers and double stick tape goo. I smoothed out as many air bubbles as I could, before trimming it to fit. (This is a very forgiving project.)
Since I had decided I wanted to make a pattern with lines in it, I used a piece of scrap paper to draw guide lines all the way around the pin.
I used the craft foam sticked first. This set included a whole bunch of sports ball shapes. I placed the circular balls along the guide lines I had drawn (randomly spaced)
Next I wanted to have thin lines of craft foam to place between the circles. To give them a sticker-like back I laid out several lines of double stick tape, before…
using my craft knife to trim them into strips.
I then placed these strips along the guide lines, and trimmed them where they met up with the circles.
I didn’t cover all of my guide lines because I wanted to add a little randomness into my pattern.
Once I had the pin covered with the design I wanted to print, I laid out a strip of ink on my glass and smoothed it out with my brayer. (Shown here half smoothed.) Once the ink was smeared out on the glass, I rolled the pin through the ink several times to make sure all of my pattern was coated. Then I did a test print on a scrap piece of paper by slowly rolling my design from one end to the other.
At this point I decided that I wanted to add more lines to my design. One of the nice things about this method is that you can add or subtract pieces as you go.
All inked up.
Once I was happy with the design, I went crazy. I tore sheets of kraft butcher paper into large squares (approximately 24″x24″). I inked up the roller, rolled the design all the way across the paper, reinked, shifted to the edge of my design and printed again. Since I was working with a randomish pattern of lines, the paper turned out great and was lots of fun to wrap with.
Tricks and Tips
• Pick a pattern idea that has some randomness to it. You will probably end up a little uneven, so it’s best to embrace the “handmade” look of it.
• If it looks like your roller is applying ink to your paper where you don’t have foam, consider adding another foam shape there to push your roller away from the paper. It will print, but that’s okay.
• If there’s no contact paper handy, you can cover the rolling pin with a pieces of card stock instead. Just tape it down with masking tape.
Things to Try
• Put a couple of colors of ink out on the glass and combine them to get a more tie-dye or ombre look.
• You can embed designs into the craft foam by simply drawing on it with a pencil or pen. I was too excited with the look of the solid shapes to try that with this project, but I plan to try it soon!
• This would be a great project to try with kids. Just grab a couple of sets of craft foam stickers from your local craft store (mine came from Michaels) and let them go to town!
Next I’ll show you how I made a smaller print to use on gift bags and boxes; but in the meantime, try this out.
From 2014-2016 I chronicled my crafty endeavors on the site Adventures-in-Making. I’ve selected a few of those DIY’s, Recipes, and other posts to share on the site.
Since this month’s DIY Craft Challenge Theme is Glitter I started thinking about all the things that sparkle around the holidays… and obviously thought “Robot”.
Actually, I’m not sure why I went straight to our metal friends, but that’s what the DIY Craft Challenge is all about! It’s a jumping off point for all your great ideas. I think glitter, I think robots. It’s just fine!
I’ve been playing with projects that use wine corks, and decided with a little paint, wire, and decoration I could make some amazing little guys for my tree.
The unusual suspects.
Supplies I used
• Wine Bottle Corks
• A large kitchen knife and cutting board
• Folk Art Metallic Acrylic Paint – in Gunmetal and Silver Sterling and paintbrush
• E6000® Craft Adhesive
• A nail and hammer and a scrap piece of wood (you could also use an awl)
• 18 Gauge Steel Galvanized Wire, needle nose pliers, and wire cutters
• Stud Earrings, buttons, and other decoration bits.
I used a few basic shapes to form my robots. Wheels were just thin slices off the corks. Bodies and heads were mainly full or shortened corks. Legs were cut long wise either in half or in quarters. I used a very sharp knife to cut several different shapes out and held those shapes together to see what looked “roboty” to me.
Once I decided on the shape of my robot, I painted each piece with the gunmetal color of acrylic. If you’re having trouble getting the paint to stick to the outside of the cork, rough it up a little with sandpaper.
After several (sloppy) coats of paint, I began drilling holes in my corks to run wire through. I love that using wire instead of glue means that the wheels, heads, and arms can all be spun or moved.
For the wheely robots, I ran the through the center body piece, and through each wheel.
Then secured the ends of the wire by making a loop with the wire, then folding the loops down against the wheel.
When I had a wire that I couldn’t run all the way through a piece, I applied a dab of E6000 adhesive to the end before pressing it into the cork.
Mad Robot Scientist Workshop
I have a huge stash of old earrings that were donated to me, and some of them were absolutely perfect for decorating the robots. It’s okay that they are a little mismatched; their hearts are in the right place. (Get it?!)
I had a great time making these little guys… and playing with them. I absolutely love taking the opportunity to look at everything in a new way.
Breaking down robots into a few basic shapes, then building them from an unexpected material.
While you’re brainstorming for the DIY Challenge, I encourage you to take the chance to try something a little different. Take the theme and run with it.
If you ever make robots like these, be careful.
They can get rowdy and make a royal mess out of your other decorations… especially if they have help.
From 2014-2016 I chronicled my crafty endeavors on the site Adventures-in-Making. I’ve selected a few of those DIY’s, Recipes, and other posts to share on the site.
I’ve been getting a lot of questions lately about my lettering, and a few poor souls have even asked if I teach a class (HA!). I tell everyone the same thing– my lettering has improved over the past year because I’ve been practicing. I know, that sounds like a cop-out, but it’s true! I’ve been making signs and chalkboards for the store, lettering in my prints, and wearing through Prismacolors like nobody’s business.
The key, for me, if to cut myself some slack while I’m practicing. Doodling letters is swell, and I take any opportunity to write words in weird ways.
This wrapping paper is a perfect example. I wanted to come up with a simple way to wrap a couple of small gifts, and went to the (very soggy) garden for inspiration. The remaining herbs were so pungent and gorgeous that I decided to use them as accents on a basic brown paper wrapping.
The whole thing’s pretty simple, and I’m sure you could come up with something even more special. The point is, I was able to mess around with letters and words without feeling too self-conscious. It’s just wrapping paper, and the herbs take center stage.
For the second gift, I made a tall bag with a few materials, and I thought I’d share my process.
Supplies I Used
• Plain brown kraft paper – you could also repurpose a grocery bag. • Fresh herbs from the garden • White Prismacolor Pencil • Flour & water to form a paste. You can also use glue, of course! • Scissors • Pencil • A can of spray paint as a base form
First I traced the base of the can to form the bottom of my bag…
and cut out the circle, about 1/4 inch inside my line.
I then measured the can and cut out a piece of paper for the main part of the bag, leaving myself about 2 inches of extra height to wrap along the bottom and enough width to cover the whole can with a little overlap.
I made a fold at that 2 inch mark, and cut a little fringe into that end (the bottom.) You’ll see why in a second.
I used my trusty white pencil to doodle words all over the paper.
I’ve started using a flour paste for a lot of paper projects, lately. Here I used about equal parts water and flour, mixed well, and applied with a cheap paintbrush.
I wrapped the paper around my spray paint can and painted both edges with my paste…
then began folding the fringe pieces down. Once those were down I painted them, and the round bottom piece with paste…
applied like so, and left to dry.
After it was completely dry (a few hours later) I trimmed the top of the bag, and filled it with my gift, and a little tissue paper.
Simple directions for a unique bag- and a great way to work on those lettering skills.
Are you inspired by herbs, like I am? Don’t forget to share you spice & herb work with us for our November DIY Challenge! We’d love to see what you think up.
From 2014-2016 I chronicled my crafty endeavors on the site Adventures-in-Making. I’ve selected a few of those DIY’s, Recipes, and other posts to share on the site.
If you’ve tried out our Paper Flower or Tie-Dye Tissue Paper DIYs you know how much fun it is to dye paper with liquid watercolor. There’s something so magical about the way the colors mix and flow through the paper fibers.
I was thinking about fall leaves, and of course paper dyeing seemed like the perfect way to capture the fiery colors of the season. After a little experimentation, I came up with a dyeing variation where leaves mysteriously appear on a gorgeous field of color.
Supplies You’ll Need
• White tissue paper
• A Pigment Based White Stamp Pad, like this Craftsmart Pigment Ink Pad from Michaels. Other stamp pads, or inks, should work too, just test them out on a piece of scrap tissue.
• Stamps, made or bought. I made my own in a method similar to the one Rachel used for her Stamped Scarf project. I carved my stamps from cheap erasers.
• Blick Liquid Watercolors
• Liquid Droppers and/or absorbent foam paint brushes.
Here’s a sneak peek at the leafy magic…
To get started- decide how you are going to use your tissue, and where the leaf design should be. If you are using it in a bag, I would suggest decorating the corners; if you’re going to wrap with it you will want to decorate from the center out.
Ink up your stamp, and press it firmly on your tissue. (You know- stamp it!)
Repeat with your stamps in a random pattern until you are happy with the design. It may be difficult to see the white ink on white tissue- but that’s what makes the next part so fun!
Let the stamped tissue dry for a few minutes, then fold the tissue several times and place on a plate or other protective surface. With your dropper or brush begin applying dabs, drops, and lines of liquid watercolor to the tissue.
The leaves should start to appear in white on your tissue. (The watercolor won’t soak into the area that you have covered with the stamp ink.) If you end up with excess dye puddling up on your design, simply dab with your brush or a paper towel.
Keep dropping and dabbing until you’ve covered the area with color.
Flip the tissue over and add color there as well. (It should soak through all the layers.) After you are done, let the sheets dry completely (at least overnight) before unfolding and using them.
Tada! Customized tissue that will make all your gifts pop.
Other things to try
• More color combinations
• Different stamps – maybe stars, initials, polkadots…
• Other types of ink – colored or metallic ink pads, block printing inks and more
• Drawing with metallic Sharpies or paint pens
• Drawing with dry watercolor pencils before dyeing
• Experimenting with other papers
From 2014-2016 I chronicled my crafty endeavors on the site Adventures-in-Making. I’ve selected a few of those DIY’s, Recipes, and other posts to share on the site.
Over the last couple of years I have started to accumulate little tchotchkes, despite my best efforts to “collect no functionless thing.” Every little piece has a special connection to my family and memory, so they’ll all just have to stay.
My mom’s house had shadowboxes everywhere, but most of them were type cases that I have since stolen and use for their original purpose (holding lead type for letterpress printing.) I decided to use scrap materials to make a shadowbox of my own, and since I love letters it turned into an ampersand.
Supplies for the Base
• Scrap Cardboard- lots of it, including one piece that was at least 12×12
• Printed Letter or Symbol – approximately 12″ x 12″. I printed on, and tape together several pieces of letter-sized paper to make my template.
• Pencil
• Scotch Tape
• Carbon Paper (if you have it)
• X-acto Knife
• Gummed Paper Tape (and wet sponge) or Wide Masking Tape – I like using gummed tape on projects like this because you can slide the tape while it is wet and get the placement just right.
• Scissors
Supplies for Paper Mache Layer
• Black and White Printed Newsprint (or other thin paper)
• Bowl
• All Purpose Flour
• Water
First I print out and pieced together the template using scissors and scotch tape. I lightly taped the template to a large piece of cardboard (at least 12″x12″), slipped the carbon paper underneath and traced along it with a pencil- checking periodically to make sure that I was making an impression on the cardboard. (Alternately you can cut the letter shape out of your template, and trace around it with pencil.)
I darkened the lines with pencil to make sure I knew where to cut.
Carefully I started cutting the shape out of the cardboard.
Voila!
To make the sides of the shadowbox, I cut several 2″ strips of cardboard, making sure that the corrugation ran the short way. (See image above.)
Since there are a lot of curves in the ampersand, I gave myself a head start by slitting along the ribs on one side of each of the strips. This allowed the strip to flex more easily along the curves.
Slowly I started covering each edge of the ampersand piece with the cardboard strips, following around each side.
I attached each piece using gummed paper tape (masking tape would work as well.) On heavy curves, I stuck the tape to the side first, then made small cuts that overlap and lay flat on the back side. (Everything will be covered with with paper mache, so little mistakes are a-okay.) I cut and began a new piece at each sharp corner, and connected them with gummed tape. REMEMBER: It’s just cardboard, so if you mess up it’s okay! Just toss that piece and try again. I messed up a lot.
After I had the whole shape outlined and taped, I made a few more strips of board for shelves. These strips are 1.75″ each, so that they are a little less deep than the outside walls.
I took a good look at what I wanted to store, and tried to leave space for each item. (If you have larger or smaller nicknacks you might want your shelves placed differently.) I trimmed the shelves to size, and attached them to the walls using more gummed tape pieces.
With the cardboard base built, I got everything ready for paper mache. I typically combine water and flour in a bowl until I have something that resembles very runny pancake batter.
I tore newspaper into small strips, and dipped it into the flour mixture, then laid a single layer or pieces all along the base, including the sides and back. (Again, mistakes are OK! You can always remove a piece and replace it.)
A gloppy mess.
After I had the base completely covered, I let it dry in front of a heater for a few hours, then went back and added a few more pieces to the spots I had missed. (You can add a whole second layer if you want, it will make the form looks smoother, and give you a little extra strength.)
Well, I’m done for now. I love the way my keepsakes fit into this shadowbox… and happy that I made it using only scrap materials.
Other Things I Might Try
• Sealing it with a spray sealant. I’m skipping this step for now, but if everything falls apart, I’ll let you know!
• Painting the whole shape, or just the inside. If you mix acrylic paint with glue you can make a partially translucent color. That way the print will still show through.
• Do a whole word of shadowboxes.
From 2014-2016 I chronicled my crafty endeavors on the site Adventures-in-Making. I’ve selected a few of those DIY’s, Recipes, and other posts to share on the site.
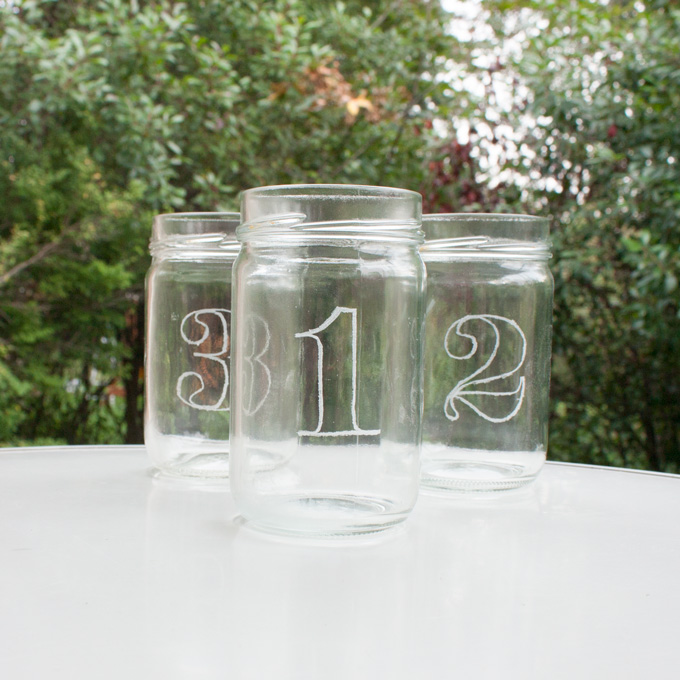
I used to have a set of numbered glasses that I loved. Each was marked (1-6) with a decal. When people would visit, I would give each their own number, so they wouldn’t mix up glasses. It was lovely.
Unfortunately it’s a partial set now, because they were delicate, and I am clumsy.
It’s been my goal to replace them for some time. So that was my first project when I got the Dremel etching underway.
Refer to your tool manual. I have listed my safety gear below, but it might not be adequate for your setup. Take all the precautions you can, and be ready to pay attention to what you’re doing.
• A respirator or dust mask.
• Safety goggles or Safety Glasses.
Tool Tips
• Practice a little bit with the tool to get an understanding of how it works on glass.
• Higher speeds seem to work best on glass.
• Build a jig to hold your glass in place while you work on it. I used a piece of plywood with scrap “rails” attached to it. My jig is painted black so I can easily see my project.
• Rubberized gloves may make it easier for you to hold onto your jar.
• Remember not to etch too deeply into the glass. Don’t hold the bit in one place for too long. Your goal is to make a pattern that is just barely felt when you run your finger across it.
Measure your glass and decide how large you would like your number to be. (I decided that a 2.5 inch number would be perfect. That’s roughly 180 pt.) Choose your size, and type numbers in your favorite font. Make sure to leave some extra space to cut the templates apart.
Cut the numbers into strips that will fit easily within your glass. You want the paper to be pressed as closely to the glass as possible.
Use a little tape to hold the paper template in place.
Now it’s time to etch! First take a good look at your number and make sure it’s straight and located where you want. You will notice that the thickness of the glass will affect the way you see your template from different angles, and it may be difficult to trace the number perfectly. If you like, you can trace the number on the glass with a Sharpie to make sure you have the shape just right. (The Sharpie mark will come off easily after you are done etching.)
Your first etching step (shown above) is to make a light outline of your number, using the pointed end of the bit and a very soft touch. Try to keep as straight-on to your template as possible– and cut yourself some slack. These are going to be awesome even if you have a stray line or two.
Once you have outlined the whole number lightly, remove the template and retrace the number to thicken up your outline. Hold the bit close to parallel with the surface of the glass to get a thicker, more consistent, line.
If you are happy with the shape of your outline, move on to outline the other numbers you would like to do in the same way.
Voila! You have numbered glasses! But don’t stop there…
Using the pointed end of the bit, add small designs and lines to the inside of your number. These little additions will look fun, camouflage any mistakes you made with the outline, and make the numbers pop-out on the glass. (This was my favorite part of the whole project. Any opportunity to doodle.)
I’m excited to show off my new glasses, and love that I turned something that should have been recycled into something I can use for years.
Other symbols to try
• Initial Letters for the people who visit often, or to give as gifts.
• Card Suits for game night (Which drink is trump?)
• Astrological Symbols
• Different Speech Bubbles
• Animal Silhouettes
• Punctuation marks (which I love)
From 2014-2016 I chronicled my crafty endeavors on the site Adventures-in-Making. I’ve selected a few of those DIY’s, Recipes, and other posts to share on the site.
***
We’re not happy unless we’re making things- which means we have a whole slew of projects from the time before A-i-M. We thought we take time now-and-again to share some of these projects from the DIY vault. This one’s more of a Show + Tell, but it’s a great example of how you can add creativity into you life anywhere…. even with scraps.
Have I mentioned I am unable to throw anything away?
A few years ago, after printing and trimming massive quantities of cards, I was left with a treasure trove of cotton, cover-weight paper strips (which I have since started using to make handmade paper).
I grabbed a bottle of Elmer’s glue and started working them into simple Christmas decorations, using the strength of the stock, and a few tricky reinforcing pieces disguised as decoration. Eventually the pieces began to turn into birds, trees, and other fun critters.
I would find a picture of an animal, and work with the paper scraps until they started to take a shape I liked. It was fun trying to recreate animals with the strips, using just glue and the natural resistance of the cover-stock.
I enjoyed playing with them, and making scenes and patterns out of the shapes. Nothing beats a quick, simple exercise that uses scrap materials.
I’ve got to go now- there’s a box of black paper scraps calling my name.


You must be logged in to post a comment.