AIM TODAY: Get your space in order.

IMG_4139
From 2014-2016 I chronicled my crafty endeavors on the site Adventures-in-Making. I’ve selected a few of those DIY’s, Recipes, and other posts to share on the site.

Yesterday I picked up an unlabeled box, fought to pull the lid off, and was greeted by an explosion of confetti.

You might think that’s a funny prank- except that it was me who had the bright idea of putting the confetti in that box in the first place. Dumb. My own prank would have been thwarted by a simple “Confetti” label on the box. Next time- maybe.

If you’re like me, this dreary weather makes staying under the covers all day pretty appealing. I’ve been in kind of a creative rut, and even a self imposed vacation didn’t fix everything. Well, time to try something new…

Order to fight the blues.

It’s time to clean, organize, dump, and declutter. Here are a few ways I’ve been getting things in order:

• Organizing, filing, and labeling my tools and materials. I am much happier when everything has a home. I am ecstatic if that home makes sense and is easy to access. I try to keep my most-used tools handy, and put less-used tools and materials in labeled boxes that will be easy to find when it’s time to use them.
• Trying out those “I bet I could…” projects and tools. I have a tendency to accumulate ideas and materials, but it’s hard to get to everything. If I have little projects that have been sitting in my head for a while, I try to take an afternoon to try them out for real- even if it doesn’t feel like the best use of my time. If the project is a dud (which happens) I’ll know it and be able to move on to other ideas.
• Dumping materials and tools I’m never going to get to, or don’t really want. I’m trying to be really honest with myself about what I really want to spend my limited time doing. If I have a hole punch I will never use, or paper that I abhor, I’m better off passing it onto someone who would like it. If it’s something I saved from the recycling bin (no judgement) then maybe it’s time for it to go back in there… and maybe that “confetti” was really just the holes punched from a binding project.
• Similar to the “I bet I could” projects, I’ve been working on the small quick projects I put off in favor or more in-depth creative pursuits. Framing and hanging posters at my house, designing signage and displays for the shop, etc.

Do you have any tricks you use to simplify your work and your workspace? We’d love to see!

AIM DIY: Woven Paper Gift Basket

IMG_4049
From 2014-2016 I chronicled my crafty endeavors on the site Adventures-in-Making. I’ve selected a few of those DIY’s, Recipes, and other posts to share on the site.

After my experiment with the rolled paper gift basket, I decided that I needed a quicker version that I wouldn’t feel bad about parting with as a gift basket. (The rolled paper version was lovely, but it took so much time that it was more like a gift in itself.)

Using similar methods, and the same materials, I came up with a very simple woven basket that could easily be sized to fit different gifts.

Supplies I used

• A medium sized stapled catalog
• Elmer’s Glue-All
• A dowel for rolling strips
• Clothes pins
• Scissors
IMG_3949
My first step was to remove the staples that bound the catalog, and to cut it length-wised into 5″ pieces.

IMG_3956
I took each piece and quickly rolled it around a wooden dowel, starting at the corner. I then secured the other corner with a drop of glue, and carefully  slid the paper tube off of the dowel. I then flattened it with my fingernail into a long strip of paper.

IMG_3966

IMG_3969
I estimate how many strips of paper I wanted in the width and length of my basket (in this case it was 3 pieces by 5 pieces), and started weaving the base pieces together- alternating “over” and “under”. Every once in a while I added glue between pieces of paper to ensure that things wouldn’t slide around while I was working (a little bit goes a long way.)

IMG_3972
Once I had my base woven I used a straight edge to fold all of the woven strips to the center. This made it easier to begin the sides of my basket.

IMG_3978

IMG_3983
Using a similar “over and under” method, I wove strips through the existing strips. I secured each piece with a tiny drop of glue, and clipped the pieces together with clothes pins. When I got to the end of a side, I made a fold in the strip I was working with, and began weaving it into the next side. When I reached the end of my weaving strip, I attached it to another loose strip with a drop of glue, then continued weaving until I made it all the way around the basket.

IMG_3986
I repeated this with another strip of paper, weaving in and out along every side of the basket, and securing with glue and clothes pins. Once everything felt dry and stable, I simply trimmed the strips at the top of the weaving, and voila…

IMG_3995
a super simple gift basket made out of recycled materials- sure to brighten someone’s day.

IMG_4025
I have to say I don’t love the look of this basket as much as the rolled paper version- but it took significantly less time, and I think with a little experimentation I could (or you could) make it into something really special.

IMG_4064

Things to try

• Using more, smaller strips of paper for a more intricate texture.
• Using brown kraft paper for a simpler look.
• Weaving at a 45 degree angle, like this project from {nifty thrifty things}
• Finishing the top of the basket a little cleaner, either by covering them with a strip, or by rounding them off.
• Using stitched paper.
• Coming up with some sort of nifty handle.
• Making a lid so it can close like a box.
• Making a huge version that could be used as a fruit basket.

AIM DIY: Herb and Spice Gift Wrap

IMG_3859
From 2014-2016 I chronicled my crafty endeavors on the site Adventures-in-Making. I’ve selected a few of those DIY’s, Recipes, and other posts to share on the site.

I’ve been getting a lot of questions lately about my lettering, and a few poor souls have even asked if I teach a class (HA!). I tell everyone the same thing– my lettering has improved over the past year because I’ve been practicing. I know, that sounds like a cop-out, but it’s true! I’ve been making signs and chalkboards for the store, lettering in my prints, and wearing through Prismacolors like nobody’s business.

The key, for me, if to cut myself some slack while I’m practicing. Doodling letters is swell, and I take any opportunity to write words in weird ways.

IMG_3759
This wrapping paper is a perfect example. I wanted to come up with a simple way to wrap a couple of small gifts, and went to the (very soggy) garden for inspiration. The remaining herbs were so pungent and gorgeous that I decided to use them as accents on a basic brown paper wrapping.

The whole thing’s pretty simple, and I’m sure you could come up with something even more special. The point is, I was able to mess around with letters and words without feeling too self-conscious. It’s just wrapping paper, and the herbs take center stage.

IMG_3790
For the second gift, I made a tall bag with a few materials, and I thought I’d share my process.

IMG_3732

Supplies I Used

• Plain brown kraft paper – you could also repurpose a grocery bag.
• Fresh herbs from the garden
• White Prismacolor Pencil
• Flour & water to form a paste. You can also use glue, of course!
• Scissors
• Pencil
• A can of spray paint as a base form

IMG_3746
First I traced the base of the can to form the bottom of my bag…

IMG_3751
and cut out the circle, about 1/4 inch inside my line.

IMG_3754
I then measured the can and cut out a piece of paper for the main part of the bag, leaving myself about 2 inches of extra height to wrap along the bottom and enough width to cover the whole can with a little overlap.

IMG_3755
I made a fold at that 2 inch mark, and cut a little fringe into that end (the bottom.) You’ll see why in a second.

IMG_3760
I used my trusty white pencil to doodle words all over the paper.

IMG_3761
I’ve started using a flour paste for a lot of paper projects, lately. Here I used about equal parts water and flour, mixed well, and applied with a cheap paintbrush.

IMG_3764
I wrapped the paper around my spray paint can and painted both edges with my paste…

IMG_3765
then began folding the fringe pieces down. Once those were down I painted them, and the round bottom piece with paste…

IMG_3768
applied like so, and left to dry.

IMG_3771
After it was completely dry (a few hours later) I trimmed the top of the bag, and filled it with my gift, and a little tissue paper.

IMG_3819
Simple directions for a unique bag- and a great way to work on those lettering skills.

IMG_3790
Are you inspired by herbs, like I am? Don’t forget to share you spice & herb work with us for our November DIY Challenge! We’d love to see what you think up.

(You know, keep life spicy.)

AIM DIY: Appearing Leaf Drop-Dyed Tissue

IMG_3541
From 2014-2016 I chronicled my crafty endeavors on the site Adventures-in-Making. I’ve selected a few of those DIY’s, Recipes, and other posts to share on the site.

If you’ve tried out our Paper Flower or Tie-Dye Tissue Paper DIYs you know how much fun it is to dye paper with liquid watercolor. There’s something so magical about the way the colors mix and flow through the paper fibers.

I was thinking about fall leaves, and of course paper dyeing seemed like the perfect way to capture the fiery colors of the season. After a little experimentation, I came up with a dyeing variation where leaves mysteriously appear on a gorgeous field of color.

IMG_3375

Supplies You’ll Need

• White tissue paper
• A Pigment Based White Stamp Pad, like this Craftsmart Pigment Ink Pad from Michaels. Other stamp pads, or inks, should work too, just test them out on a piece of scrap tissue.
• Stamps, made or bought.  I made my own in a method similar to the one Rachel used for her Stamped Scarf project. I carved my stamps from cheap erasers.
Blick Liquid Watercolors
• Liquid Droppers and/or absorbent foam paint brushes.

Here’s a sneak peek at the leafy magic…

To get started- decide how you are going to use your tissue, and where the leaf design should be. If you are using it in a bag, I would suggest decorating the corners; if you’re going to wrap with it you will want to decorate from the center out.

IMG_3435
Ink up your stamp, and press it firmly on your tissue. (You know- stamp it!)

IMG_3437
Repeat with your stamps in a random pattern until you are happy with the design. It may be difficult to see the white ink on white tissue- but that’s what makes the next part so fun!

IMG_3450
Let the stamped tissue dry for a few minutes, then fold the tissue several times and place on a plate or other protective surface. With your dropper or brush begin applying dabs, drops, and lines of liquid watercolor to the tissue.

IMG_3455
The leaves should start to appear in white on your tissue. (The watercolor won’t soak into the area that you have covered with the stamp ink.) If you end up with excess dye puddling up on your design, simply dab with your brush or a paper towel.

IMG_3462
Keep dropping and dabbing until you’ve covered the area with color.

IMG_3467
Flip the tissue over and add color there as well. (It should soak through all the layers.) After you are done, let the sheets dry completely (at least overnight) before unfolding and using them.

IMG_3504

IMG_3560
Tada! Customized tissue that will make all your gifts pop.

Other things to try

• More color combinations
• Different stamps – maybe stars, initials, polkadots…
• Other types of ink – colored or metallic ink pads, block printing inks and more
• Drawing with metallic Sharpies or paint pens
• Drawing with dry watercolor pencils before dyeing
• Experimenting with other papers

AIM DIY: Ampersand Shadow Box

IMG_3313
From 2014-2016 I chronicled my crafty endeavors on the site Adventures-in-Making. I’ve selected a few of those DIY’s, Recipes, and other posts to share on the site.

Over the last couple of years I have started to accumulate little tchotchkes, despite my best efforts to “collect no functionless thing.” Every little piece has a special connection to my family and memory, so they’ll all just have to stay.

My mom’s house had shadowboxes everywhere, but most of them were type cases that I have since stolen and use for their original purpose (holding lead type for letterpress printing.) I decided to use scrap materials to make a shadowbox of my own, and since I love letters it turned into an ampersand.

Supplies for the Base

• Scrap Cardboard- lots of it, including one piece that was at least 12×12
• Printed Letter or Symbol – approximately 12″ x 12″. I printed on, and tape together several pieces of letter-sized paper to make my template.
• Pencil
• Scotch Tape
• Carbon Paper (if you have it)
• X-acto Knife
Gummed Paper Tape (and wet sponge) or Wide Masking Tape – I like using gummed tape on projects like this because you can slide the tape while it is wet and get the placement just right.
• Scissors

Supplies for Paper Mache Layer

• Black and White Printed Newsprint (or other thin paper)
• Bowl
• All Purpose Flour
• Water

IMG_3208
First I print out and pieced together the template using scissors and scotch tape. I lightly taped the template to a large piece of cardboard (at least 12″x12″), slipped the carbon paper underneath and traced along it with a pencil- checking periodically to make sure that I was making an impression on the cardboard. (Alternately you can cut the letter shape out of your template, and trace around it with pencil.)

IMG_3211
I darkened the lines with pencil to make sure I knew where to cut.

IMG_3228
Carefully I started cutting the shape out of the cardboard.

IMG_3229
Voila!

IMG_3216
To make the sides of the shadowbox, I cut several 2″ strips of cardboard, making sure that the corrugation ran the short way. (See image above.)

IMG_3234
Since there are a lot of curves in the ampersand, I gave myself a head start by slitting along the ribs on one side of each of the strips. This allowed the strip to flex more easily along the curves.

IMG_3243
Slowly I started covering each edge of the ampersand piece with the cardboard strips, following around each side.

IMG_3251
I attached each piece using gummed paper tape (masking tape would work as well.) On heavy curves, I stuck the tape to the side first, then made small cuts that overlap and lay flat on the back side. (Everything will be covered with with paper mache, so little mistakes are a-okay.) I cut and began a new piece at each sharp corner, and connected them with gummed tape.  REMEMBER: It’s just cardboard, so if you mess up it’s okay! Just toss that piece and try again. I messed up a lot.

IMG_3257

IMG_3262
After I had the whole shape outlined and taped, I made a few more strips of board for shelves. These strips are 1.75″ each, so that they are a little less deep than the outside walls.
I took a good look at what I wanted to store, and tried to leave space for each item. (If you have larger or smaller nicknacks you might want your shelves placed differently.) I trimmed the shelves to size, and attached them to the walls using more gummed tape pieces.

IMG_3273
With the cardboard base built, I got everything ready for paper mache. I typically combine water and flour in a bowl until I have something that resembles very runny pancake batter.

IMG_3276
I tore newspaper into small strips, and dipped it into the flour mixture, then laid a single layer or pieces all along the base, including the sides and back. (Again, mistakes are OK! You can always remove a piece and replace it.)

IMG_3278
A gloppy mess.

After I had the base completely covered, I let it dry in front of a heater for a few hours, then went back and added a few more pieces to the spots I had missed. (You can add a whole second layer if you want, it will make the form looks smoother, and give you a little extra strength.)

IMG_3281
Well, I’m done for now. I love the way my keepsakes fit into this shadowbox… and happy that I made it using only scrap materials.

IMG_3298b

Other Things I Might Try

• Sealing it with a spray sealant. I’m skipping this step for now, but if everything falls apart, I’ll let you know!
• Painting the whole shape, or just the inside. If you mix acrylic paint with glue you can make a partially translucent color. That way the print will still show through.
• Do a whole word of shadowboxes.

What would you make?

AIM TOOLBOX: Dremel Micro Review for Glass Etching

IMG_2839

From 2014-2016 I chronicled my crafty endeavors on the site Adventures-in-Making. I’ve selected a few of those DIY’s, Recipes, and other posts to share on the site.

I have a secret. I’ve been hoarding glass bottles… and jars. Sure, I’ve been drinking out of a set of 6 jars, but what no one knows is I have a whole box of them in my closet.

Shoot. Now you know.

The big plan was to use etching cream to mask and etch them into glass masterpieces– but something always stopped me. It may have been that the first time I pulled out the etching cream, Safety Husband insisted on reading the ingredients and warnings. He then set out a strict list of suggestions for using the DANGEROUS stuff I got from the craft store. I followed the suggestions once, but lived in fear of getting out the cream ever again. I had the PPE for it, but even so, it was a little scary. “Wear gloves. You don’t want it eating through your skin… to your bones.

We live in a world of excess caution, over here.

Safety Husband recommended safety goggles and a respirator- talked down to spectacles and a dust mask.
For Dremel Etching, Safety Husband recommended safety goggles and a respirator- accepted spectacles and a dust mask.

The box of glass lived to taunt me. Sitting in there, instead of going to the recycling bin where it belonged; until I got the bright idea of looking for alternate etching options. There are a lot of great, videos, but the one from Dremel sold me. It was time to replace our old rotary tool, so after some shopping I decided on the…
Dremel Micro, which is cordless.
•I bought two diamond bits, but I’ve only got around to playing with the one that looked most useful, the Dremel Diamond Wheel Point Bit.
** UPDATED 12/14 – I’ve since started using two different diamond bits with more success. 7105 Diamond Ball Pointand 7103 5/64-Inch Diamond Wheel Point

Experiments

I tried several different ways of getting my initial artwork laid out, including drawing the design on with a Sharpie, as well as using masks that we had made with the intention of using the etching cream.

Tara Bliven drew and cut out this beautiful mask for me.

We drew and cut these masks out of contact paper, but you could also use masking tape. They are a great way to start out, because the mask will help you learn to control the tool. Thankfully, this is a cordless dremel tool so you don’t have to worry about the wire tangling whilst you’re trying to follow the guide. If you jog out of the lines, the mask material will shred before you mark the glass, giving you one chance to screw up without consequences.

IMG_2849
The mask is definitely the most time consuming and tedious way to go. I’ve moved on to freehand patterns, and occasionally use paper templates that taped to the other side of the glass. (More on that later.)

IMG_2873

Tips

•Higher Speeds (controlled with a button on this model) work much better for etching glass. I usually use the second to highest speed. The highest works even better, but the sound is skull-splitting, so I only use it when absolutely necessary.
•Using the bit I’ve listed above, you will mainly be making thinnish lines, so plan on going over your artwork a couple of times. It works best to hold the bit as close to parallel with the surface of the piece.
•Make a jig for round items. I took a couple of wood scraps and made a kind of rail for the glasses to lay in. (See in the photos above.) Make sure it’s small enough to move around, as you will want to be able to approach your piece for all angles. After my experiments, I sprayed the whole jig black so I could see my work more easily.
•Wear Protective Gear… or you’ll get in trouble. I found a dust mask and glasses worked for me, but it might be good to start out with even more coverage, so you might want to look for personal protective equipment to suit you and the job you’re about to undertake. Remember that your glass could shatter at any time.
•Start with thick glass pieces, and don’t grind too much in one place. This is not a tool for drilling, so you’re more likely to shatter your pieces than cut cleanly through.
•Start with trash pieces you’re not afraid to throw away. There’s definitely a learning curve.
•Hand-wash any pieces, to make sure you’re not shocking the thinned glass with hot water.
•Work outside. You’ll be generating a ton of dust. While I haven’t had any sharp pieces (yet) it’s nice to let nature get rid of the dust.
•This is a no-distraction project. Don’t plan on watching TV while you work with power tools.

Things to Love

•It’s lightweight. Initially I was planning to use a flex shaft like they use in the video, but the cable is not very flexible, and I decided the lack of cord would be a benefit.
•It compact and easy to transport (although it does not come with a carrying case.)
•The battery lasts longer than I do. I haven’t had to stop what I was doing to recharge.
•I haven’t hurt myself (yet). This is always remarkable.

Things to Hate

•The “Lock” button sticks out just above the power button, and I have hit it accidentally a couple of times while the Dremel is running. It makes a terrible sound to tell me I’m killing it to death.
•It’s still a little clumsy. Even though the end is tapered so you can hold on to it, it’s more like trying to write legibly with a Squiggle Pen than an actual writing implement.
•It is quite tricky to get make a curve. A lot of this has to do with skill, and the kind of bit I’ve been using.
•The sound, especially at higher speeds. It makes a high keening when you’re using it on the glass. The birds have been complaining about this as well. It’s just life in the etching game.

Things to Try

•More bits. I tried scratching the glass with non-diamond bits with little result, but now that I’m hooked on the etchin’, I’m going to try everything. (If you have suggestions, I’d love to hear from you.)
•More freehand designs.
•On flat surfaces, like plates, trays, etc. On mirrors.
•Make a set of matching glasses, with patterned numbers, using paper templates. That’s pretty specific, huh? I guess a DIY is in the works… but until then, have fun!

IMG_2858

AIM DIY: Tiny Marker Stamps

IMG_2272
From 2014-2016 I chronicled my crafty endeavors on the site Adventures-in-Making. I’ve selected a few of those DIY’s, Recipes, and other posts to share on the site.

I was invited to join the local gallery at an Art Outside event this summer, and put together a mini-version of my paper flower class for kiddos who were attending. I brought a bunch of pre-dyed flower petals so that they could form a little flower on a bobby-pin, to use anywhere.

I thought it would be fun to let them hide some bugs in their buds, so I carved a few mini-stamps of beetles, spiders, and bees to stamp amongst the petals. In order to make the tiny stamps easier to use, I came up with a way of sticking them in the end of Crayola Broad Line Markers. I thought I’d share!

IMG_2195
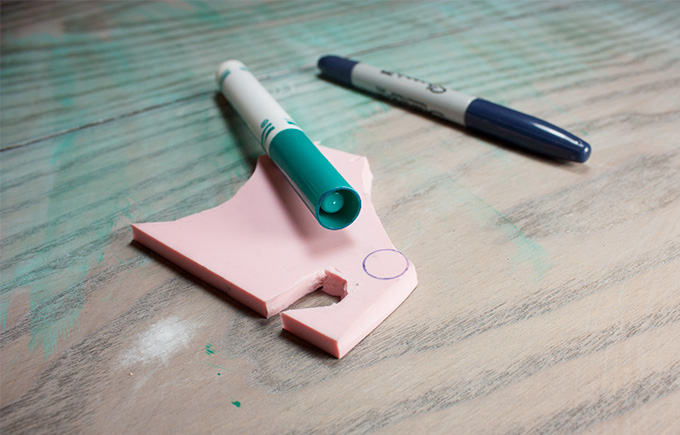
First I cut out a circle to fit the end of the marker by coloring the cap of the marker with a Sharpie
then immediately stamped it onto a piece of Speedy Carve Rubber Stamp Block.

IMG_2198
I cut the tiny circle out with a craft knife and then

IMG_2201
drew a tiny spider to carve out.

IMG_2204
Then I pushed and shoved and slowly worked the pieces of rubber into the end of the marker. It’s good to have a tight fit so it won’t work itself out as you use it.

IMG_2207
I used Speedball Linoleum Cutter to carve the extra pieces out of the rubber. Because the stamp is so small, it’s important to work slowly on small sections. Actually, the marker makes it a lot easier to carve, and kept my other hand away from the sharp tools.

I tested the stamp repeatedly, by using the marker it was attached to to color the stamp. I ran the marker over the design, stamped, and used that information to remove more of the rubber. The more stamps I made, the simpler they got. It is really difficult to keep a lot of detail on such a small surface.

IMG_2232
Finally I had a sweet little bug stamp to add to the flowers. Bwahahaha.

IMG_2260
I have all sorts of stamps I want to make using this method. Some of them might even be un-creepy!

If you’d like to try this project yourself, check out the supplies at the Adventures in Making Amazon Store . If you buy through our store you’ll pay the usual Amazon price, but we’ll get a small percentage to help us power our creative adventures. You’re great!

AIM DIY: Seed Sling-Shot + Free Template

DIY: Seed Sling-Shot + Free Template
From 2014-2016 I chronicled my crafty endeavors on the site Adventures-in-Making. I’ve selected a few of those DIY’s, Recipes, and other posts to share on the site.

Now, a typical person might throw away the scrappy evidence of a long week of paper making… but no one said I’m typical. My most recent batch of paper contains wildflower seeds, so I decided the scraps would make lovely confetti (and grow, too!)

Using this video tutorial, I made an origami pop-up box perfect for storing a small stash of confetti or flower seeds.

DIY: Seed Sling-Shot + Free Template
I used paper that already had colored pattern on one side, and as an added “bonus”, I printed a corny poem and a thank you message in the box.  So all the people who get one will know to “pull the flaps, fling, and make it bloomy.” I closed each box with a piece of ribbon.

I’m sure you can come up with something less silly- so I’m giving you a pdf template* you can add your own wording to. Click the image below, and go to town!

The template is 8.5×11 inches, and you can resize if you need to. Make sure to use light-weight paper, and fold the printing into the box while you’re working.

SLINGSHOTTEMPLATE

*After you save the file to your desktop, you should be able to open and edit the file in Adobe Reader. If you don’t have Reader, it’s available for free here.

AIM DIY: Pom-pom Cat Toy

From 2014-2016 I chronicled my crafty endeavors on the site Adventures-in-Making. I’ve selected a few of those DIY’s, Recipes, and other posts to share on the site.

Cooper, who is now becoming a-big-cat, has finally demolished his favourite toy (seen here with kitten Cooper.)

DIY: Pom-pom Cat Toy from Adventures In Making blog #craft #yarn #tutorial

In a typical bout of consumeristic frenzy, I searched high and low for a replacement. NEEDS : Yarn pom-pom with bell. FINDS : Nothing. At some point I thought “I have yarn, I have bells… lets craft this thing.”

What You Need

• Yarn
• Cardboard
• Circle shape to trace
• Scissors
• Bell (optional)

DIY: Pom-pom Cat Toy from Adventures In Making blog #craft #yarn #tutorial

Patrick, Kat, and I traced two concentric circles on a piece of cardboard, and cut along them to make a ring with an opening. Then we did it again so we had two rings. We cut a piece of yarn or heavy-duty thread about a foot long and sandwiched it between the two cardboard rings with the ends sticking out at each side of the opening. Using our fingers to hold the sandwich together, we starting wrapping the whole thing with yarn.

DIY: Pom-pom Cat Toy from Adventures In Making blog #craft #yarn #tutorial

So we wrapped…

DIY: Pom-pom Cat Toy from Adventures In Making blog #craft #yarn #tutorial

and wrapped…

DIY: Pom-pom Cat Toy from Adventures In Making blog #craft #yarn #tutorial

and wrapped…

DIY: Pom-pom Cat Toy from Adventures In Making blog #craft #yarn #tutorial

until it was about this thick.

DIY: Pom-pom Cat Toy from Adventures In Making blog #craft #yarn #tutorial

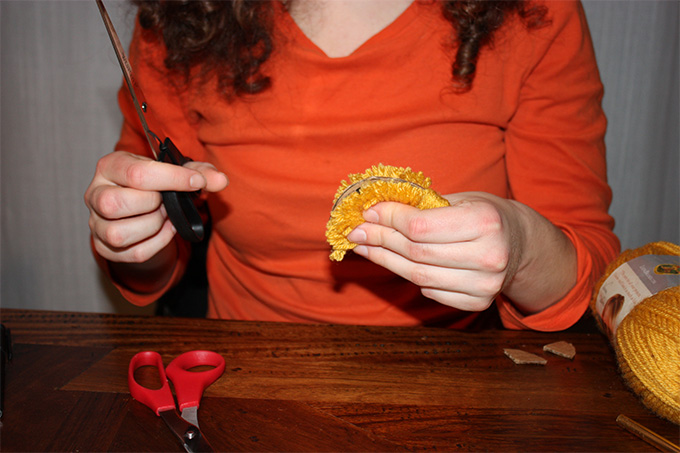
Then, while holding it carefully, we cut between the layers of cardboard, pulling the inside string to gather up the pieces.

DIY: Pom-pom Cat Toy from Adventures In Making blog #craft #yarn #tutorial

and we cut…

DIY: Pom-pom Cat Toy from Adventures In Making blog #craft #yarn #tutorial

and pulled until it made a pom-pom.

DIY: Pom-pom Cat Toy from Adventures In Making blog #craft #yarn #tutorial

We tied up the strings, used them to attach a jingle bell, and gave it a haircut.

DIY: Pom-pom Cat Toy from Adventures In Making blog #craft #yarn #tutorial

Here’s one…

DIY: Pom-pom Cat Toy from Adventures In Making blog #craft #yarn #tutorial

and here are three.

During this adventure I learned…

• Cheap yarn works best for pom-poms.
• It is faster and easier to make a pom-pom than shop for a cat toy.
• I should always employ a quality control expert for crafty inspections.

AIM SHOW + TELL: Handmade Paper Envelopes

Show + Tell: Handmade Paper Envelopes #adventuresinmaking #crafting #craft

From 2014-2016 I chronicled my crafty endeavors on the site Adventures-in-Making. I’ve selected a few of those DIY’s, Recipes, and other posts to share on the site.

Tara over at Ephemera Press started a great new project called the Elevated Envelope. It’s just what it sounds like, a chance to brighten some people’s day with an artsy envelope (made by you); and you get cool envelopes back! The theme was “Summer,” so I used my summer obsession with handmade paper to my advantage.

Check out my full tutorial and paper making adventure here.

I started with a blended concoction…

Show + Tell: Handmade Paper Envelopes #adventuresinmaking #crafting #craft

which included cotton paper scraps, cut off pieces of cover paper, and (of course) junk mail. I did my usual process (blend, screen, roll out, dry) with one big change.

Show + Tell: Handmade Paper Envelopes #adventuresinmaking #crafting #craft

For these envelopes I did some quick-pressing to get plants I could add into the paper. I used the microwave, board and rubber bands to get nice flat pieces I could embed.

When I pulled the screen out of the pulp, I laid a few leaves on top, and gently poured more pulp over them with a spoon. I then went ahead with the rolling and drying process.

Show + Tell: Handmade Paper Envelopes #adventuresinmaking #crafting #craft

A few days later (so I knew it was really dry) I trimmed and embossed the paper to fold into an envelope. I decided to stitch the ends together with my sewing machine rather than glue it like a normal envelope. (This was both creativity and laziness on my part.)

Show + Tell: Handmade Paper Envelopes #adventuresinmaking #crafting #craft

I included an extra piece of handmade paper inside of a little story. Some of the pieces were seeded with wildflower seeds. (If you want to add this to your paper, make sure you have really small seeds, and add them before straining your pulp. Don’t blend them or try to sprinkle on top.) I put the whole thing together and sealed the flaps.

Show + Tell: Handmade Paper Envelopes #adventuresinmaking #crafting #craft

So now these little envelopes are headed out all over the world. It was an awesome excuse to do my favorite summer things (wander around my yard picking flowers and making paper.)

Now back to the real world.