AIM DIY: Herb and Spice Gift Wrap

IMG_3859
From 2014-2016 I chronicled my crafty endeavors on the site Adventures-in-Making. I’ve selected a few of those DIY’s, Recipes, and other posts to share on the site.

I’ve been getting a lot of questions lately about my lettering, and a few poor souls have even asked if I teach a class (HA!). I tell everyone the same thing– my lettering has improved over the past year because I’ve been practicing. I know, that sounds like a cop-out, but it’s true! I’ve been making signs and chalkboards for the store, lettering in my prints, and wearing through Prismacolors like nobody’s business.

The key, for me, if to cut myself some slack while I’m practicing. Doodling letters is swell, and I take any opportunity to write words in weird ways.

IMG_3759
This wrapping paper is a perfect example. I wanted to come up with a simple way to wrap a couple of small gifts, and went to the (very soggy) garden for inspiration. The remaining herbs were so pungent and gorgeous that I decided to use them as accents on a basic brown paper wrapping.

The whole thing’s pretty simple, and I’m sure you could come up with something even more special. The point is, I was able to mess around with letters and words without feeling too self-conscious. It’s just wrapping paper, and the herbs take center stage.

IMG_3790
For the second gift, I made a tall bag with a few materials, and I thought I’d share my process.

IMG_3732

Supplies I Used

• Plain brown kraft paper – you could also repurpose a grocery bag.
• Fresh herbs from the garden
• White Prismacolor Pencil
• Flour & water to form a paste. You can also use glue, of course!
• Scissors
• Pencil
• A can of spray paint as a base form

IMG_3746
First I traced the base of the can to form the bottom of my bag…

IMG_3751
and cut out the circle, about 1/4 inch inside my line.

IMG_3754
I then measured the can and cut out a piece of paper for the main part of the bag, leaving myself about 2 inches of extra height to wrap along the bottom and enough width to cover the whole can with a little overlap.

IMG_3755
I made a fold at that 2 inch mark, and cut a little fringe into that end (the bottom.) You’ll see why in a second.

IMG_3760
I used my trusty white pencil to doodle words all over the paper.

IMG_3761
I’ve started using a flour paste for a lot of paper projects, lately. Here I used about equal parts water and flour, mixed well, and applied with a cheap paintbrush.

IMG_3764
I wrapped the paper around my spray paint can and painted both edges with my paste…

IMG_3765
then began folding the fringe pieces down. Once those were down I painted them, and the round bottom piece with paste…

IMG_3768
applied like so, and left to dry.

IMG_3771
After it was completely dry (a few hours later) I trimmed the top of the bag, and filled it with my gift, and a little tissue paper.

IMG_3819
Simple directions for a unique bag- and a great way to work on those lettering skills.

IMG_3790
Are you inspired by herbs, like I am? Don’t forget to share you spice & herb work with us for our November DIY Challenge! We’d love to see what you think up.

(You know, keep life spicy.)

AIM DIY: Ampersand Shadow Box

IMG_3313
From 2014-2016 I chronicled my crafty endeavors on the site Adventures-in-Making. I’ve selected a few of those DIY’s, Recipes, and other posts to share on the site.

Over the last couple of years I have started to accumulate little tchotchkes, despite my best efforts to “collect no functionless thing.” Every little piece has a special connection to my family and memory, so they’ll all just have to stay.

My mom’s house had shadowboxes everywhere, but most of them were type cases that I have since stolen and use for their original purpose (holding lead type for letterpress printing.) I decided to use scrap materials to make a shadowbox of my own, and since I love letters it turned into an ampersand.

Supplies for the Base

• Scrap Cardboard- lots of it, including one piece that was at least 12×12
• Printed Letter or Symbol – approximately 12″ x 12″. I printed on, and tape together several pieces of letter-sized paper to make my template.
• Pencil
• Scotch Tape
• Carbon Paper (if you have it)
• X-acto Knife
Gummed Paper Tape (and wet sponge) or Wide Masking Tape – I like using gummed tape on projects like this because you can slide the tape while it is wet and get the placement just right.
• Scissors

Supplies for Paper Mache Layer

• Black and White Printed Newsprint (or other thin paper)
• Bowl
• All Purpose Flour
• Water

IMG_3208
First I print out and pieced together the template using scissors and scotch tape. I lightly taped the template to a large piece of cardboard (at least 12″x12″), slipped the carbon paper underneath and traced along it with a pencil- checking periodically to make sure that I was making an impression on the cardboard. (Alternately you can cut the letter shape out of your template, and trace around it with pencil.)

IMG_3211
I darkened the lines with pencil to make sure I knew where to cut.

IMG_3228
Carefully I started cutting the shape out of the cardboard.

IMG_3229
Voila!

IMG_3216
To make the sides of the shadowbox, I cut several 2″ strips of cardboard, making sure that the corrugation ran the short way. (See image above.)

IMG_3234
Since there are a lot of curves in the ampersand, I gave myself a head start by slitting along the ribs on one side of each of the strips. This allowed the strip to flex more easily along the curves.

IMG_3243
Slowly I started covering each edge of the ampersand piece with the cardboard strips, following around each side.

IMG_3251
I attached each piece using gummed paper tape (masking tape would work as well.) On heavy curves, I stuck the tape to the side first, then made small cuts that overlap and lay flat on the back side. (Everything will be covered with with paper mache, so little mistakes are a-okay.) I cut and began a new piece at each sharp corner, and connected them with gummed tape.  REMEMBER: It’s just cardboard, so if you mess up it’s okay! Just toss that piece and try again. I messed up a lot.

IMG_3257

IMG_3262
After I had the whole shape outlined and taped, I made a few more strips of board for shelves. These strips are 1.75″ each, so that they are a little less deep than the outside walls.
I took a good look at what I wanted to store, and tried to leave space for each item. (If you have larger or smaller nicknacks you might want your shelves placed differently.) I trimmed the shelves to size, and attached them to the walls using more gummed tape pieces.

IMG_3273
With the cardboard base built, I got everything ready for paper mache. I typically combine water and flour in a bowl until I have something that resembles very runny pancake batter.

IMG_3276
I tore newspaper into small strips, and dipped it into the flour mixture, then laid a single layer or pieces all along the base, including the sides and back. (Again, mistakes are OK! You can always remove a piece and replace it.)

IMG_3278
A gloppy mess.

After I had the base completely covered, I let it dry in front of a heater for a few hours, then went back and added a few more pieces to the spots I had missed. (You can add a whole second layer if you want, it will make the form looks smoother, and give you a little extra strength.)

IMG_3281
Well, I’m done for now. I love the way my keepsakes fit into this shadowbox… and happy that I made it using only scrap materials.

IMG_3298b

Other Things I Might Try

• Sealing it with a spray sealant. I’m skipping this step for now, but if everything falls apart, I’ll let you know!
• Painting the whole shape, or just the inside. If you mix acrylic paint with glue you can make a partially translucent color. That way the print will still show through.
• Do a whole word of shadowboxes.

What would you make?

AIM DIY: Watercolored Business Cards

Watercolored Business Cards
From 2014-2016 I chronicled my crafty endeavors on the site Adventures-in-Making. I’ve selected a few of those DIY’s, Recipes, and other posts to share on the site.

Last week I combined a few of my favorite things and letterpress printed A-i-M cards on scraps of cotton paper. I wanted to make them super special (and representative of our creative spirit) so I pulled out my handy-dandy liquid watercolors and went to town.  I tried a few different methods, and wanted to show how they turned out.

IMG_2455
I really like working with Blick Liquid Watercolor. I use it for my paper flowers, and pretty much everything else. I can water it down as much or as little as I want, and it washes out of everything I accidentally spill it on. (Very important. I’m a little messy.) I keep several plastic containers around to mix colors in.

IMG_2449
The paper scraps were Crane Lettra 110# Cover, and I used a rubber based letterpress ink on them.

I think this would also work on other papers, including watercolor paper and uncoated card stock. You could also try adding your print with a stamp (like this tutorial from Akula Kreative) or use a non-watersoluble printing method (like a laser printer, or copier.)

IMG_2464

Dipped and Dry Brushed

My first instinct was to take each card individually and dip it into a few colors. Some of them I then tapped on the table, to distribute drops, and some I used a dry brush to sweep through watercolor puddles.

IMG_2475-2 IMG_2490

Edge Painting

I discovered a really wonderful thing while I was dipping small stacks in the watercolor. The color would soak into the edges, but not into the face of the pieces in the middle of the stack. I started dipping each side of the stack into a different color, and ended up with these lovely ombre edges. There is a little bleed onto the face of the cards, but it’s very subtle.

IMG_2467IMG_2510

A Happy Splatter Accident

Remember what I said earlier about being a messy experimenter? Well, this time it worked out for me! I was partially working on a glass palate, which eventually was covered with lots of little drop of watercolor. I pressed one of the cards against the splatters, and ended up with these lovely color patterns.

IMG_2506IMG_2569I had a great time playing with the liquid watercolor (again) and love how easy it is to introduce color and pattern on a simple card.

The splatter was definitely my favorite. What do you think?

AIM DIY: Plastic Free Card Wraps

IMG_2434
From 2014-2016 I chronicled my crafty endeavors on the site Adventures-in-Making. I’ve selected a few of those DIY’s, Recipes, and other posts to share on the site.

Instead of using plastic sleeves for my cards, I like to hold the card and envelope together with a strip of recyclable paper. I also use this as a chance to price my cards, and provide a little story to go along with each design. (Stories can make your products- more on that in the Packaging Post).

Since I’ve been using the photo corners to package my prints, I decided to move over to a similar method to pack my cards. I played around with folding until I came up with a method that needs no tape or plastic, but still looks pretty nifty!

IMG_2401
First I print out my card descriptions, and cut them into strips with a rotary cutter. Each strip is about 2.5″ tall and 11″ wide.

IMG_2415
For smaller cards (up to 4 1/4″ x 5 1/2″) I use a decorative blade or punch on one edge of the strip.

A Then I turn everything over, and center the envelope diagonally on the paper strip. B Once it’s centered, I fold the non-decorative corners in, using the envelope as a guide. C Then I fold the flap back across. The scalloped edge will now be on top…  D so that I can slip the corner of the card into the little pouch I made with the folds. Then I slip the other corner in. The card itself keeps the wrap secured.

I use a similar method to cover larger cards (up to 5″ x 7″), with a couple of changes. Since I have to use more of the length of the strip, it takes a little adjustment to make sure that I have a pretty corner to tuck into. I still center the envelope on the strip (diagonally) but then…

IMG_2422
I fold the two opposite corners first. (Notice that the first fold doesn’t quite cover the whole corner of the envelope.) G Then I fold the second, longer, side over to make the same type of pocket for a card. Then slide in the card a corner at a time.

IMG_2427
Voila. A plastic free wrap, and a story too!

You might not need to use exactly this method for all the things you get up to- but I hope my experiment encourages you to think outside of the box with your projects. Just a couple of little clever changes could make the world a better place.

(I’m thinking big.)

AIM DIY: Tiny Marker Stamps

IMG_2272
From 2014-2016 I chronicled my crafty endeavors on the site Adventures-in-Making. I’ve selected a few of those DIY’s, Recipes, and other posts to share on the site.

I was invited to join the local gallery at an Art Outside event this summer, and put together a mini-version of my paper flower class for kiddos who were attending. I brought a bunch of pre-dyed flower petals so that they could form a little flower on a bobby-pin, to use anywhere.

I thought it would be fun to let them hide some bugs in their buds, so I carved a few mini-stamps of beetles, spiders, and bees to stamp amongst the petals. In order to make the tiny stamps easier to use, I came up with a way of sticking them in the end of Crayola Broad Line Markers. I thought I’d share!

IMG_2195
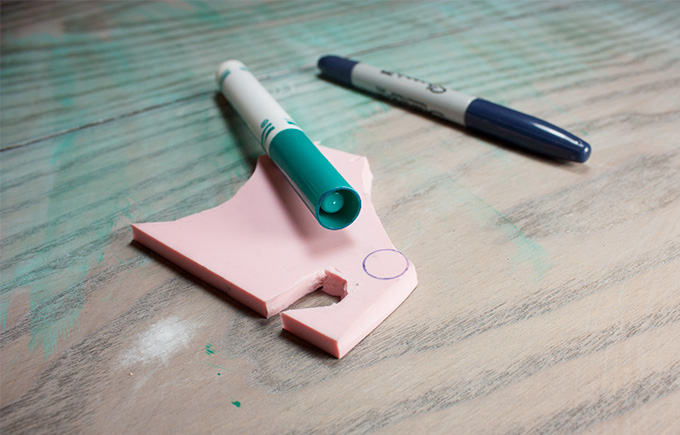
First I cut out a circle to fit the end of the marker by coloring the cap of the marker with a Sharpie
then immediately stamped it onto a piece of Speedy Carve Rubber Stamp Block.

IMG_2198
I cut the tiny circle out with a craft knife and then

IMG_2201
drew a tiny spider to carve out.

IMG_2204
Then I pushed and shoved and slowly worked the pieces of rubber into the end of the marker. It’s good to have a tight fit so it won’t work itself out as you use it.

IMG_2207
I used Speedball Linoleum Cutter to carve the extra pieces out of the rubber. Because the stamp is so small, it’s important to work slowly on small sections. Actually, the marker makes it a lot easier to carve, and kept my other hand away from the sharp tools.

I tested the stamp repeatedly, by using the marker it was attached to to color the stamp. I ran the marker over the design, stamped, and used that information to remove more of the rubber. The more stamps I made, the simpler they got. It is really difficult to keep a lot of detail on such a small surface.

IMG_2232
Finally I had a sweet little bug stamp to add to the flowers. Bwahahaha.

IMG_2260
I have all sorts of stamps I want to make using this method. Some of them might even be un-creepy!

If you’d like to try this project yourself, check out the supplies at the Adventures in Making Amazon Store . If you buy through our store you’ll pay the usual Amazon price, but we’ll get a small percentage to help us power our creative adventures. You’re great!

AIM DIY: Hand-Dyed Paper Flowers

Paper Flowers
From 2014-2016 I chronicled my crafty endeavors on the site Adventures-in-Making. I’ve selected a few of those DIY’s, Recipes, and other posts to share on the site.

***

We’re not happy unless we’re making things- which means we have a whole slew of projects from the time before A-i-M. We thought we take time now-and-again to share some of these projects from the DIY vault. We’ve touched them up a little, so they should still be new to you, even if you’ve been following us forever.

A couple of years ago, after taking the Crafting for Kittens class (where the lovely Laurie taught us to make crepe paper flowers), I decided I wanted to put together my own paper flower project using easy-to-find materials, and  a little inspiration from tie-dyeing tissue. Since then I’ve been teaching them as a class at the store, and I thought I would share them with those of you who aren’t close enough to join us for a class or party.

flowers_3They are made with a bunch of inexpensive supplies- I’ve linked to some of my favorites below*
• A package of white coffee filters
• Scissors
• Liquid Water Colors – I now use Blick Liquid Watercolor
• A few bowls to dip into (they won’t get ruined, no worries.)
Floral Wire like this.
• Wire cutters
• Floral Tape – Floratape is the best.

flowers_4
Take a few coffee filters (1-6) and fold them in half over and over again, till you have a triangle.

flowers_5Then trim the outside part of the triangle in curves, points, or anything you’d like. (The fun is in the ‘sperimenting.)

Pour the liquid watercolors into small dishes. Add water if you would like (not too much though, if you want rich colors.)

flowers_6
Dip one end into one color and let it slowly wick up the dye, then flip the folded filter and repeat in another color. I would recommend doing the lighter color first. You can also squeeze extra moisture out gently.

Unfold the stack or leave the pieces folded up, and allow to dry overnight. Make sure to leave airspace between your petal sets- they will transfer color if you aren’t careful.

flowers_7
After dried, and opened, it should look something like this. Play with the number of filters you use- this one has 6, but I have even done a tiny single filter flower.

flowers_8Measure out a double length of floral wire, folded at the end.

flowers_9
I have done some of these with button centers, and some without. If you are using a button, feed the wire through two of the holes, and leave the button at the doubled end.

flowers_10
Piece by piece, feed the filters onto the wires and bunch them up at the end.

flowers_11
After all your pieces are wired and bunched, start wrapping floral tape at the top. I usually do a couple of runs of tape directly under the petals, pushing them up as I go, then continue to wrap the stem all the way down. (Remember to stretch the tape to activate the adhesive.) Often you’ll find you need to tighten up the petals by adding more tape near the top.

IMG_8377_forindd
It may take a little trial and error to make a perfect bouquet, but even the work is fun!

If you’re local and want a hands-on class that includes all the supplies you need, make sure to swing by the So, There store in Issaquah.

I’d love to meet ya!

*If you’d like to try this project yourself, check out the supplies at the Adventures in Making Amazon Store . If you buy through our store you’ll pay the usual Amazon price, but we’ll get a small percentage to help us power our creative adventures. You’re great!

AIM DIY: Handmade Paper Tutorial

DIY: Handmade Paper #tutorial #craft #recycled
From 2014-2016 I chronicled my crafty endeavors on the site Adventures-in-Making. I’ve selected a few of those DIY’s, Recipes, and other posts to share on the site.

I have always wanted to make paper. It seemed like a magic trick.

I mean, you’re gonna make paper out of only paper? AMAZING.

When Rachel asked me what I wanted to do on our upcoming craft retreat, this was the first thing that popped into my head. What follows can only be referred to as an adventure… in magic!

DIY: Handmade Paper #tutorial #craft #recycled

What You Need

• Recycled wastepaper
• Paper shredder
• Blender (I would recommend buying one second hand and only using it for paper making)
Large Dip Handmold
• Bucket
• Large dishpan or container
• Sponge
• Piece of cloth or sheet
• Warm water

For those of you who don’t know, you can make paper out of your trash. This part I found particularly exciting because it fit in perfectly with my hoarder tendencies. (No, I don’t keep my trash, I just hate throwing it out. Especially shredded paper which the recycling “man” won’t take.)

My Process

We shredded paper using a paper shredder, and our hands (when the shredder died a loud horrible death, making a noise that Patrick referred to as a cry of “just let me go.”) We sorted it by color (which meant that the resulting papers were slightly different shades of gray.)

I dunked it all in a bucket of warm water to soak for a while.

DIY: Handmade Paper #tutorial #craft #recycled

Here I am, excited about a bucket full of water and shredded paper.

I took these handfulls and put them in a blender (ala Goodwill) along with more warm water. I then blended them until they were the consistency of…. pulped paper.

DIY: Handmade Paper #tutorial #craft #recycled

I poured several batches of the pulp into a larger storage container filled with more warm water.

There are several ways to build the “pulp catcher.” I cheated and bought one on clearance at a craft store. (It’s an Arnold Grummer.) It’s basically a thick screen with small holes sandwiched between a wooden frame (deckle) and a hard plastic screen. I slipped the whole sandwich underneath the water and brought it up slowly until it was above the water and evenly coated in pulp.

DIY: Handmade Paper #tutorial #craft #recycled

This is what the pulp looks like at first (and when it starts feeling like magic.)

DIY: Handmade Paper #tutorial #craft #recycled

The kit also included a thin piece of screen. After removing the whole kit from the water, I removed the wooden deckle, and laid the piece of screen over the top.

DIY: Handmade Paper #tutorial #craft #recycled

I have to admit from here on out the tasks were a little tedious. First I had to press most of the water out of the pulp, through the screen, using a sponge and all of my wringing strength.

DIY: Handmade Paper #tutorial #craft #recycled

Then I got this piece of magic… something that looked like a piece of paper!

DIY: Handmade Paper #tutorial #craft #recycled

After flipping the thick screen over onto a piece of old sheet, and sponging the back of it some more, I was able to separate the paper from the whole kit. I sandwiched the piece in between two cotton sheets, and ironed it like crazy (highest setting) until it was mostly dry.

IMG_0070

I left all the pieces between two heavy wooden planks over night… to see what happens next check out this post on Handmade Paper Envelopes.

During this adventure I learned…

• Paper is magic, and putting your hands in warm pulpy water is therapeutic.

• Don’t use your fancy appliances for crafting. I killed the shredder and blender. (Though, I think it was shoddy modern manufacturing what did them in.) The iron…

• The iron got coated in some sort of ick. Fortunately I used our old iron, AND discovered that the ick was easily removed by white vinegar and a little scrubbing.

• After doing the paper making process a few times, I actually got rid of the ironing step. Now I roll the sheets out between 2 shamwows (I know…) and then place them on extra cardboard while they are still pretty damp. Once they are dry enough to hold their form, I transfer them to a clothes line to dry, until I move them into a stack to dry fully between two heavy peices of wood.

• When you use junk mail, your paper is going to be gray. Most of the tutorials I read recommended using blank papers, and colored tissue paper. I’d rather have gray paper than create more trash in the world, but we’ll see how things go.

• Thick flower petals and pieces do not work best for this project. I ended up with a couple of very lumpy pages. Also, predried flowers often have dyes on them that do not bleed how you think they should.

• Rachel is a great crafting cheerleader and documentorian, and Patrick loves me, and proved it by ironing paper for hours.